



Published on 8 October, 2025 by Robert Abela
Step-by-Step: How to Build a Secure Custom WordPress Login Page
Trying to create a secure custom WordPress login page for your site?
The default WordPress login page is pretty basic and doesn’t offer the best security features out of the box.
To fix that, this post will teach you how to create a secure login page that’s totally unique to your site.
You’ll be able to add a login form to any spot on your site and customize the behavior in all kinds of useful ways, while also creating a secure experience that protects your login page and user accounts from malicious actors.
Below, we’ll break this process into two high-level steps:
- Building your custom login page.
- Securing your login page.
Both parts of the process are important, so keep reading for the full guide!
Table of contents
How to Build Your Custom Login Page
In this post, we’ll be using the Profile Builder plugin to create the custom login page.
Profile Builder is a freemium plugin that enhances the WordPress user registration system with custom registration, profile, and login forms.
You can add a login form anywhere on your site using a block or shortcode, then customize its styling and backend settings, including redirect options.

1. Install the Profile Builder Plugin and Complete the Setup Wizard
To get started, you’ll want to install and activate the Profile Builder plugin on your site.
For this guide, we’re using the premium plugin. However, you can follow most of this guide using the free version of the plugin that’s available on WordPress.org.
With the premium version, you get greater control over login form styling, custom redirects, social logins, and other useful features. It also unlocks advanced options for custom registration, profile editing, and content restriction.
2. Complete the Profile Builder Setup Wizard
Once you activate the plugin, it will give you a short setup wizard to configure some important basics.
This should launch automatically, but you can also manually open it by going to the Profile Builder menu in your WordPress dashboard and then clicking the Open the Setup Wizard button in the Setup Progress Review box.
On the first screen, you can choose to create dedicated pages for important user forms, including the registration, login, edit profile, and password reset pages.

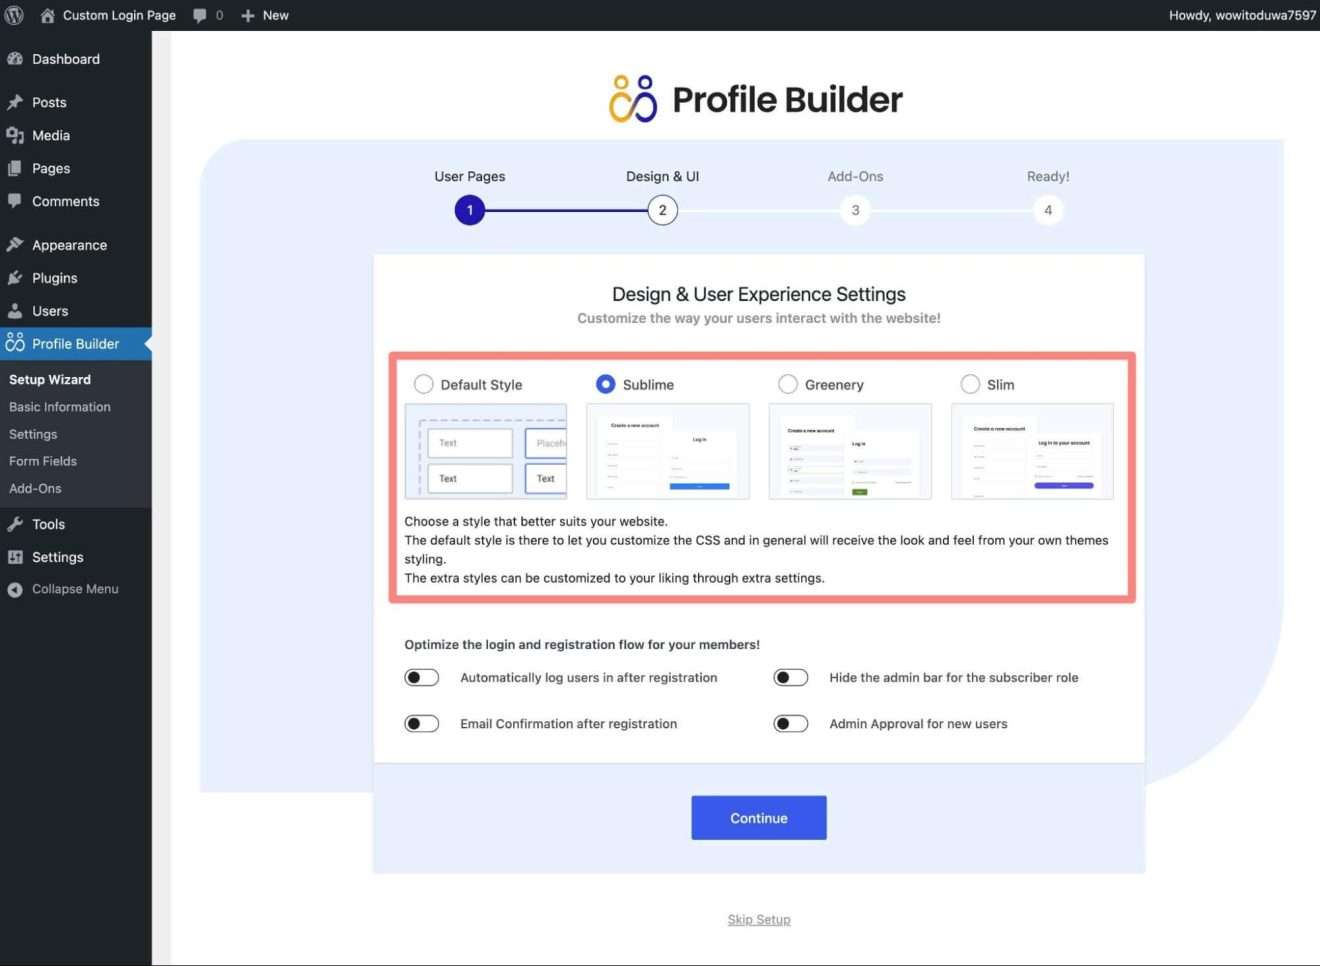
On the next screen, you can customize the design and user experience.
With the premium version of Profile Builder, you can choose from four different pre-made designs and customize them.
Below that, you can select some default user experience settings, although most of these apply to the registration page.
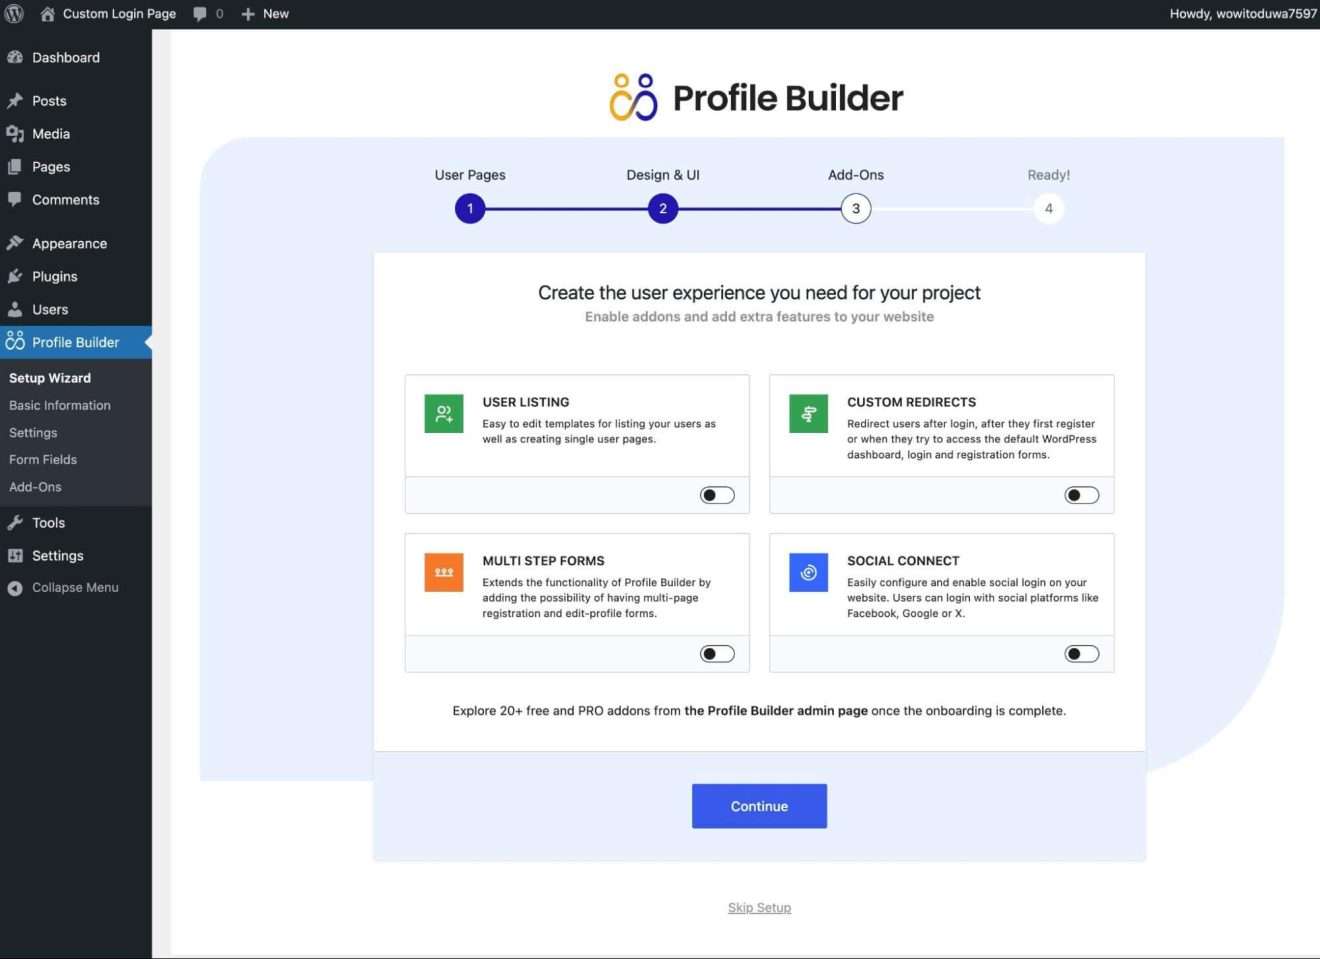
On the last screen, you can choose which add-ons you want to enable. The exact add-ons that you have access to will depend on which version of the plugin you’re using.
For a custom login page, the Custom Redirects add-on can be useful, as it lets you use conditional rules to redirect users to different pages after they log in.
You can always skip making a choice now and install add-ons later.
3. Set Up Your Custom Login Page and Embed the Login Form
Unlike some other plugins, Profile Builder lets you use a block or shortcode to include your login form anywhere on your site.
If you chose to create a dedicated login page in the Profile Builder setup wizard, you can access it by going to Pages → All Pages and editing the Login page.
If you want to create a new page or edit an existing page that includes your login form, you can open the editor for that specific page.
For this guide, we’ll create a brand new login page.
To embed the actual login form, you can use one of these two options:
- Login block – you can find this under Profile Builder in the block inserter.
- [wppb-login] shortcode – you can add this shortcode to any place that accepts shortcodes.
For this example, we added the Login block, which offers some additional customization settings in the block settings.
In the block settings, you can choose the default pages to redirect all users to after they log in or log out of your site. Below, we’ll also cover how to set up custom after-login redirects.

Once you publish or update the page, your custom login page will be live on your site.
However, you can still make a few additional tweaks.
4. Additional settings and configurations (Optional)
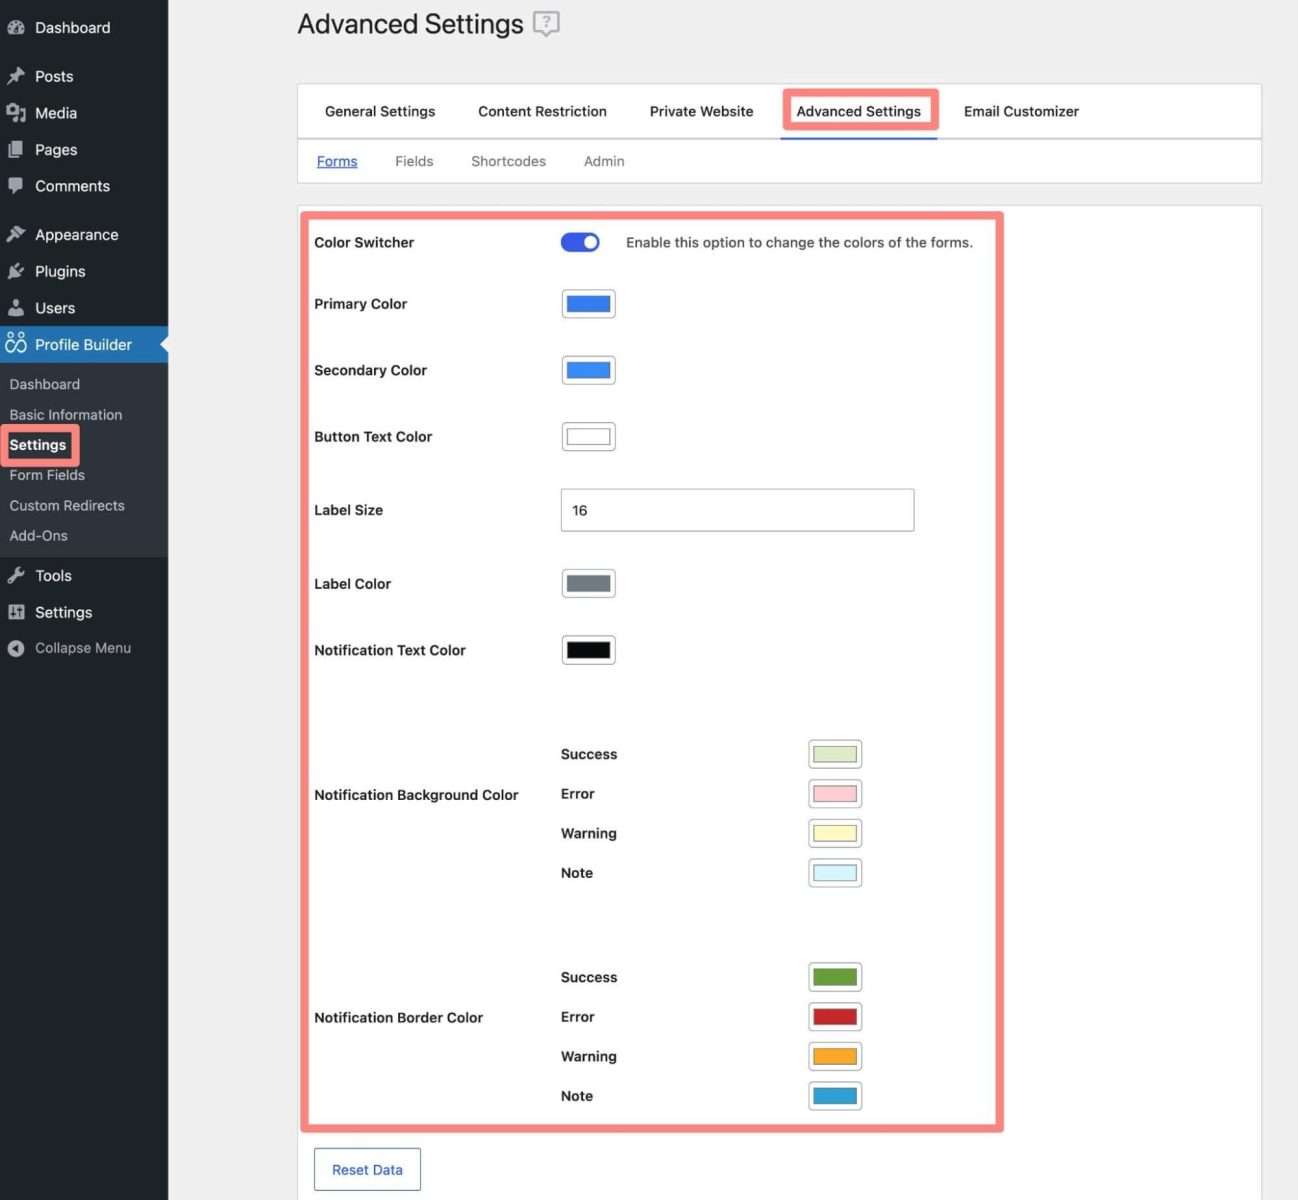
Once you’ve set up a basic login form, Profile Builder gives you plenty of options to refine the experience. If you’d like to adjust the look, the plugin includes a built-in Color Switcher (found under Settings > Advanced Settings) so you can tweak the design without touching CSS.
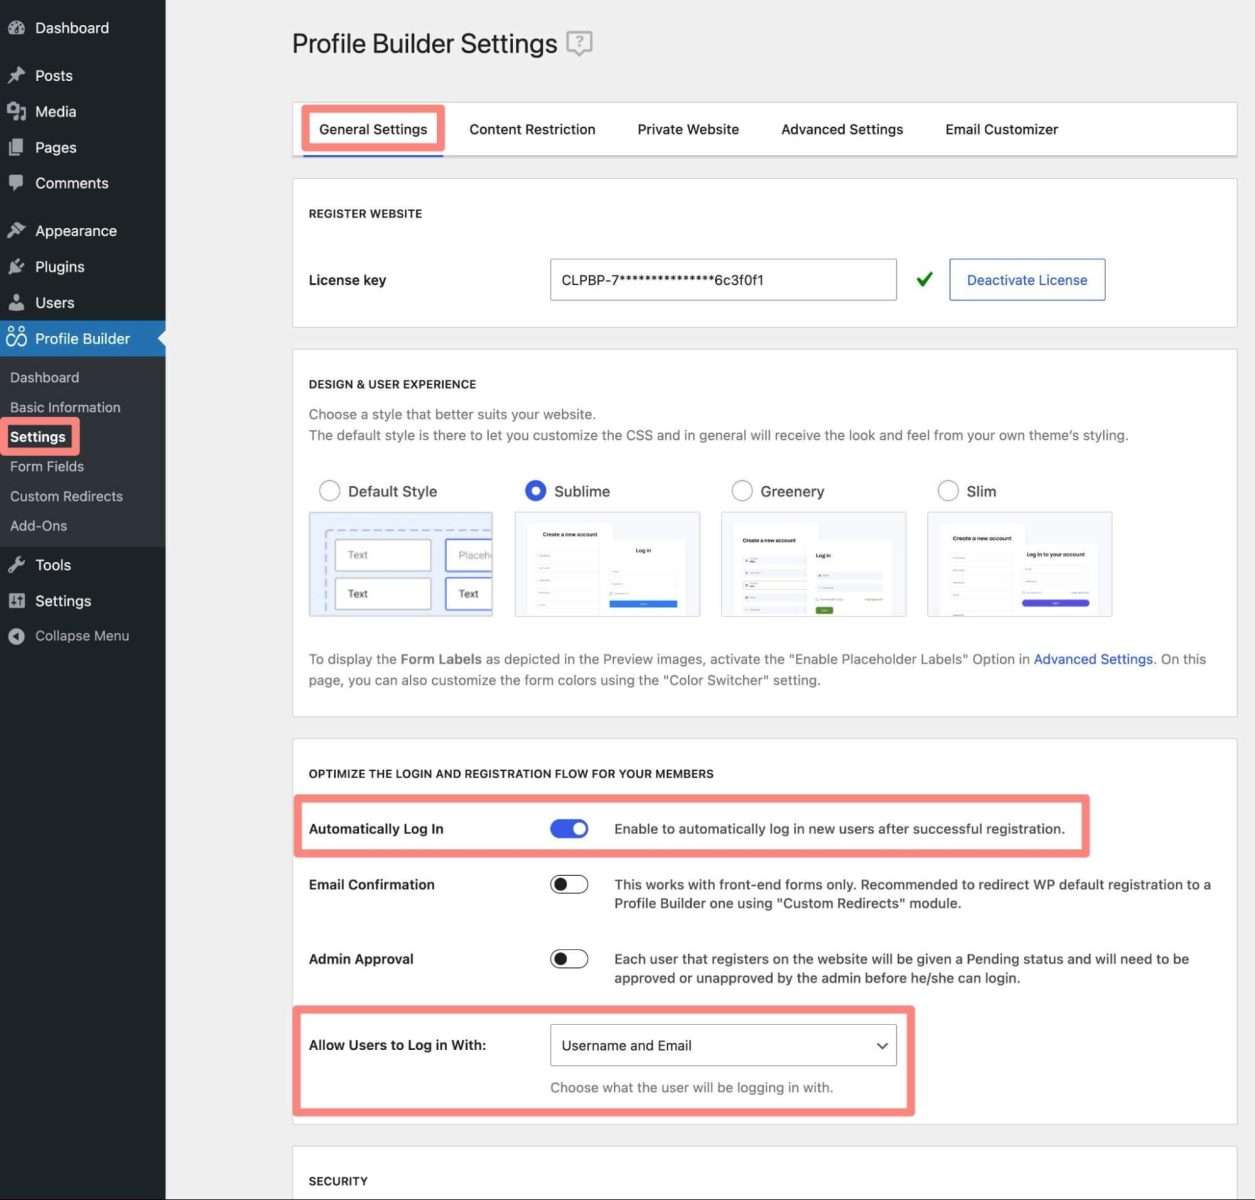
Beyond appearance, you can also explore the General and Advanced Settings areas to fine-tune functionality. For example, you can decide whether users should be logged in automatically after registration, what login credentials they can use (username, email, or both), whether the “Remember Me” box is checked by default, and even save the date of each user’s last login.
If you’re on the Pro plan, the Custom Redirects add-on adds even more flexibility.
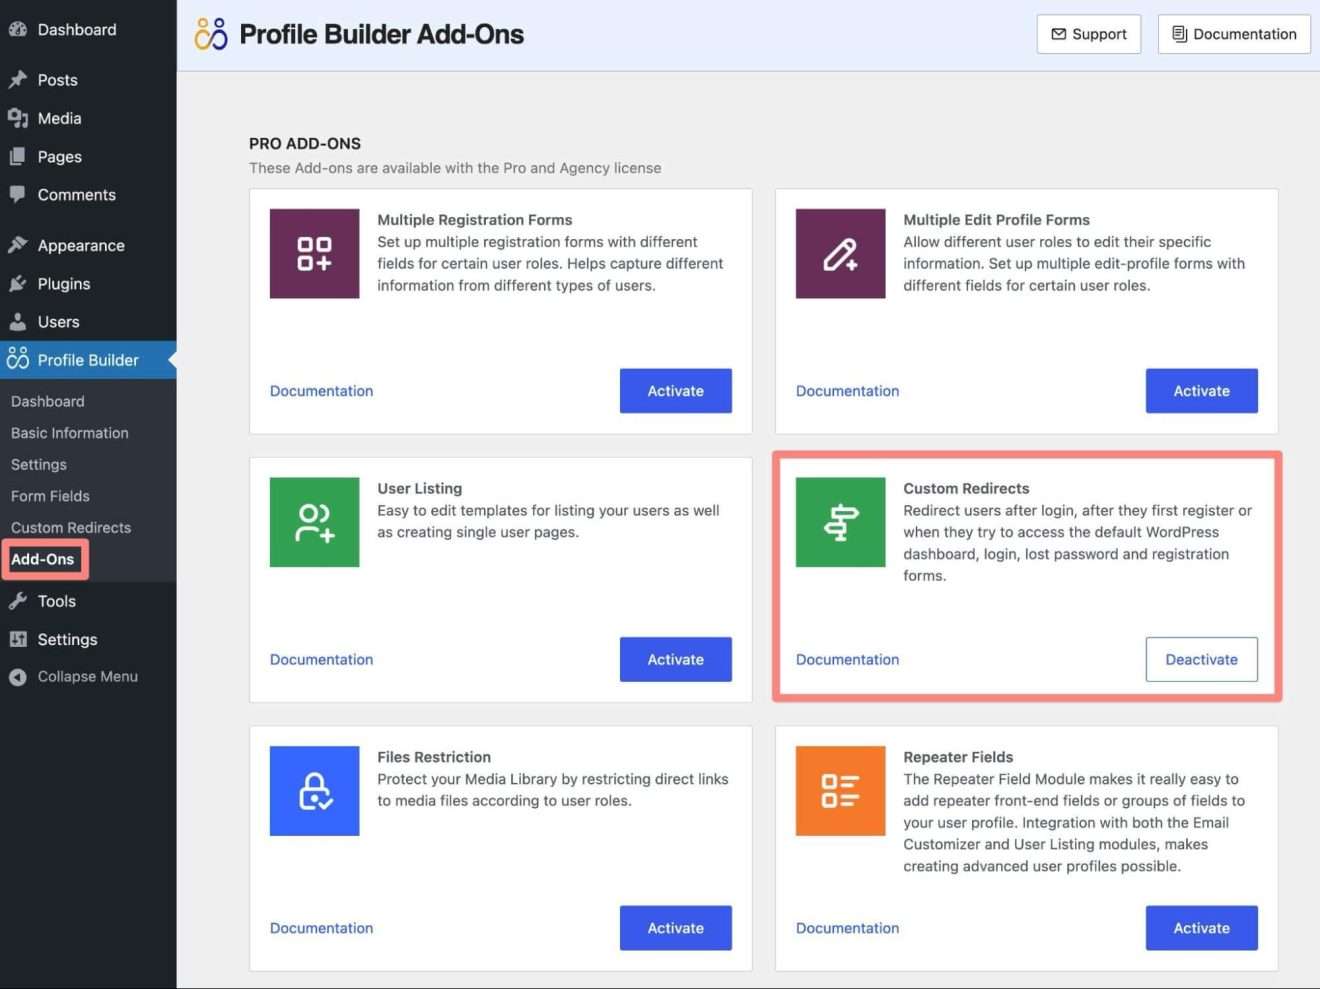
This lets you set up conditional rules to redirect users after login—whether that’s sending members of a specific role to a dashboard or guiding individual users to a tailored page.

Finally, Profile Builder isn’t just about login forms. You can also create a custom registration page and a frontend profile editing area, helping you deliver a seamless, branded experience across all your user pages.
If you’d like to set these up in addition to your custom login page, you can check out the developer’s guides on creating a custom user registration page and creating a frontend user profile page.
How to Secure Your Custom Login Page
Your login page is an attractive target for bad actors looking to gain access to your site. So, once you’ve created it, you’ll also want to secure your login page to protect it from bots and users with bad intentions.
To do that, you can use our Melapress Login Security plugin, which works perfectly with Profile Builder.
Here’s how to set it up and secure your custom login page.
1. Install Melapress Login Security
To get started, install and activate the Melapress Login Security plugin, which is available for free at WordPress.org.
If you’d like more features, there’s also a premium version that includes features like one-click WooCommerce and LearnDash integration, geoblocking, unrecognized device policies, and more!
2. Set Up Login Security Polices
Once you’ve activated the plugin, you can set up some basic login hardening rules by going to Login Security > Login Security Policies.
First, check the Enable login security policies box. Then, you can use the options to set up both Site-wide policies and Role-based policies.
Here are some of the things you can do:
- Enforce password policies – this ensures that users have strong passwords for their accounts.
- Disable password reset links – this will require you or another admin to manually reset a user’s password.
- Lock accounts after a certain number of failed login attempts – you can customize how many failed attempts are allowed, when to reset the attempts, and how to unlock an account.
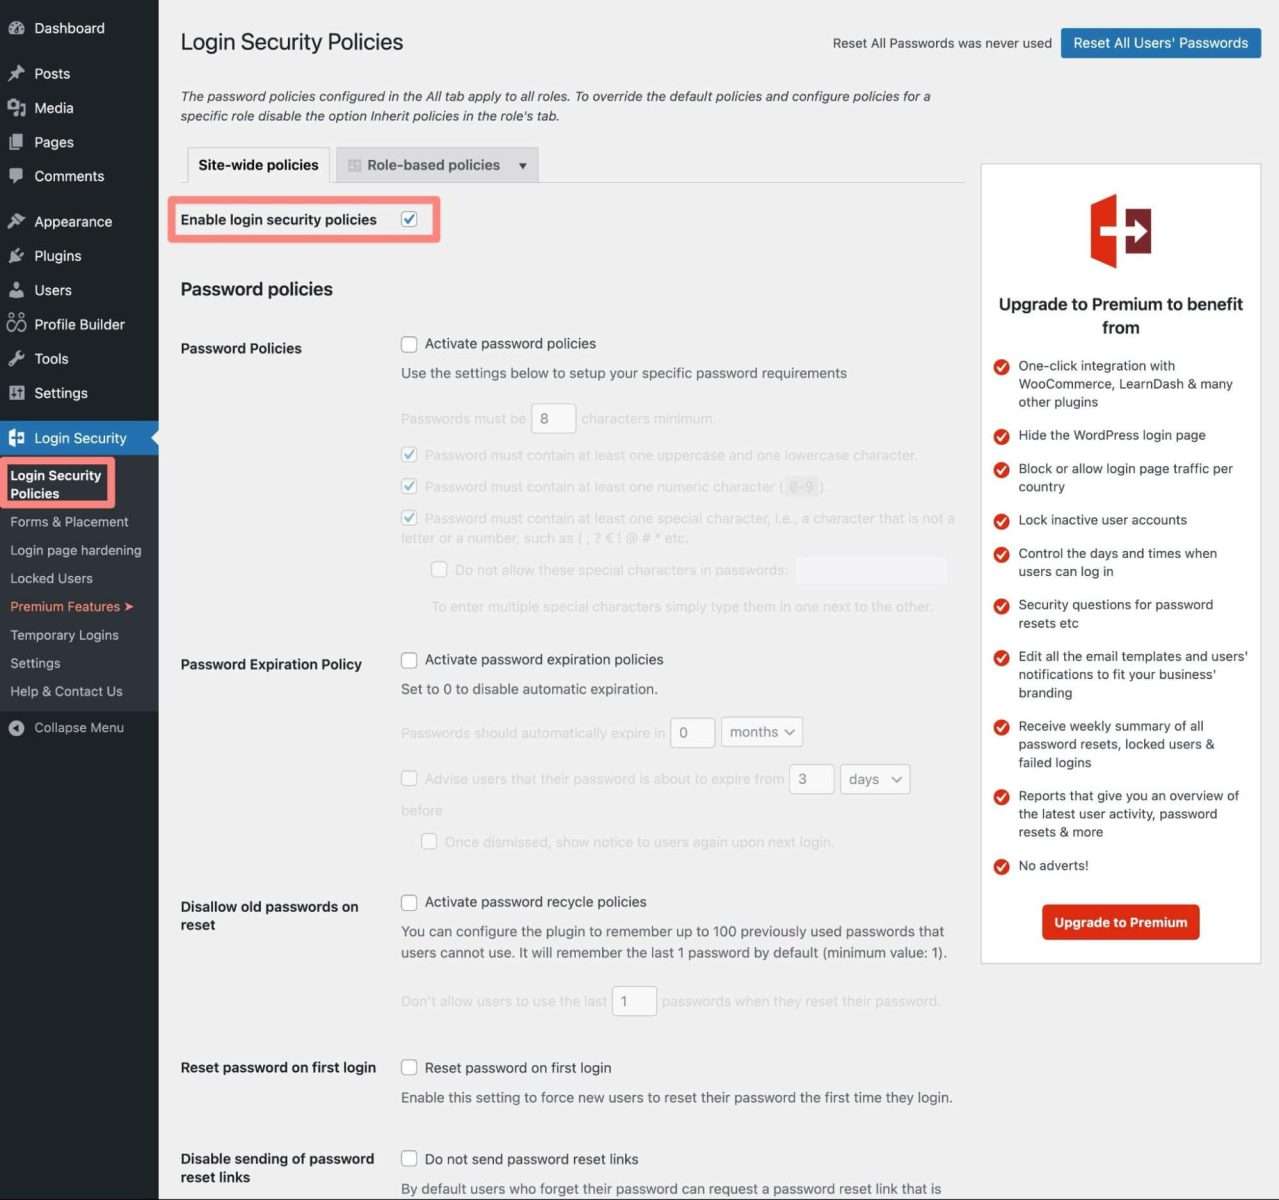
Note – the Restrict username/email address login settings overlap with settings in Profile Builder, so make sure that you choose the same option in both plugins.
The free version also comes with many other nifty features, including the ability to:
- Create temporary login links for developers or managers
- Restrict access to the login page via IP address
- Limit failed login attempts
- Change the default WordPress login URL
- Reset all passwords with one click
- And much more!
3. Upgrade to Premium for More Protection
You can do everything above with the free version of Melapress Login Security at WordPress.org.
If you want to protect your custom login page even further, though, you can upgrade to the premium version of Melapress Login Security to access the following protections:
- One-click integration with WooCommerce, LearnDash, and others – Easily secure your e-commerce and LMS login pages.
- Restrict user login by country – you can also set up geoblocking rules to block logins from certain countries (or to only allow logins from safelisted countries).
- Restrict user login times – you can only allow users to log in on certain days and or time periods. For example, you could block logins outside of working hours.
You can learn more and purchase the premium version here.
4. Set Up Two-Factor Authentication (2FA)
Another great way to protect your login page is to set up 2FA, which requires users to enter a one-time security code in addition to their other login credentials.
You have a couple of options to do this.
First off, the premium version of the Profile Builder plugin includes a basic 2FA feature built in that supports smartphone app-based 2FA.
However, if you want more flexibility and more advanced configuration options, our WP 2FA plugin is the way to go.
The free version of WP 2FA already supports mobile app (TOTP) and email (HOTP) 2FA, as well as backup codes, 2FA policies to enforce 2FA use for users, universal third-party plugin support, and more.
The premium version adds support for hardware keys, SMS, push notifications, trusted device policies, one-click 2FA login, and more.
Create Your Secure Custom Login Page Today
If you allow other people to register for accounts on your site, a custom login page is a great way to create a more user-friendly and professional experience for your users.
With Profile Builder, you can easily add a login form to any page on your site, while also accessing other features to improve all aspects of the user profile experience, including custom registration and edit profile pages.
Using user account security plugins like Melapress Login Security and WP 2FA, you can ensure your custom login page is secure, preventing bad actors from gaining access to your user accounts.
Together, these two plugins will help you create an attractive, user-friendly login page that’s also protected from malicious actors.