



Updated on 5 September, 2024 by Brenda Barron
How to Hide or Exclude a Category from a WordPress Blog or Page
Sometimes, you don’t want a certain category of posts to appear on your homepage or in other areas of your sites but still appear in their own category pages.
Maybe you only want to showcase your most popular topics, or simply want to declutter and organize your blog. Or, maybe you have empty categories you want to keep for a rainy day but don’t want them listed. Is deleting or unlisting your posts really the only option?
The answer is no, thankfully.
You can just hide categories from your blog pages. That way, any post within a certain category will no longer appear in your main blog view but will still be accessible in their own category pages. Unfortunately, WordPress has no built-in way to do this. You’ll need to either add custom code or install a plugin.
There are multiple ways to exclude all the categories you’d like from your WordPress site, and we’ll cover exactly how to do it below: with a code snippet, a plugin to hide categories in WordPress, or even password-protecting categories so no one can access them.
With this small change, your website will be more streamlined and organized. Let’s get right into it.
Table of contents
Exclude categories with PHP
If you want to exclude a WordPress category, or several categories, from your homepage, sidebar, and blog page, a simple code snippet will do the trick.
Here is the PHP code:
function exclude_category( $query ) {
if ( $query->is_home ) {
$query->set('cat', '-xx');
}
return $query;
}
add_filter('pre_get_posts', 'exclude_category');
You’ll need to replace the “xx” on line 3 with the proper category ID, but we’ll explain that in a moment.
If you want to exclude several categories, you can just add each one separated by a space. Here’s an example:
$query->set('cat', '-1 -2 -3');So, how can you find a WordPress category ID? Just go to the category page at Posts > Categories and click on the category you want to exclude. In the address bar, you’ll see something like this:
yourwebsite.com/wp-admin/term.php?taxonomy=category&tag_ID=7
Check the tag_ID in the address bar. This is your category ID. Replace the “xx” in the code with this number.
Here’s how this code works:
- Any post that falls under the categories you set will be removed from most parts of the site. For example, it will be removed from your homepage where your posts are shown, widgets in your sidebar and footer, and so on.
- Posts from excluded categories will still appear in search results, on their own WordPress category page, and will be indexed by search engines.
- If you have a widget that lists all your categories, the categories you exclude won’t be hidden from that category list.
That way, posts from excluded categories can still be found, but they won’t clutter up your more important and relevant blog posts. If you want it to work differently, you can add to the code yourself if you know PHP or try using a category excluder plugin. We’ll go over that later.
Now, let’s add this code snippet to your website.
How to add code with a plugin
The easiest way to add small bits of code like this is with a code snippets plugin. We’ll use WPCode.
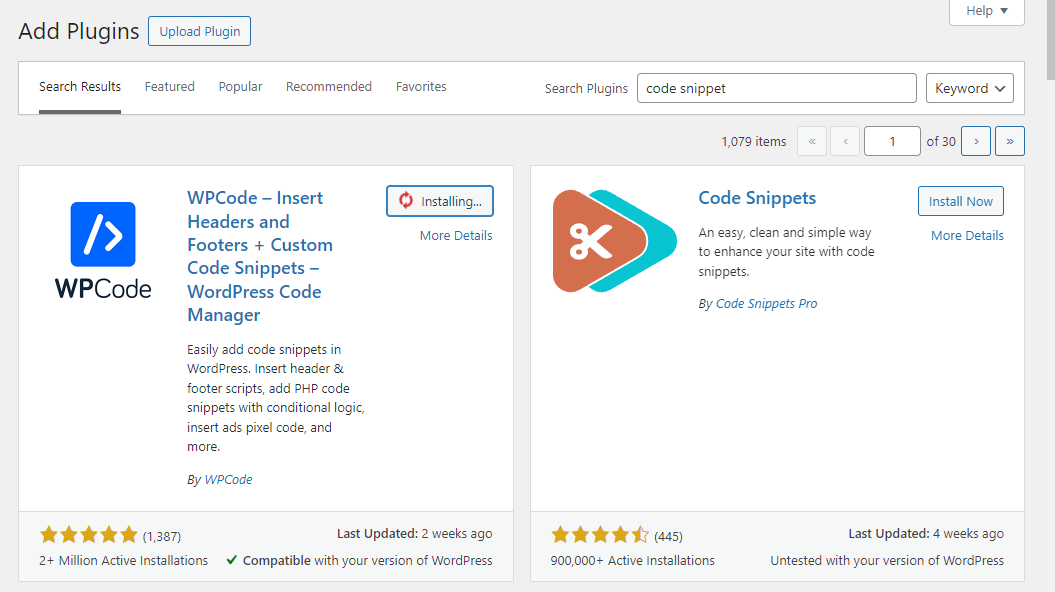
1: Open your WordPress dashboard and go to Plugins > Add New Plugin. Search for WPCode, then install and activate the plugin.
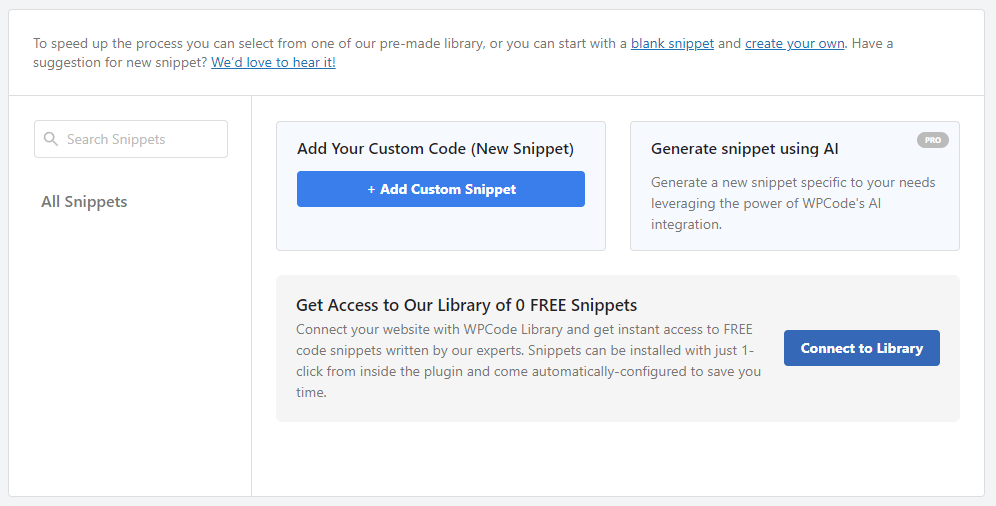
2: You’ll have a new menu item on the left: Code Snippets > + Add Snippet. Once you open this, hover over Add Your Custom Code (New Snippet), and click the + Add Custom Snippet button.
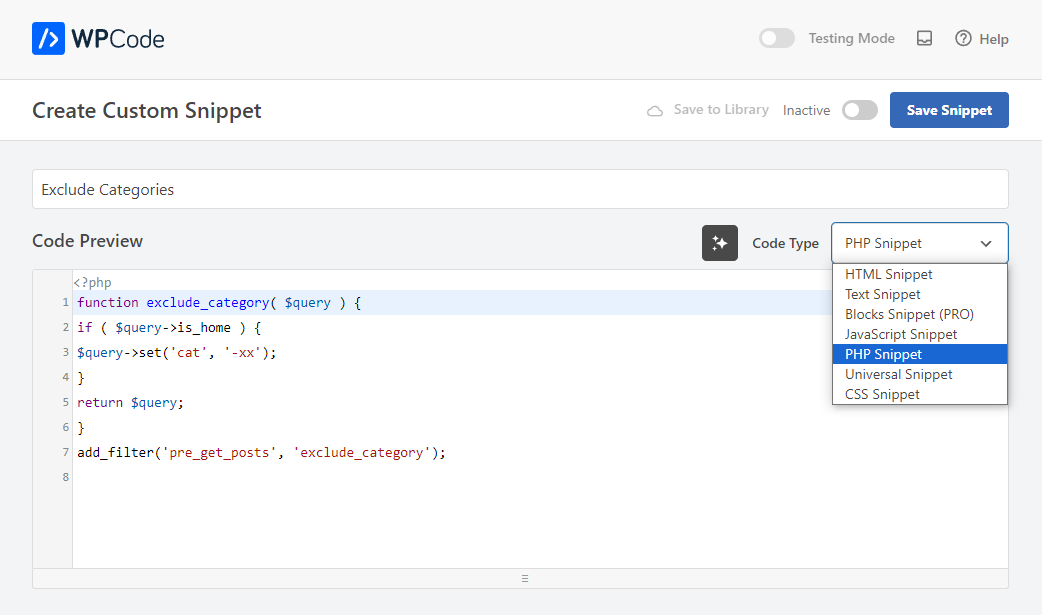
3: Click the Code Type dropdown and select PHP Snippet. Copy the PHP code snippet we provided in the section above and paste it into the Code Preview box. Make sure you replace the ‘-xx’ in the code you just pasted in with the category IDs as explained above.
4: Optionally, you can scroll down and use the Location picker to place this code only in certain parts of your site or set up Smart Conditional Logic for it if you want your excluded category to be viewable under certain conditions.
5: Make sure you tick the capsule next to Inactive to activate your snippet, then click Save Snippet.
With that, you should notice posts of the categories you set are no longer showing.
How to add code manually
If you don’t want to rely on a plugin, you can also add this code snippet manually to functions.php. There are two ways to do this: via FTP (File Transfer Protocol), or directly through the dashboard.
There are actually two functions.php files: one for WordPress core (located in the wp-includes folder), and one for your active theme (located in the /wp-content/themes/ folder). It’s generally recommended to avoid editing core files, especially since they’re often reset when WordPress is updated or reinstalled, so we’ll be editing the file related to themes.
What follows are two approaches for completing this task.
Edit functions.php through the Theme File Editor
One way to add this code is to edit functions.php through the dashboard. You can find the file editor in Tools > Theme File Editor. Just look for Theme Functions (functions.php) in the list on the right, then paste your code in at the bottom.
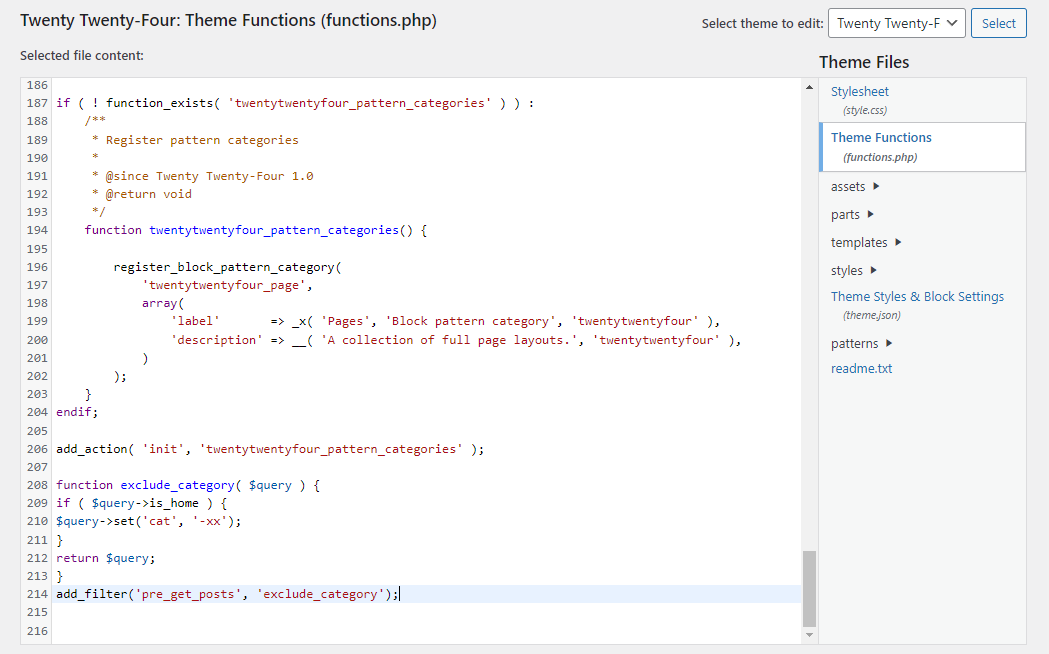
Note that rather than editing theme files directly, it’s recommended to create a child theme and edit that instead. This ensures that your customizations won’t be lost when your theme updates. To make sure you’re using a child theme, check your active theme under Appearance > Themes in your WordPress dashboard. If it’s not a child theme, you can create one by following a few simple steps, as outlined in the official Theme Handbook.
Edit functions.php through cPanel
Another way to edit this code manually is to access functions.php through cPanel in your hosting account. Not all hosts allow this, however, as they don’t all provide users with FTP/SFTP access. If you don’t have this level of access, just follow the previous process, editing through WordPress. To access your website files through FTP, you can:
1: Obtain your FTP credentials. If your web host uses cPanel, you can find your credentials under the Files tab in the FTP Accounts section. Otherwise, you can ask them for your FTP credentials.
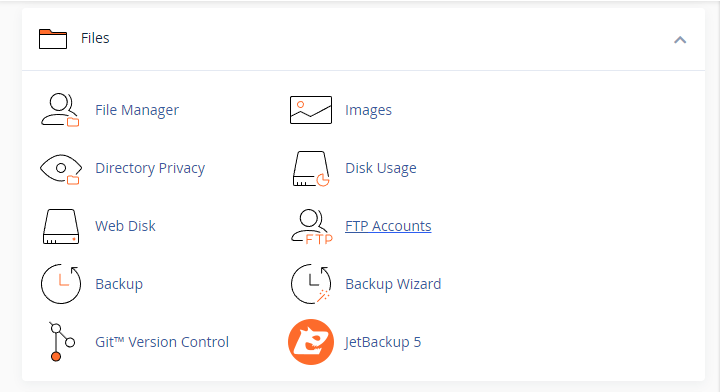
2: Install an FTP client like FileZilla. This will allow you to connect to your website via FTP and edit its files. After installing the FTP client, open it.
3: Enter your FTP credentials into the bar at the top (Host, Username, Password, and Port), and click Quickconnect.

4: You can find your theme’s functions.php in the wp-content/themes folder. Open your active theme. Double-click functions.php to open and paste your code at the bottom. Save the file and upload it back to your website.
Hide categories with a plugin
Sometimes it’s good to write your own code rather than installing a bunch of unnecessary plugins, but if our PHP snippet doesn’t quite do what you want it to, you’ll need a plugin like Ultimate Category Excluder.
This plugin allows you to configure exactly what categories you exclude and where you exclude them from, including from your homepage, archives, RSS feeds, and search results. You can set these for each individual category for maximum customization.
Despite the granular level of control, this plugin is super simple and easy to use, with only a single settings page with boxes to tick.
Here’s how you can use Ultimate Category Excluder to hide WordPress categories from blog pages.
1: In your WordPress dashboard, go to Plugins > Add New Plugin to install and activate Ultimate Category Excluder.
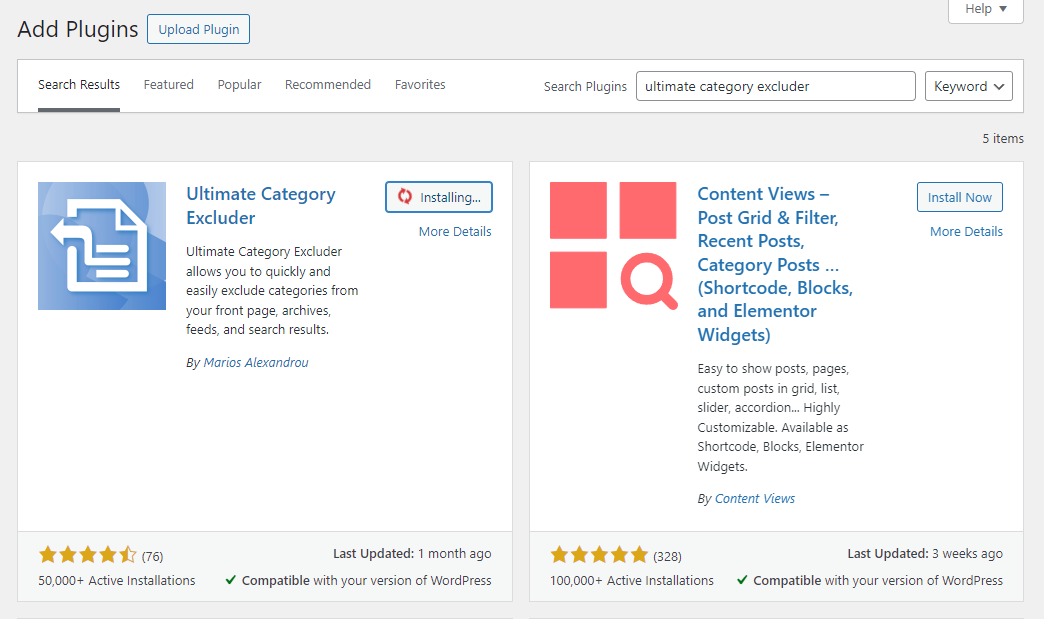
2: You’ll find a new menu tucked away in Settings > Category Excluder. Now you can set which categories you want to exclude from various parts of your site.
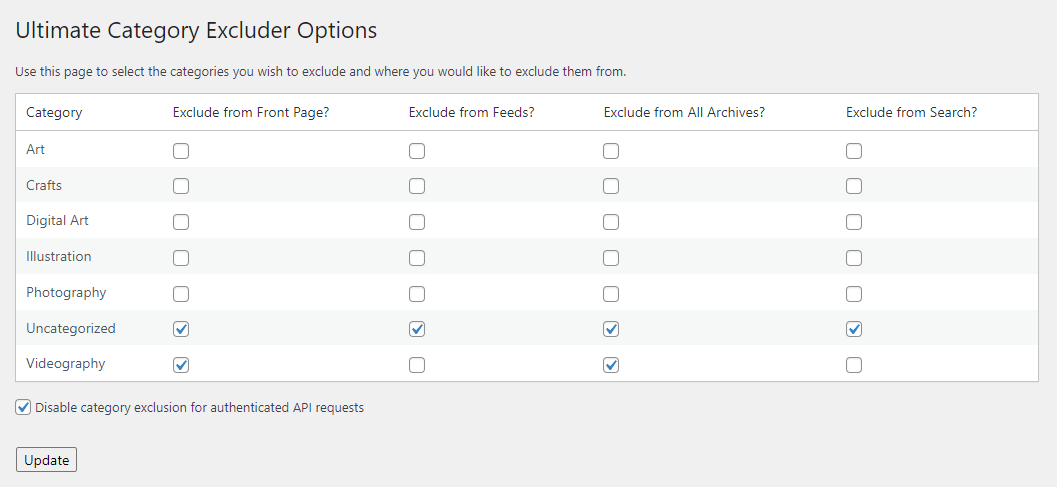
3: When you’re finished, click Update to save.
If you’re not sure what these settings mean, here’s an overview.
- Exclude from front page – This will remove posts not just from your homepage, but also any widgets that list your posts. For example, if you have a “Latest Posts” widget in your footer, excluded categories won’t appear there on any page.
- Exclude from feeds – This will hide categories from your RSS feed.
- Exclude from All Archives – This will hide categories from your full list of archived posts. For example, if you use the Archives block, any selected posts won’t appear in the list.
- Exclude from Search – Excluded categories will not appear in WordPress search results.
Note that this will not hide specific categories from search engines like Google – these will still be indexed by search engines and can be found by organic visitors. If you want to hide a post from your website entirely, it’s best to unpublish it. You can password-protect the page to prevent casual visitors from accessing it, but search engines may still index it. To hide the page from search engines, you should either disallow crawling and indexing via your site’s robots.txt file or use a “noindex” meta tag.
Password protect WordPress categories
Another way to hide categories and the pages within them is by adding password protection, ensuring that only authorized users can access them.
Natively, WordPress does support password-protecting an individual posts’ page, but not categories or all posts within them. All you need to do is open any post and click the Settings button (an icon of a box) in the top right corner. Click Status, and tick Password protected to set a password.
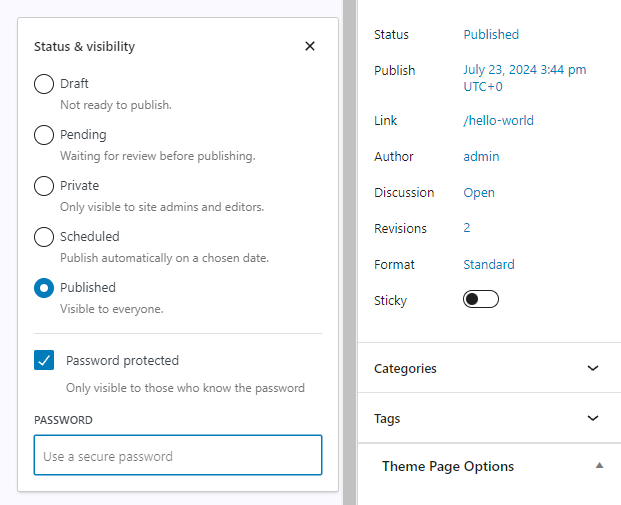
You may wish to combine this with the category exclusion steps above, as password-protected posts will still appear on the front page.
If you want to password-protect all posts in a category at once, you’ll need a plugin like Password Protect WordPress. Here’s how to do it.
1: Install and activate PPWP (Password Protect WordPress) through Plugins > Add New Plugin.
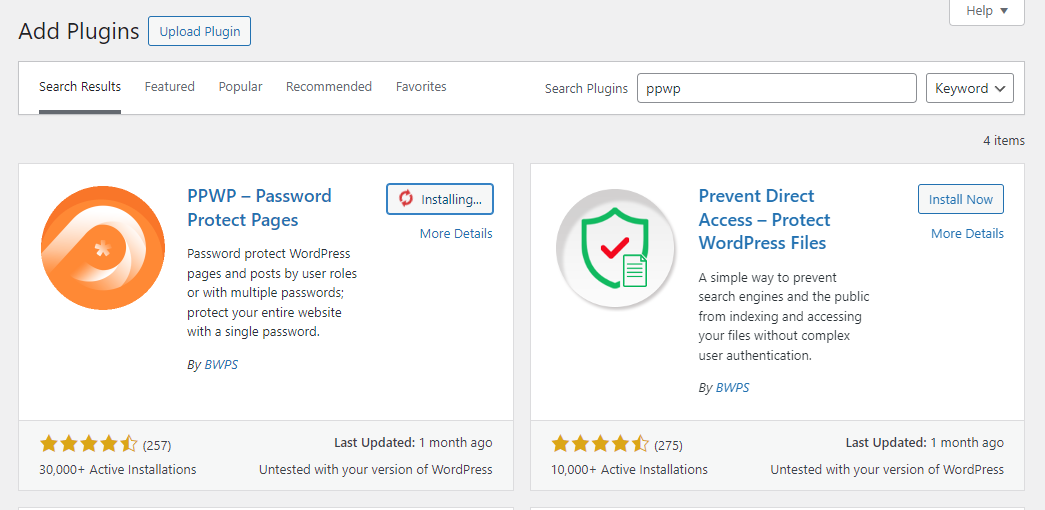
2: Now go to Posts > Categories. You’ll see a new section: PPWP Lite: Category Protection. Tick the toggle button and select the categories you want from Select your private categories.

3: Click Save Changes.
4: Now, you may want to make it so your password-protected pages don’t appear on certain pages, like the homepage. Navigate to Password Protect WordPress > Settings.
5: In the Protected Content Visibility section, tick the Exclude the password protected posts from the following views button. You can click the X to remove any pages or click in the box to add more.

6: Click Save Changes when you’re done.
If this doesn’t work, you may need to add some code to hide password-protected categories, or you can use Ultimate Category Excluder as outlined in the steps above.
Organizing WordPress categories
Making your content truly resonate with its intended audience matters a lot, and a little organization can surprisingly help you achieve this. Hiding WordPress categories from your blog page is a good way to organize and declutter your site, ensuring that only your best content makes it to the front page – but still draws in organic traffic.
Whether you use plugins, add custom code, or resort to password-protecting your categories, your content is now a little more streamlined and easier to navigate.