


Updated on 7 October, 2026 by Robert Abela
WordPress Email Deliverability: Why Emails Fail (and Why It Matters for Security)
Email is arguably the most common and most important channel of communication for WordPress websites. It’s used for everything, from alerts and password reset flows to email-based Two-factor Authentication (2FA).
As a website owner sending emails from your WordPress site, there are a few issues you’ll likely encounter. If you simply try and install a plugin to send emails on your website’s behalf, there’s a good chance your emails will end up in the junk/spam folder. What’s more, while PHP has a built-in mail() function to send email, some hosts disable this function, or have strict controls on how email is sent and how much of it is sent.
The reason email delivery is not a straightforward topic is due to various anti-spam measures put into place. This guide gives an overview of why deliverability matters, the most common reasons WordPress emails fail or end up in spam, and the practical steps you can take to improve your delivery rates, including how logging your emails helps you catch failures before they become business or security problems.
Table of contents
- Why should I be concerned about WordPress email deliverability?
- Common reasons WordPress emails fail or end up in spam
- Test and log your emails before changing anything
- How to fix WordPress email deliverability
- Use an email delivery service or SMTP plugin
- Monitor email sending and performance over time
- Still having issues? Work with an expert
- Frequently asked questions
Why should I be concerned about WordPress email deliverability?
Making sure your WordPress website is sending emails that actually get delivered is vital for a number of reasons.
WordPress, the theme, and many of the plugins you have installed on your website rely on email in several instances. Below are just a few of them:
- new user registration
- password reset email
- admin alerts and security notifications
- new orders information on WooCommerce stores (or other ecommerce setups)
- members’ updates and new messages notifications on membership websites
- emails when someone submits your website’s contact, support, and other forms
- newsletter emails (if you host the newsletter on your website)
- login code emails (in case of email-based 2FA)
However, that’s far from the end of the story for the use of email in WordPress. WordPress often requires users to act on information emailed to them. More crucially, some WordPress functions are aimed at site administrators, such as alerting them of various errors or available updates.
When taking into account the myriad of plugins out there which rely on wp_mail() (a WordPress wrapper around PHP’s mail() function), it becomes quite clear that ensuring your websites can send emails that will get correctly delivered should be on every WordPress admin’s to-do list.
It’s also worth remembering that deliverability and security are more closely related than you might think at first. Beyond simply reaching the inbox, reliable email helps protect sensitive information, maintain brand reputation, and prevent some email-based attacks. A failed email can also mean a user never receives a password reset or 2FA code, or an administrator misses an important security notification.
Common reasons WordPress emails fail or end up in spam
There are many reasons why your WordPress emails may fail to send or end up in the spam folder. Although we can’t list every single factor that might trigger spam filters, below are some of the most important ones.
- Server and IP reputation. Since many WordPress sites are hosted on shared hosting accounts, where there could be hundreds of different companies or individuals sending emails from the same server, it’s common for the server’s reputation to get tarnished through no fault of your own. This can also happen for other reasons, though.
- Lack of authentication. A lack of authentication protocols like SPF, DKIM, and DMARC records can cause issues with deliverability. While not always required, these technologies make email more legitimate and therefore make it harder to “spoof” email from another domain. By having emails authenticated and, in the case of DKIM, cryptographically signed, emails are much less likely to go to junk or spam folders. (We cover how to set these up later in this guide.)
- Hosting/server restrictions and technical failures. This includes things like PHP misconfigurations, cURL and other software errors, as well as your web host outright blocking emails or forcing you to enable the functionality.
- Email content and formatting. Your email content plays an important role in spam filtering, and simple mistakes can cause emails to be flagged:
- Trigger words and sales language.
- A low text-to-image ratio.
- Suspicious links and attachments.
- Formatting and design issues.
- Incorrect email setup. Using spammy-looking “from” email addresses or sending emails from a poorly authenticated subdomain can increase the chances of your email being flagged as spam, as well as increase the chances of users marking the email as spam accidentally.
- Sending patterns and bounced emails. Spam filtering technology looks at past behavior and at common sending patterns used by spammers. Sudden increases in email volume and too many bounced emails can cause spam filters to divert emails to the spam folder.
Test and log your emails before changing anything
Before you start making changes to your email setup, it’s important to thoroughly test your email functionality. This ensures you address the right issue. Logging plays a central role here: it tells you whether emails are actually leaving your site at all, which is the difference between a sending problem and a spam-filtering problem.
Step 1: Set up a logging tool
Email testing and logging tools are a great way of logging email activity, clearly showing you if emails are being sent and if anything goes wrong. This isn’t just useful when initially testing your setup; it’s also very useful for monitoring your emails afterward.
WP Activity Log is a great plugin you can use for this purpose. It will not only log your email activity but also other changes being made on your site. You can check event ID 6061 for an overview of the emails your WordPress website sends, which gives you an idea of how and when your site sends emails. Best of all, this can be done with the free plan, so you won’t have to pay a dime unless you want to benefit from some of the premium features.
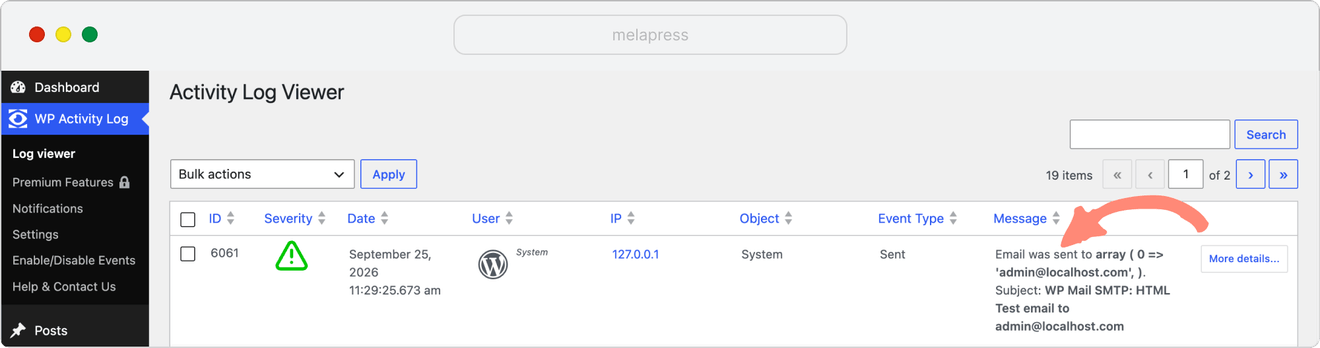
Bear in mind that this only confirms that WordPress has sent the email to the server correctly. In order to troubleshoot the rest of the path, you can check the SMTP server logs. If you don’t know how to do this or it seems too complicated, you can contact your web host.
Step 2: Install an email testing plugin
Next, install an email testing plugin like WP Test Email that allows you to send test emails.
A great alternative is WP Mail SMTP by WPForms, which lets you kill two birds with one stone: it tests your website’s and domain’s email setup, and it also makes it easy to configure your site to send emails through SMTP services to improve deliverability. To run a test, install and activate the plugin, click WP Mail SMTP > Tools, and on the Email Test tab, click the Send Email button.
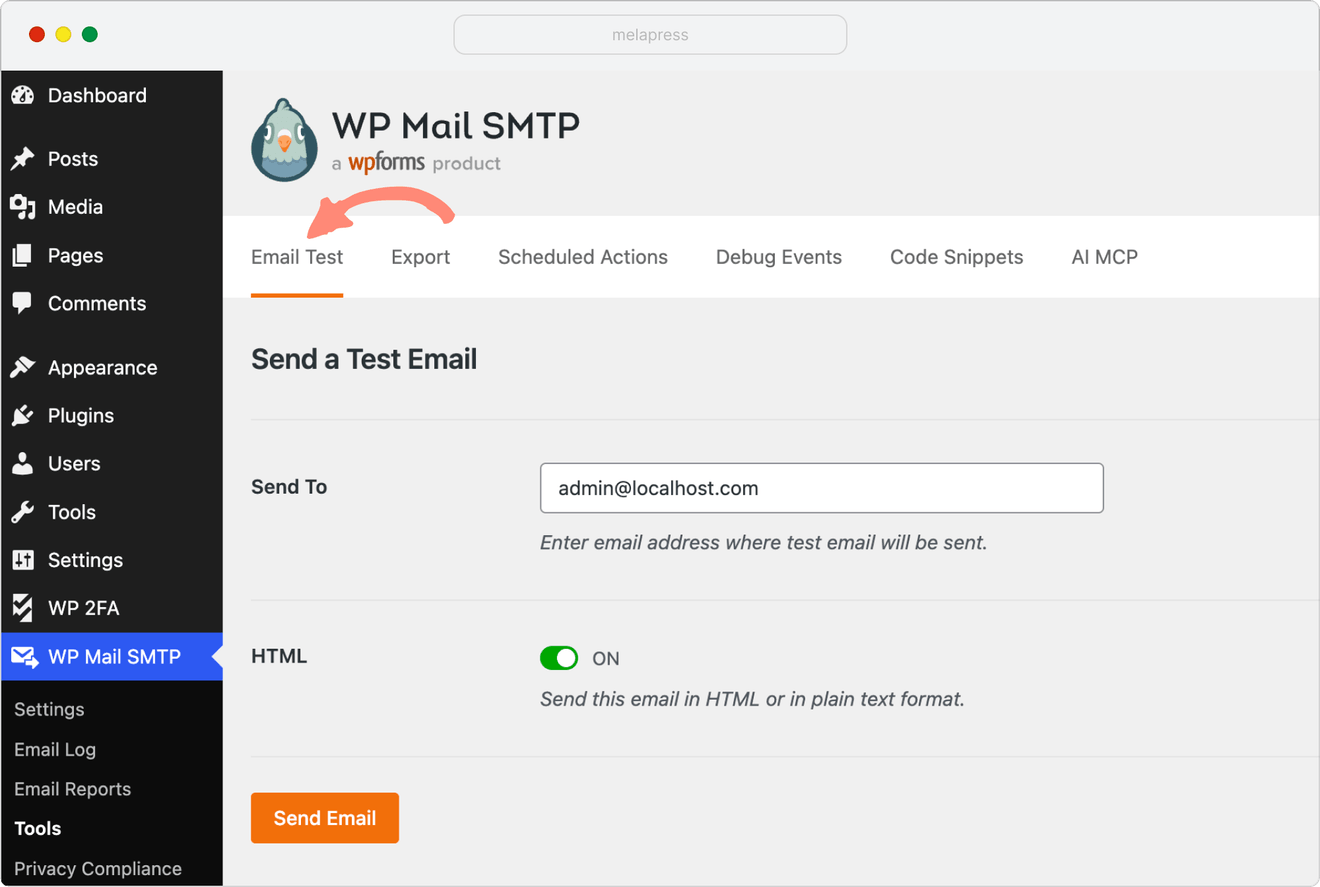
Underneath the hood, the plugin does a lot more than send a single message. In the first phase of the test, it checks if there is a hard pass or fail, for example, a failure with wp_mail() or the PHP mailer, and parses the error to suggest practical solutions that any average user can understand.
It doesn’t stop there: it then runs further checks to confirm the setup of the domain’s DNS, verifying that your SPF, DKIM, and DMARC records are all set up correctly.
Step 3: Test delivery across different providers
Send test messages to accounts at several major providers, such as Gmail, Outlook, Yahoo and iCloud. If you don’t have these yourself, you can create some. Check whether each message arrives and whether it lands in the inbox or spam folder.
Step 4: Send your email to a spam testing service
There are many email spam testing services that calculate your email spam score, which can give you a good idea of what might be causing your emails to go to spam. Mail Genius is a good option, as it will not just calculate a spam score for your email but also show you what you can do to improve. You can use the resulting checklist to quickly navigate to the section of this guide relevant to you.
How to fix WordPress email deliverability
Once you know whether the problem is a sending failure or a spam-filtering issue, you can start working through the fixes below. Most deliverability problems come down to a handful of root causes, so it’s worth working through these in order.
Use an email delivery service or SMTP plugin
Utilizing an email delivery service or SMTP plugin is by far the easiest way for WordPress administrators to improve deliverability.
SMTP stands for Simple Mail Transfer Protocol and is the standard protocol used to send emails. By default, a WordPress website uses PHP to send emails, which can lead to deliverability issues as emails are commonly blocked by web hosts. By switching to SMTP, you can alleviate many of the problems caused by the standard WordPress email setup.
Although you can use an SMTP plugin like WP Mail SMTP, YaySMTP, or similar to connect to a custom SMTP server, the easiest way of making this switch is by using an email delivery service. These services use their own SMTP server to send emails, which is far more effective than using a shared web server.
They handle all the infrastructure and bounces for you, make sure the IPs being used are properly “warmed-up” and not present on any spam lists, and they actively work to improve deliverability while diligently vetting their users. Some good email delivery services for WordPress include Brevo, SendGrid, Mailgun, SMTP.com, and Amazon SES.
Integrating your website with one of these services is as easy as ABC with WP Mail SMTP. The free plugin lets you connect to SMTP.com, SendGrid, Mailgun, Gmail, and Brevo (formerly SendinBlue), while WP Mail SMTP Pro supports any other SMTP service and adds features such as reports, priority support, and email controls. Whichever service you pick, test it thoroughly after configuring it. Most plugins have a test email feature so you can confirm everything is set up correctly.
Send emails from your own domain
If you’re not already, it’s important to send your emails from your own domain and not from standard email providers like Gmail and Outlook. If you’re using an email delivery service, this should already be the case.
Sending large volumes of emails from standard accounts like Gmail and Outlook can quickly lead to deliverability issues. Google’s and Yahoo’s sender requirements also impose stricter requirements on bulk senders, including SPF, DKIM, DMARC, low spam complaint rates, and easy unsubscribe options for marketing emails. These requirements came into effect in February 2024 and apply to senders reaching around 5,000 or more messages per day.
Set up email authentication: SPF, DKIM, and DMARC
Authentication frameworks are the single most effective technical step for both security and deliverability. The term email security framework refers to a set of guidelines and standards in place to ensure that all your email communication stays safe from risks such as spam, phishing, and unauthorized access. Different SMTP servers might use a combination of these frameworks to achieve their goal.
If you’re using an email sending service such as SendGrid, Mailgun or Amazon SES, refer to their documentation on how to set these DNS records. If you are using your own SMTP server, refer to that server’s documentation. (If you are not familiar with DNS, read our guide on DNS for WordPress websites and administrators.)
Sender Policy Framework (SPF)
Sender Policy Framework (SPF) is an email authentication framework that allows the recipient’s email server to check if an email came from a legitimate source. It works by checking the DNS record of the sender’s domain to verify that the sender’s IP address matches the authorized IP addresses for that domain. The SPF record contains information about all the IP addresses and domains that can send email on behalf of a particular domain, and any mismatch results in the email being marked as suspicious.
To implement SPF, you add a TXT record to the domain’s DNS zone file with a value such as v=spf1 mx a ip4:XXX.XXX.XXX.XXX -all. The parts mean the following:
| Part | Meaning |
|---|---|
v=spf1 | Specifies the version of the SPF protocol in use (version 1). |
mx | Authorizes the domain’s MX records to send emails on behalf of the domain. |
a | Authorizes the domain’s A records (its IPv4 addresses) to send emails on behalf of the domain. |
ip4:XXX.XXX.XXX.XXX | Adds a specific IP address to the whitelist for sending emails. |
-all | Specifies what should happen to emails that don’t match any of the authorized domains or IP addresses. |
Replace XXX.XXX.XXX.XXX with the IP address you want to whitelist (typically the IP of your mail servers) to help prevent spoofing.
DomainKeys Identified Mail (DKIM)
The DomainKeys Identified Mail (DKIM) framework relies on digital signatures to verify that the email’s sender is legitimate, and it also ensures that the contents of the email are unaltered in transit. The digital signature is a cryptographic value generated using a private key associated with the legitimate domain name, and it’s added to the email header as a DKIM-Signature field.
The recipient’s mail server accesses the public key of the sender’s domain from the DNS records and uses it to verify the cryptographic signature and verify the sender’s authenticity. A match shows that the message was signed by a domain controlling that key and that the signed portions weren’t altered.
Domain-based Message Authentication, Reporting, and Conformance (DMARC)
SPF and DKIM let receiving servers validate different parts of an email, but neither necessarily confirms that the authenticated domain matches the domain users see in the From address.
This is where DMARC comes to the rescue. DMARC checks whether SPF or DKIM passes and aligns with the domain in the From address. Domain owners can also add a DMARC policy to their DNS records to specify what should happen to messages that fail this check: the policy can tell the recipient’s server to reject, quarantine, or deliver the email.
DMARC also provides reports about messages using your domain, which can help identify authentication problems and potential spoofing or phishing attacks.
A simple DMARC record looks like v=DMARC1; p=none; rua=mailto:[email protected], where p can be set to none, quarantine, or reject, and rua specifies the address that receives the reports.
A note on encryption: When setting up your SMTP client, make sure you are sending emails over SSL/TLS. This helps prevent emails from being intercepted while in transit. Many services handle SSL/TLS encryption automatically, but you can also provide the SMTP host, port number, and encryption details manually.
Optimize your email content
Spam filters take a lot of different things into account. So, you don’t have to be perfect, it’s just a matter of the email being good enough not to be flagged. The rule of thumb is basically to make sure your emails are legitimate and don’t read like spam.
- Avoid overly promotional or deceptive content. Don’t go overboard with sales language or calls to action, and make sure your subject line accurately reflects the content of the email.
- Keep email content clear and accessible. Make sure all important information is in text and not “hidden” inside images unless necessary (which also helps screen readers), and stick to clean HTML.
- Only link to trusted websites. Link only to secure HTTPS websites, limit the number of links, keep URLs clean, and avoid cloaking links or using ambiguous anchor text. Ideally, stick to links pointing to the same domain the email is sent from.
- Make it clear who sent the email. Recipients should clearly see who sent the email from the from address and from name, plus an address and company details in the footer. Avoid sending from your admin email address. This increases the chances of spam flagging and can be a security risk. For the from name, use the shortest recognizable version of your company name without extra characters; for the from address, stick to a clean
[name]@[domain].comformat and make sure it’s monitored or set up as a noreply address with an autoresponder. - Format for mobile. Make sure emails are easy to read on mobile devices, use a professional signature and web-safe fonts, minimize HTML and CSS, use alt-text for images, and maintain consistent branding.
- Include a clear unsubscribe option (for marketing/subscribed emails). This is mandated by law in most countries and helps keep your list clean, users can opt out instead of marking your email as spam.
Stay compliant: CAN-SPAM and GDPR
Compliant email practices aren’t only important for avoiding legal consequences, they also help you avoid spam filters. The two most important pieces of legislation to be aware of are:
- The CAN-SPAM Act: Genuine transactional or relationship emails, such as order confirmations, account notifications, security alerts, and password-related messages, are exempt from most CAN-SPAM requirements. However, they must still use accurate routing information and should clearly reflect the purpose of the message. If you add significant promotional content to a transactional email, it may instead be treated as a commercial message. You can read more in the FTC’s compliance guide.
- The GDPR: Email addresses and other user information can be personal data under the GDPR. You need a lawful basis for processing that data, but you do not necessarily need consent for transactional emails. For example, sending an order confirmation or account-related message may be necessary to fulfil a contract or provide a requested service. You should still clearly explain how personal data is used and protect it appropriately. You can read more on the GDPR information site and in our GDPR compliance guide for WordPress and WooCommerce.
Monitor email sending and performance over time
Monitoring the emails being sent and their performance is the final step, and also one of the most important ones. Spam filters are constantly changing, and so are email best practices, so it’s important to stay on top of industry trends.
This is where logging pays off again. By keeping an eye on the emails being sent from your WordPress site, you can quickly discover any new technical issues that pop up, then act quickly to fix them so your spam score stays as low as possible, and so a silent sending failure never goes unnoticed until a customer complains. A logging tool like WP Activity Log gives you that visibility, confirming that emails are leaving your site and flagging when something changes.
Still having issues? Work with an expert
If you’ve followed the steps above and are still experiencing issues, it’s worth revisiting them to ensure you didn’t miss anything. If the problem persists, it may be beneficial to consult with an email deliverability expert who can provide a more in-depth analysis and offer customized solutions tailored to your situation. Remember, email deliverability can be complex, and working with an expert can speed up the process and get you better results.
Email deliverability may not immediately sound like the highest priority for WordPress admins. However, you’ll thank yourself that you took the time to set it up properly when you need to send your customers and users newsletters, password reset emails, and 2FA codes, or when you need to receive important updates about your own website.
Frequently asked questions
Why do my WordPress emails go to spam?
There are many different reasons why WordPress emails go to spam. Poorly formatted emails, spammy-looking content, a poor sender reputation, and an incorrect technical setup are some of the most common ones. You can find a full list in the section titled “Common reasons WordPress emails fail or end up in spam”
Should I use a third-party email delivery service to avoid spam issues?
In most cases, yes. These services can greatly improve your deliverability and help avoid your emails going to spam. An alternative is to use an SMTP mail plugin to send emails from your own SMTP server instead of your hosting server’s IP. A good option is the WP Mail SMTP plugin.
How can I check if my server’s IP address is blacklisted, and what to do about it?
There are many online tools that can help you check if your server’s IP address is blacklisted, including MXToolBox and DNSBL. If it is, you can try contacting your hosting provider to get the issue resolved. However, the best solution is to use an email delivery service with a dedicated SMTP server to send emails.
Can using a shared hosting service affect my email deliverability?
Yes. Other accounts on the same shared hosting service share your IP address, which can lead to emails from that IP getting a higher spam score. Most web hosts monitor for this behavior and actively work to maintain their server’s IP reputation, but a dedicated email delivery service avoids the problem entirely.