How can we help?

Search for answers or browse our knowledge base.

Table of Contents

What is the 2FA grace period and how can you configure it?

When 2FA is enforced, users need to either configure 2FA on their next login or within a grace period. WP 2FA comes with a configurable grace period that allows you to choose how long of a grace period you would like to give your users and what happens if 2FA is not configured within the grace period.

There is no ideal grace period. In fact, high-security websites do not even allow a grace period. They require users to configure 2FA as soon as they log in. So, as a rule of thumb, the sooner you can get your users to use two-factor authentication, the safer it is.

What happens when a user does not configure 2FA within the grace period?

With WP 2FA, you can decide what happens when users miss their grace period. One option is to lock the user account and prohibit the user from logging in until the account is unlocked. You can also restrict access to the dashboard or user page until 2FA is configured.

Do note that only the website’s administrators can unlock the user again. As a security precaution, user accounts cannot be unlocked automatically, even if the plugin’s settings are changed. They always have to be manually unlocked.

Read how to unlock locked WordPress users for more information on this subject.

How to configure the grace period for 2FA

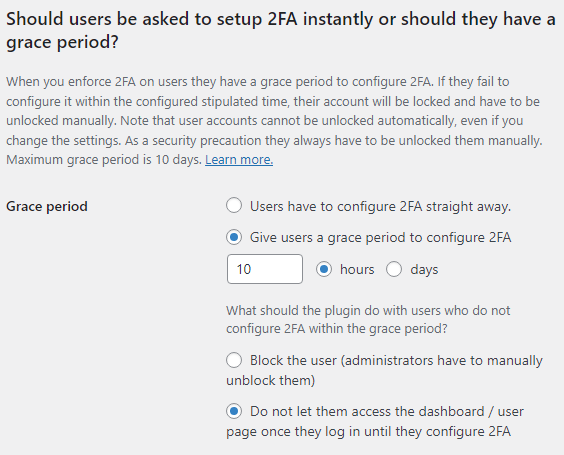
To configure a grace period, first, navigate to WP 2FA > 2FA Policies. Make sure that 2FA is being enforced, then scroll down to the grace period section, as shown in the screenshot below.

Configure WordPress 2FA grace period

Next, choose from the following options:

  • Users have to configure 2FA straight away: Choose this option to have users configure 2FA straight away
  • Give users a grace period to configure 2FA: Choose this option to give users a grace period to configure their 2FA. Depending on how long you would like the grace period to be, click on either the hours or days radio button, then enter the amount in the preceding text box.

Next, we need to tell WP 2FA what should happen when a user does not configure 2FA within the grace period.

  • Block the user: Choose the option to have the user account blocked. An Administrator will have to manually unblock the account once it’s blocked
  • Do not let them access the dashboard/user page once they log in until they configure 2FA: Choose this option to block access to the dashboard/user page until 2FA is configured. Access is restored automatically once 2FA is configured

Lastly, we can choose how we want to inform users that 2FA is being enforced by selecting from the following options:

  • Show an admin notice in the dashboard
  • Show a notification on a page on its own after the user authenticates and before accessing the dashboard

Once you’re happy with your selections, scroll down to the end of the page and click on Save Changes.

 Boost your sites’ security and management! Download our free eBook on WordPress oversight.

Uploading WP 2FA as a zip file in WordPress
WP 2FA in the WordPress plugin repository
Close

Installing WP 2FA Free

Congratulations on taking the first step towards enhancing your WordPress site's security with WP 2FA Free! You're now on your way to protecting your valuable data and ensuring peace of mind. No coding or technical knowledge is required.


Below are two ways to install WP 2FA on your website:

Go to your plugin dashboard on your site, then go to "Add New", and then search for WP 2FA.

Download the WP 2FA plugin zip, then select upload in your plugin dashboard under "Add New".

OPTION 1

OPTION 2

Uploading CAPTCHA 4WP as a zip file in WordPress
CAPTCHA 4WP in the WordPress plugin repository
Close

Installing CAPTCHA 4WP Free

Well done you. You're one step closer to safeguarding your WordPress website from spam and automated attacks with CAPTCHA 4WP. You'll be able to effortlessly integrate CAPTCHA into your forms and enjoy a website with enhanced security.


Below are two ways to install CAPTCHA 4WP on your website:

Go to your plugin dashboard on your site, then go to "Add New", and then search for CAPTCHA 4WP.

Download the CAPTCHA 4WP plugin zip, then select upload in your plugin dashboard under "Add New".

OPTION 1

OPTION 2

Uploading WP Activity Log as a zip file in WordPress
WP Activity Log in the WordPress plugin repository
Close

Installing WP Activity Log Free on your website

You deserve a pat on the back for choosing to record user actions and changes on your website. That is the first step towards better user accountability, easier troubleshooting of website security, and many other benefits of issues.


Below are the two ways to install WP Activity Log on your website:

Go to your plugin dashboard on your site, then go to "Add New" and then search for WP Activity Log.

Download the WP Activity Log plugin zip, then select upload in your plugin dashboard under "Add New".

OPTION 1

OPTION 2

Uploading Melapress Login Security as a zip file in WordPress
Melapress Login Security in the WordPress plugin repository
Close

Installing Melapress Login Security Free

Congratulations on taking control of your WordPress website's security by implementing robust login and password policies with Melapress Login Security. You can change your login page URL, limit failed login attempts, and reset passwords.


Below are two ways to install Melapress Login Security on your website:

Go to your plugin dashboard on your site, then go to "Add New" and then search for Melapress Login Security.

Download the Melapress Login Security plugin zip, then select upload in your plugin dashboard under "Add New".

OPTION 1

OPTION 2