


Updated on 17 December, 2024 by Brenda Barron
Configuring WordPress automatic updates
Performing WordPress updates is a part of regular WordPress website maintenance. It’s an essential part of keeping your site secure. That’s why updates are set to be automatic by default in WordPress. Unfortunately for some, automatic updates can cause issues. Maybe your website configuration is sensitive. Or, you’re using legacy plugins that tend to break if updates aren’t implemented carefully. In these cases, updating manually might be a better choice.
But here’s the catch: WordPress doesn’t make it easy to turn off major core updates since outdated sites are at higher risk of security breaches. Thankfully, if you’re looking to manage updates on your own terms, there are a few ways to disable them safely. And if you ever need to know how to turn them back on again, that’s possible, too.
Let’s explore several methods to take control of WordPress updates.
Table of contents
- Why disable automatic updates?
- How to (partially) disable WordPress auto updates in the dashboard
- Disable WordPress auto-update with a plugin
- How to disable WordPress auto updates with code
- Disable all automatic updates (core, theme, and plugins)
- Disable only WordPress core updates
- Enable only minor core updates (disable major updates)
- How to disable automatic WordPress updates for themes and plugins
- Why some people benefit from automatic updates
- How to enable automatic updates within the WordPress dashboard
- How to enable automatic updates using plugins
- How to enable theme and plugin updates
- Best practices for WordPress update management
- Take control of your WordPress updates schedule
Why disable automatic updates?
Automatic updates are a default feature in WordPress, designed to ensure your site stays secure and up-to-date without requiring manual intervention. However, there are valid reasons why disabling automatic updates might be a better option for certain sites:
- Maintain compatibility with critical plugins or themes by applying updates only after confirming they work as intended.
- Reduce risk by scheduling updates during low-traffic periods, reducing the impact of potential downtime caused by something breaking.
- Coordinate updates with regular maintenance tasks like backups and performance testing for streamlined site management.
- Protect custom development by reviewing and implementing updates carefully to avoid conflicts or overwriting custom code.
If these apply to your situation, the following will show you how to disable auto updates.
How to (partially) disable WordPress auto updates in the dashboard
If you’re a WordPress user looking for a simple toggleable setting to disable automatic updates, your options are limited. But there is a way to partially turn off updates within your WordPress installation.
After logging into WordPress, you’ll find this in the Dashboard > Updates screen. By default, all WordPress sites are kept up to date with every single release, including minor ones. But you can turn off minor updates. To do this, clicking Switch to automatic updates for maintenance and security releases only.

After this, WordPress will only update with major updates like those that patch serious security vulnerabilities. These major updates are designed to fix critical issues without disrupting the site’s core functionality. Keeping these updates turned on ensures your site remains secure from major risks, but you still have control over other updates.
For some sites, this isn’t good enough. If you need to completely disable all updates, you can do so with either a plugin or code snippet.
Disable WordPress auto-update with a plugin
If you’re not comfortable adding code to your site, it’s best to rely on a plugin. It’s super quick to set up and has very little room for error.
There are several plugins that can get the job done. Disable All WordPress Updates and Easy Updates Manager to name a few. Let’s try out Easy Updates Manager since it’s the most popular solution.
Start by going to Plugins > Add New Plugin and installing Easy Updates Manager. You’ll find a new plugin menu in Dashboard > Updates options.
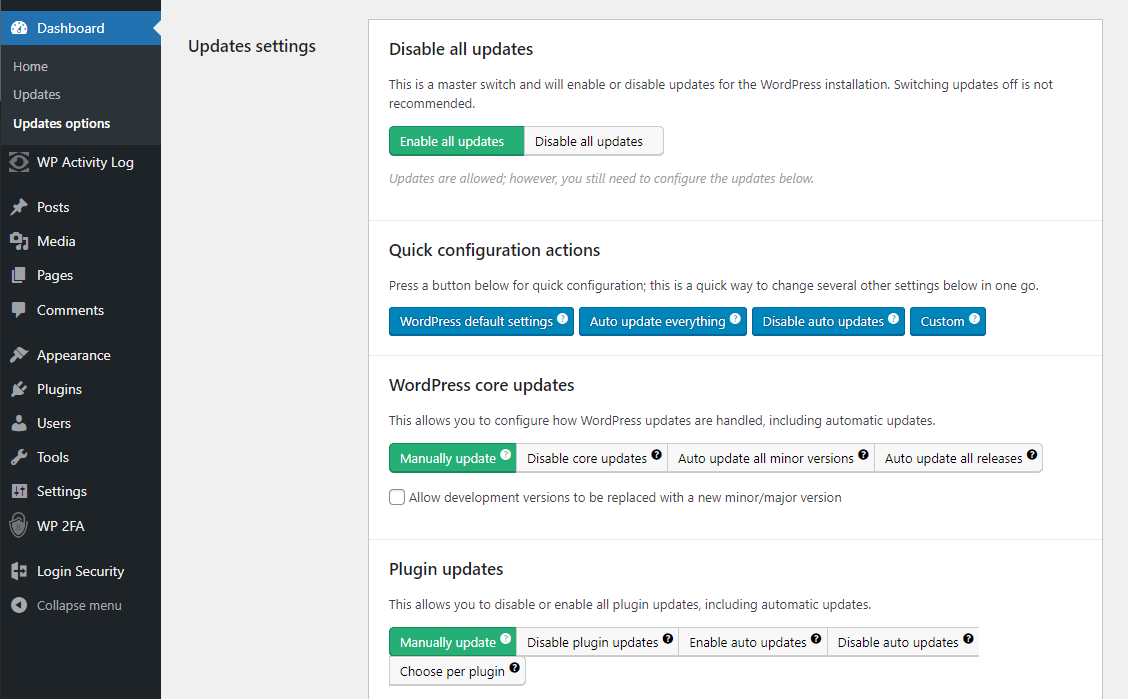
You now have a few options.
- In the Disable all updates section, you can choose to turn off all updates. This includes automatic plugin updates and automatic WordPress theme updates. This isn’t recommended since it prevents you from updating plugins, themes, or core WordPress files at all.
- In the Quick configuration actions section, click Disable auto updates to turn off automatic updates for plugins, themes, and core. Then, perform manual updates on a schedule that makes sense for you.
- In the WordPress core updates section, switch to Manually update, or Disable core updates. This turns off all update notices. You can then configure plugin and theme auto updates separately.
If you ever want to change your settings in the future, it’s really easy to do. You can even turn on email notifications for updates in case any accidentally slip through.
How to disable WordPress auto updates with code
If you’re comfortable adding some simple code to your site, this can be even more straightforward than using a plugin. It’s less user-friendly, but it means you don’t need to install yet another plugin on your site.
Before you begin, be sure to back up your wp-config file.
There are several different code snippets you can use. Here’s a brief look at each:
Disable all automatic updates (core, theme, and plugins)
This one will disable all WordPress automatic updates, core, theme, and plugins included. While this gives you full control over every update, be cautious. It requires diligent manual updating to avoid missing security patches or compatibility improvements.
define('AUTOMATIC_UPDATER_DISABLED', true)Disable only WordPress core updates
If you just want to disable WordPress core updates, the following is the code to use. This option can be useful if you want to avoid any unexpected changes to the core files. But if you still want theme and plugin updates for security and compatibility, it’ll help with that.
define('WP_AUTO_UPDATE_CORE', false)Enable only minor core updates (disable major updates)
And if you want only minor auto updates, but no major updates, you can use this code snippet. This strikes a balance. It ensures your site remains protected from critical vulnerabilities without risking major changes. The sort of changes that could disrupt your site’s layout or functionality.
define('WP_AUTO_UPDATE_CORE', 'minor')But where do you actually put this code? You’ll need to use FTP to connect to your site’s files and add it to the wp config file. To use FTP, you’ll need your FTP credentials (check your hosting dashboard or ask your host). Then, download an FTP client like Filezilla.
Once you launch Filezilla, enter your credentials in the boxes at the top and click Quickconnect.

In the panel on the right, look for wp-config.php in your root directory. Double-click on this file to open it in a text editor. Paste in the code you want at the bottom, above the line that tells you to stop editing.

Save the file. Then, upload it back to the server, and your problem should be solved.
You can also complete this task by accessing your hosting provider’s cPanel or File Manager.
How to disable automatic WordPress updates for themes and plugins
What if you want to get rid of auto-updates specifically for your themes and plugins? Turning off WordPress updates won’t affect themes or plugins. So, this requires a little extra work. Luckily, you can do it all in the WordPress dashboard.
To turn off plugin auto-updates, just log in to WordPress and go to Plugins > Installed Plugins. Click Disable auto-updates on the right of each plugin. If you need to bulk disable automatic plugin updates, use a plugin like Easy Auto Updates, mentioned above.

As for themes, it’s just as easy. In the WP admin dashboard, navigate to Appearance > Themes. Then look for Disable auto-updates in the theme box.

Themes and plugins can be pretty sensitive to small changes. Sometimes they release new features you don’t want or need. Turning off updates can be a good move so you can install security patches only as needed.
Why some people benefit from automatic updates
Automatic updates are helpful in some situations. Notably, they can make WordPress site maintenance less of a burden on those pressed for time. While they’re not always the right choice for every site, enabling automatic updates (or keeping them on) offers several perks.
1. Enhanced security
Keeping WordPress core, themes, and plugins updated is one of the most effective ways to protect your site from vulnerabilities. Malicious actors seek out software that’s outdated to exploit and then gain unauthorized access to websites. Enabling automatic updates ensures critical security patches are applied as soon as they’re released.
2. Hands-free maintenance
For small business owners, bloggers, or hobbyists, managing updates manually can be time-consuming and easy to overlook. Automatic updates eliminate the need to monitor new releases constantly. This frees up your time to focus on growing your site or business.
3. Improved performance and features
Many updates include performance optimizations and new features that improve site functionality or the user experience. Automatic updates ensure you’re always benefiting from the latest advancements without delay.
4. Compliance with hosting requirements
Some hosting providers require WordPress installations to stay updated to meet security or performance standards. Automatic updates can help you comply with these requirements without needing to track updates manually.
5. Ideal for low-complexity sites
If your website doesn’t rely on custom code or niche plugins, the risk of updates causing conflicts is significantly lower. For such low-complexity sites, enabling automatic updates is a simple way to keep your site up-to-date without unnecessary intervention.
6. Built-in rollback protection
In most cases, WordPress handles automatic updates smoothly, and many managed hosting providers offer built-in safeguards like automatic backups or rollback features. If something does go wrong, you can quickly restore your site to its previous state with minimal downtime.
7. Support for large-scale site management
If you manage multiple WordPress sites, automatic updates can streamline the maintenance process. Instead of logging into each site individually, you can enable auto-updates to ensure all your sites stay secure and up-to-date without additional effort.
While enabling automatic updates offers clear benefits, it’s essential to strike a balance between convenience and control. You can enable automatic WordPress updates selectively. Keeping core updates automatic while manually updating plugins or themes is one example, as we discussed previously.
How to enable automatic updates within the WordPress dashboard
The simplest way to enable automatic updates is directly through the WordPress dashboard. This built-in functionality allows you to automate updates for WordPress core, themes, and plugins without requiring additional tools or technical expertise.

Log in to your WordPress dashboard then go to Updates. Then select the option to Enable automatic updates for all new versions of WordPress.
How to enable automatic updates using plugins
If you’re looking for more flexibility or a user-friendly way to manage automatic updates, plugins can help. These tools allow you to customize what updates are applied and even provide notifications when updates occur.
We’ve already mentioned Easy Updates Manager. This plugin lets you enable or disable auto-updates for WordPress core, plugins, themes, and translations.
WP Auto Updater is another option. It’s straightforward and focused solely on managing WordPress auto-updates.
If using Easy Updates Manager, after installing and activating the plugin, you can enable updates by going to your dashboard then Updates Options. Then, under the General Settings tab, toggle Enable Automatic Updates to activate updates for core files.
How to enable theme and plugin updates
Once you’ve enabled WordPress core automatic updates, you may wish to enable them for themes and plugins, too. This ensures your site’s components remain up-to-date with the latest features, security patches, and compatibility fixes.
Enabling plugin auto-updates
To enable auto plugin updates, log in to your WordPress dashboard then go to Plugins > Installed Plugins.
For each plugin, locate the Automatic Updates column. Click the Enable auto-updates link next to each plugin.

If you have multiple plugins, select them using the checkboxes. Then use the Bulk Actions dropdown to enable auto-updates for all selected plugins.

Enabling theme auto-updates
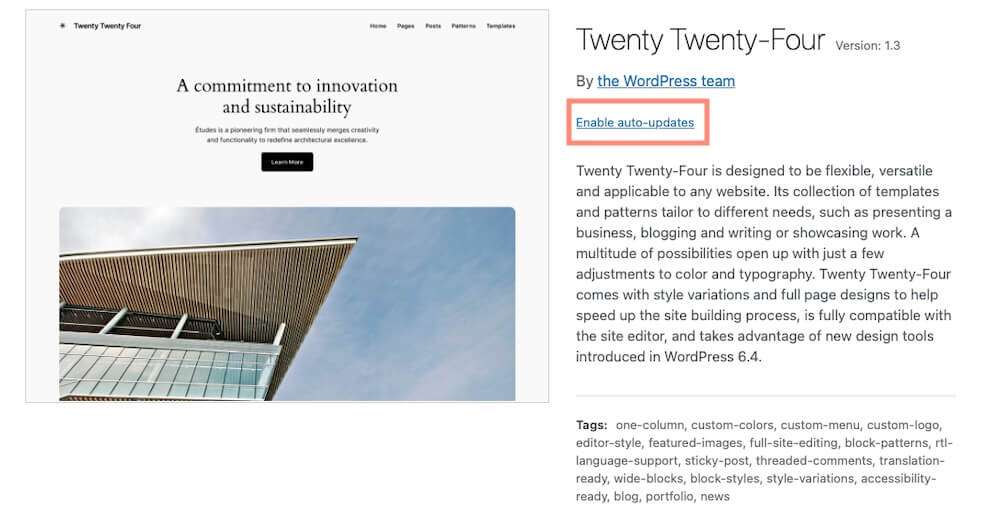
If you wish to turn on auto-updates for themes go to Appearance > Themes in the WordPress dashboard. Then, locate the theme you want to update automatically.
Click the Theme Details button then click Enable auto-updates.
Best practices for WordPress update management
Disabling automatic updates in WordPress can be a risky choice. If your goal is to shut off updates permanently, any security expert would beg you to reconsider. Without updates, your site is left wide open for vulnerabilities.
But disabling auto updates doesn’t have to mean leaving your site vulnerable. It just puts you in control. With this approach, you can configure the update within your environment and decide when to push it live.
Here are some best practices for keeping your WordPress site safe while disabling auto updates.
- Regularly check for updates – Even when auto updates are disabled, you should still keep an eye on new core releases. WordPress will check for updates and notify you in Dashboard > Updates as long as you don’t turn this functionality off. Check the patch notes for security updates, performance improvements, and new features you want to prioritize adding.
- Use a staging site – Test updates in a staging environment before applying them to your live site. This allows you to catch any compatibility issues with themes, WordPress plugins, or custom code before they affect your visitors. Or before they ruin your site’s layout and functionality. Once you’re sure it’s all working correctly, apply the update to your live site.
- Regular backups – When auto updates are disabled, it’s more important than ever to keep frequent, automated backups. This is your safety net. In case something slips through due to an unpatched security vulnerability, you’ll be covered. Or, if a problematic update takes down your site, you can restore it.
- Prioritize security updates – While new features can be delayed, security updates should never be ignored. Keeping your site protected means always installing security updates ASAP.
- Schedule manual updates – Don’t fall behind on updating your site. Schedule a periodic maintenance window. Use this time to test and install any new and necessary updates. Whether that’s weekly or monthly, keep on top of it.
Keep these tips in mind. Then you can take a more flexible approach with auto updates but still keep your site safe from threats.
Take control of your WordPress updates schedule
Sometimes, disabling WordPress’ auto updates is a necessity. When updates tend to break things, it’s best to shut them off. Then, you can enable them on your own terms.
However, it’s still important to not leave your site or any of its components out of date. Especially since it can leave you wide open for security breaches. But you’ll be able to test the update on a staging site and push it through after confirming it doesn’t break anything.
Disabling WordPress auto updates gives you full control over your site’s stability and security. But it does leave you with the task of handling these updates manually. Ultimately, it’s up to you how you set up your site. And how much time you spend bug-testing new WordPress updates. We hope that this post has helped you make a decision. And we hope it’s given you enough options for disabling WordPress automatic updates.