Working with websites requires you to be familiar with different types of files. You are probably used to dealing with some common ones like HTML, CSS, JavaScript, and PHP files. However, some lesser-known files like the .htaccess file still play an important role in overall site functionality.
The .htaccess file is a configuration file used by the Apache web server. This file controls various aspects of your website’s behavior on a per-directory basis. A single website installation can have multiple .htaccess files. They are used to override the main web server configuration for a particular directory. –
In this tutorial, you will learn the basics of the .htaccess file, its WordPress security implications, and its practical applications. We will provide you with some code snippets that you can use on your own websites.
Where is the .htaccess file located?
You can usually find the .htaccess file in the root directory of your website. However, its exact location and your accessibility to it depends on a few factors.
For WordPress websites, this file is present inside the main website directory. Other files and directories that you will find there include index.html, index.php, wp-admin, wp-content, etc. Read our post on the WordPress file system for more details.
Depending on your hosting provider, the main directory can have many names, such as public_html, www, etc.
The .htaccess file is specific to Apache web server, so you won’t find this file on other systems such as Nginx or Microsoft IIS.
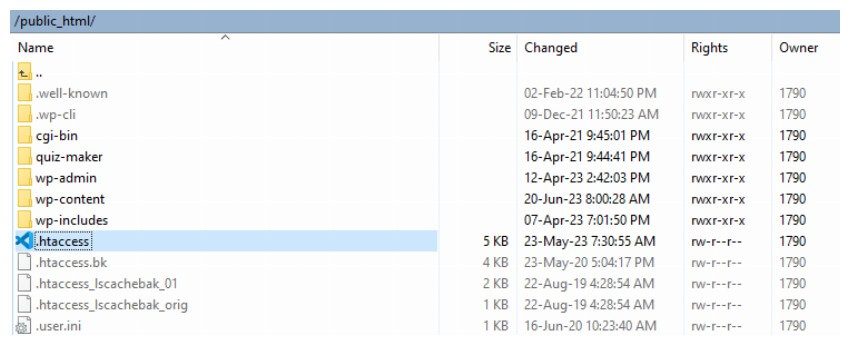
People with a shared hosting account can usually find it inside the public_html directory. You can access this directory either using an FTP application of your choice or through the file manager in your cPanel account with your web host.
The following image shows the public_html directory from one of my shared hosting accounts.

If you are hosting two or more websites on the same shared hosting account, you can find the .htaccess file inside the directory for the respective domain.
Sometimes, you won’t see any .htaccess file when you access your root directory through an FTP client. This is because some of these clients have settings to hide some files by default. You simply need to turn on the toggle to show hidden files in these applications.
How to create a .htaccess file
Creating a .htaccess file of your own is easy. If you are using Microsoft Windows locally, open File Explorer and go to the directory of your choice. Right-click in any empty space and then select New > Text Document as shown in the image below.

This will create a new file with the name New Text Document.txt. Select the file and rename it .htaccess. You will get a warning popup that says changing the file name will make the file unusable. Don’t worry about it and just select Yes.
You should now have a .htaccess file in your desired directory. You can now upload the file to the server either by using an FTP client or through the cPanel File Manager.
A single WordPress installation can have multiple .htaccess files located in different directories. A .htaccess file that you place in a particular directory will affect that directory as well as all its sub-directories.
Editing the .htaccess file
All .htaccess files are text files with a changed extension. This means that you can simply edit them using some capable text editors which support syntax highlighting to make editing easier.
Even the built-in Notepad application in Windows can edit the file. However, you can download and install other more powerful editors like Visual Studio Code and Notepad++ if you regularly do development work.
The file we created in the previous section is empty. However, you can also download the .htaccess file on your website either through cPanel or through an FTP client to edit locally.
There are some important points that you should remember while editing any .htaccess file to suit your needs:
- Always take a backup of your original .htaccess file. This is important because you will always have the option to go back to the original configuration if anything goes wrong. In fact, it is a good idea to take regular backups of your whole WordPress website.
- Make sure that you are using a plain text editor like Notepad, Notepad++, or VS Code to edit the .htaccess file. This prevents any formatting or encoding issues that might arise with editors like MS Word.
- You can add comments into a .htaccess file by starting a line with the character ‘#’. Use comments to explain how different directives that you have added to the file work. This will help you later when you come back to the file in the future.
- Don’t make a lot of changes to your file at once. It is a good idea to make incremental updates and save changes to the file and then see if everything is working as expected. This way, you will know exactly which of the directives that you added to the file caused any unexpected behavior.
- It is also a good idea to thoroughly test your website after you make any changes. This ensures that the directives you added to the file are working as expected and there are no unintended bugs resulting in error pages.
Be careful with the order of directives and familiarize yourself with the required syntax. You also need to be careful with whitespace because it can affect how the server interprets different rules.
How to use the .htaccess file to improve WordPress security
You can use the .htaccess file to do a lot of things. For example, you can add some directives to your .htaccess file to implement caching or improve security. Our focus will be on discussing how to improve website security.
Restrict access to the WordPress dashboard
Different directories in your WordPress installation can have their own .htaccess file. Therefore, you need to create a new .htaccess file inside the wp-admin directory first.
Let’s say you want to restrict access to the WordPress dashboard to a single IP address. You can do so by simply adding the following lines to your file:
order deny,allow
#Replace the below 192.168.5.1 with your IP address
deny from all
allow from 192.168.5.1
- The first line tells the server the order of precedence it needs to follow for the upcoming directives.
- The second line is simply a comment that tells you to replace the given IP address with your own. Make sure that you replace the IP address.
- The third line denies access to all IP addresses by default. Using this line by itself will restrict everyone from accessing the WordPress dashboard.
- The fourth line tells the server to only allow access to requests originating from the specified IP address.
In the above example, we are allowing only IP address 192.168.5.1 to access the WordPress admin dashboard (wp-admin directory). Remember to change the IP address (192.168.5.1) to your public IP address. If you are not sure what is your IP address, Google “What is my IP address”. Also make sure that the IP address that your ISP provides you is static and not dynamic. Otherwise, you will lose access to the admin dashboard yourself.
What if you want to whitelist multiple IP addresses? You simply add a new line with the allow directive.
order deny,allow
#Replace the below 192.168.5.1 with your IP address
deny from all
allow from 192.168.5.1
allow from 10.130.130.7
You can follow the same strategy to restrict visitor access to other directories.
Restricting access using this method isn’t feasible if you have a dynamic IP address. In this case, you should consider using the MelaPress Login Security plugin to automatically block malicious users with too many failed login attempts. It also has many other useful features like custom login pages, and enforcing strong passwords.
Prevent image hotlinking
Hotlinking is the direct linking to several of your website’s files from another website. Typically media content is hotlinked such as images and videos. Therefore when someone visits the website which is hotlinking to your website, the images shown on this website are retrieved from your website using your bandwidth.
This will result in an extra load on your website and is also bandwidth theft, therefore you should prevent hotlinking. This could also lead to copyright issues.
You can use the following directives in your .htaccess file to prevent image hotlinking.
#Switch on rewrite engine
RewriteEngine on
#Allow empty referrals, in case visitors are using personal firewalls
RewriteCond %{HTTP_REFERER} !^$
#Match request URL. Replace www.yourwebsite.com with your website URL
RewriteCond %{HTTP_REFERER} !^http(s)?://(www.)?www.yourwebsite.com [NC]
#Match all files with the below list of extensions
RewriteRule .(jpg|jpeg|png|gif)$ – [NC,F,L]
As usual, all the lines that start with ‘#’ are actually comments. We will now explain what all the other lines do.
- The first line enables the Apache rewrite engine to allow URL rewriting and redirection.
- The second line is for visitors whose privacy settings strip the referer information. Also, no referer information will be present if any visitor tries to access the image directly. This directive allows those visitors to see the image.
- The third line allows the loading of images if the referer is your website.
- The last line allows you to specify the extensions whose hotlinking you want to prevent. It also uses three different flags. The NC flag makes the match case insensitive. The F flag returns a 403 forbidden status code to deny access to these files. The L flag means that this is the last rule the server has to process.
If you would like to block hotlinking to other file types, such as videos with avi or mp4 extensions, add their file extension to the last line of the sample .htaccess in the above example, next to the gif extension.
Add these directives to the .htaccess file in the root folder of your WordPress or website if you would like to prevent hotlinking to all media files on your website.
Block bad actors from accessing your WordPress website
If you want to ban a bad user from accessing your WordPress website or blog and you have the user’s IP address or hostname, you can block such users by using a .htaccess file.
On the other hand, if you want to ban the IP address from accessing any part of the website, then place the .htaccess file in the root of your WordPress or website.
If you would like to block access only to a specific directory on your website, then upload the .htaccess file to that particular directory.
If you already have a .htaccess file in the root of your WordPress, download the existing one and add the below at the end of the .htaccess file.
You can use the following directives to block bad users based on their IP address.
Require all granted
Require not IP 192.168.1.2
Require not IP 10.130.130.6
Require not IP 172.16.130.106
The Require directive specifies the requirements that have to be met in order to allow access to resources.
The first line grants access to all IP addresses. The next three lines restrict access by specific IP addresses.
You can also use the following rules to ban a whole IP range, such as from 192.168.1.1 to 192.168.1.254.
Require all granted
Require not IP 192.168.1
It is also possible to ban a user, a group of users, or an ISP by using hostnames. For example, if an ISP’s hostname is badisp.com, you can use the below example to block such ISP.
Require all granted
Require not host badisp.com
Block bad bots from accessing your WordPress site
Bots, short for robots, are computer programs that browse (surf) websites all over the internet and automatically perform specific tasks. Like almost everything else on the internet, there are good bots and bad bots.
Good bots are used by search engines such as Google and Yahoo to crawl your website, learn about it and use such information so your website can rank in the search engine results.
Bad bots are typically used to harvest email addresses from websites, which are later used by spammers. Bad bots are also used to find security vulnerabilities in websites. When vulnerabilities are found by these bad bots, they are later exploited by hackers.
The primary reasons for blocking bad bots are that they result in spam and consume bandwidth that could be used elsewhere. Banning the bots will save money for both you and your visitors.
You can block a single bad bot from accessing your WordPress by using an .htaccess file. For example, the directives below will block a bad bot with the user-agent string evilbot.
RewriteEngine on
RewriteCond %{HTTP_USER_AGENT} ^evil
RewriteRule ^(.)$ http://no.access/
The user-agent string is an identifier that is sent by web browsers or client applications when they make an HTTP request to the server. This string contains basic information about the visitor’s software. For example, here is the user-agent for my browser:
Mozilla/5.0 (Windows NT 10.0; Win64; x64; rv:109.0) Gecko/20100101 Firefox/114.0
We are using this user-agent string to block the bad bots. Let’s see how it works.
- The first line enables the rewrite engine.
- The second line specifies the condition that the visiting client has to meet to be matched. In this case, it specifies that the user-agent string has to start with the word evil.
- The third line defines the rewrite rule which tells the server to replace the entire URL with the http://no.access if there was a match in the previous condition.
You can also block multiple bad bots at once by using the following directives:
RewriteEngine on
RewriteCond %{HTTP_USER_AGENT} ^evilbot [OR]
RewriteCond %{HTTP_USER_AGENT} ^spambot [OR]
RewriteCond %{HTTP_USER_AGENT} ^virusbot
RewriteRule ^(.)$ http://no.access/
There are two things that we want to highlight here.
First, bad bots are like pests. It is impossible to get rid of them. You can have the most extensive list of bad bots but new ones will appear every day. The above directive is meant to help you effectively block bad bots which are affecting your WordPress website and not block all the bad bots on the internet.
Second, it is easy for visiting clients to spoof the user-agent string. For example, a bad bot might use the user-agent string of Mozilla to disguise itself. You should consider using additional security measures such as authentication or IP-based restrictions along with this method.
You should also consider some security plugins like CAPTCHA 4WP to add CAPTCHA to any forms like comment forms, login forms, and registration forms on your website. This will help reduce spam due to bots.
Use HTTP Authentication to secure your WordPress website
Protecting your wp-admin directory and WordPress dashboard with a .htaccess file is a vital procedure when locking down your WordPress blog or website. As a blogger and webmaster you know that once a malicious user gains access to your WordPress dashboard, it is game over.
By adding an extra layer of server-side security you are also hardening your WordPress installation against zero-day vulnerabilities that might be discovered in WordPress wp-admin scripts.
To password-protect your WordPress admin area you have to create an Apache .htpasswd file. This file is like a database of usernames and passwords which the web server will use to authenticate users.
You can create such a file by using an online password file generator or by referring to the How to create an Apache password file htpasswd tutorial.
Add the following code to the .htaccess file in your wp-admin directory.
#Enable basic authentication
AuthType Basic
#This text is displayed in the login dialog
AuthName “Restricted Area”
#The absolute path of the Apache htpasswd file. You should edit this
AuthUserFile /path/to/.htpasswd
#Allows any user in the .htpasswd file to access the directory
require valid-user
- The first line directs the server to use basic authentication.
- The second line specifies the message that should appear when people try to access the WordPress dashboard.
- The third line contains the absolute path to the .htpasswd file. It is important to place this file outside the public_html or www directory for better security.
- The last line adds the requirement that any visitor trying to open the dashboard is listed in the .htpasswd file and is using valid credentials.
Some files such as the admin-ajax.php file have to be accessible to different WordPress plugins so that they can function properly. This file is also present under the wp-admin directory. Using the above directives will make the plugins non-functional as they won’t be able to access the file.
You can use the .htaccess file to grant anonymous access to this specific file while all other files still require authentication. Simply add the following lines below the directives you added earlier.
<Files admin-ajax.php
Order allow,deny
Allow from all
Satisfy any
</Files>
- The first line specifies that the upcoming directives will only apply to the file listed on this line.
- The second line specifies the order to follow for evaluating the access control rules.
- The third line tells the server to grant access to the specific file, i.e., admin-ajax.php to all the requesting IP addresses. This means that everyone will be able to access this file.
- The fourth line states that anyone who either meets the authentication criteria or the IP address criteria should get access to the specified file.
We should clarify that not all WordPress plugins require access to this file. Therefore, you can simply password-protect the wp-admin directory and confirm that the website is still fully functional. If not, allow access to the admin-ajax.php file as suggested above.
Restrict access to WordPress files
If you would like to restrict access to one or more WordPress core files, or several files on your website from being accessed from an external source, you can do so by using .htaccess files if you are running an Apache web server.
Restricting access to files with .htaccess is ideal for files that have to be accessible under the hood by your WordPress installation but never accessed directly by your website visitors. One such example would be the WordPress configuration file wp-config.php found in the root of your WordPress.
<Files wp-config.php>
order allow,deny
deny from all
</Files>
Place the above directives in the .htaccess file that shares the same directory with the file whose access you want to restrict. In this case, this would be the WordPress root directory.
If you would like to restrict access to any other individual file on your website, change the file name in the first line and upload the .htaccess file to the directory where the file resides. Keep in mind that if you already have an .htaccess file in that directory, simply add the above directives at the end of the .htaccess file.
What if you want to restrict access to multiple files with the same extension? You can do so with the following directive:
<FilesMatch “\.(htaccess|htpasswd|log|ini)$”>
Order Allow,Deny
Deny from all
</FilesMatch>
The first line uses regular expressions to restrict access to all files which have the listed extensions. In this case, it restricts access to the .htaccess, .htpasswd, .log, and .ini files. These files usually contain sensitive information so it makes sense to restrict access to them.
If you would like to restrict access to more file extensions than the ones specified above, add the extension to the first line between the brackets next to the ini extension.
Important things to keep in mind
If you have been following the article up to this point, you should have a good understanding of the .htaccess file in WordPress. There are a few more important points that you should need to know about them.
- For .htaccess files to work, the main Apache web server configuration option AllowOverride must be enabled. If the AllowOverride option is not switched on, then the .htaccess file configurations will not work and the main web server configuration will be applied. So before applying any configuration changes using .htaccess files, always check that the AllowOverride option is enabled.
- When .htaccess files are used, each time someone visits your website, the Apache web server must search through each and every directory within the domain and load all .htaccess file configurations. Such operation will not affect the performance of low-traffic websites, though the webmaster might notice performance degradation in high-traffic websites.
Therefore .htaccess files should only be used when the main web server configuration is not accessible, as in a web hosting environment. If the Apache web server configuration is accessible, all the configuration directives should be specified at the server level. - When you enable Permalinks in WordPress, a .htaccess file is created in the root directory of your WordPress installation. When WordPress writes to a .htaccess file, it always writes the data between the BEGIN WordPress and END WordPress .htaccess file comments. As seen in the example below, these two lines start with a hash ‘#’ character, which means such lines are comments and will not affect the configuration.
#BEGIN WordPress
WORDPRESS DATA
#END WordPress
When updating the default WordPress .htaccess file it is important to NEVER add any configuration directives between those two comment lines. Any configuration directives between these two comments might be overwritten by WordPress.
Conclusion
The .htaccess file plays an important role when it comes to controlling the behavior of a website. You can use it to override server-level configuration settings for specific directories or files within a website.
In this tutorial, you learned how to create your own .htaccess file or modify an existing .htaccess file. You also learned about different rules and directives that you can place in these files to make your website more secure.
Keep tabs on WordPress file changes with Website File Changes Monitor Plugin for WordPress. This free plugin helps you track changes to your WordPress site’s code and identify leftover files that can lead to sensitive data leaks, and malicious code and malware injected during successful hacks.


