Home Blog WordPress Management htpasswd tutorial | How to create an Apache password file

Creating an Apache Password File

htpasswd tutorial | How to create an Apache password file

To password protect a directory or section of your WordPress blog or website, you need to generate an Apache password file, better known as htpasswd file. In this article we will explain how to create a password file for Apache web server, which is the most popular web service used by hosting providers. Below is also a screenshot of an Apache httpasswd file if you had to open it with a text editor such as Microsoft’s Notepad.

Using htpasswd tool to create a htpasswd file

Htpasswrd is the tool you have to use to create an .htpasswd file. It is shipped with almost all Linux distributions which have Apache installed. If you are using Windows, you can use Xampp. Xampp is a lightweight version of an Apache web server and MySQL database server installation on Windows, which any webmaster can use to install a local copy of a WordPress blog or website for testing. To access the htpasswd tool to generate a password file, navigate to c:xamppapachebin directory using the command line.

Note: By default Xampp is installed in c:xampp. If you changed the default installation directory, navigate to [Xampp installation path]apachebin. The same commands and switches apply to both the Linux and Windows version of htpasswd tool.

If you do not have an htpasswd file already, you have to create one and add a username and password to it the first time you run the htpasswd tool.  To do so use the below command:

Htpasswd –c [password file name] [username]

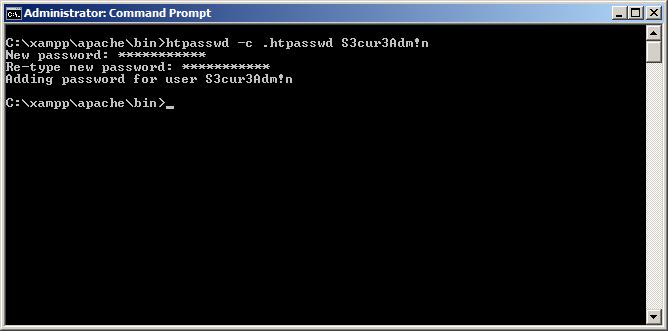
The –c switch means create a new Apache password file. The [password file name] should be changed to the name of the file you want to create, and the [username] should be replaced with the username you want to add to the file. As an example, if you would like to create a password file called .htpasswd and use a username S3cur3Adm!n, use the below command:

Htpasswd –c .htpasswd Secur3Adm!n

Once you run the above command, the tool will ask you to specify a password for the user twice. Once you specify a password, the new Apache username and password file is created and the username entry is added to the .htpasswd file as seen in the below screenshot.
Using htpasswd tool to add entries to existing htpasswd file

If you already have an existing htpasswd file and you would like to add new usernames to it, use the same command mentioned about without the –c switch.

Advanced htpasswd tool features

By default, the htpasswd uses MD5 to encrypt the passwords in Apache htpasswd files. Use any of the below switches to enforce stronger encryption:

-d to force CRYPT encryption on file

-s to force SHA encryption of passwords on file

You can use the –b switch to use the password specified in the command line rather than having the application prompting for it.

Use the –D switch to delete existing users from the Apache htpasswd file.

For a complete htpasswd tool documentation refer to the Apache hpasswd documentation.

WP White Security Security Tip: Ideally Apache password files (htpasswd) should be stored in a directory which is not accessible via web just in case the web server software is compromised.

Once you generate your WordPress htpasswd file for Apache, upload it to your web server and configure its path in the htaccess file used to restrict access to a specific location. If you want us to generate htpasswd files for you for FREE, just drop us an email.


Leave a Reply

Your email address will not be published. Required fields are marked *

Stay in the loop

Subscribe to the Melapress newsletter and receive curated WordPress management and security tips and content.

Newsletter icon

It’s free and you can unsubscribe whenever you want. Check our blog for a taste.

Envelope icon

The survey results are in: Find out what your WordPress security gameplan might be missing

Close

The survey results are in: Find out what your WordPress security gameplan might be missing

Uploading Melapress Login Security as a zip file in WordPress
Melapress Login Security in the WordPress plugin repository
Close

Installing Melapress Login Security Free

Congratulations on taking control of your WordPress website's security by implementing robust login and password policies with Melapress Login Security. You can change your login page URL, limit failed login attempts, and reset passwords.


Below are two ways to install Melapress Login Security on your website:

Go to your plugin dashboard on your site, then go to "Add New" and then search for Melapress Login Security.

Download the Melapress Login Security plugin zip, then select upload in your plugin dashboard under "Add New".

OPTION 1

OPTION 2

Uploading CAPTCHA 4WP as a zip file in WordPress
CAPTCHA 4WP in the WordPress plugin repository
Close

Installing CAPTCHA 4WP Free

Well done you. You're one step closer to safeguarding your WordPress website from spam and automated attacks with CAPTCHA 4WP. You'll be able to effortlessly integrate CAPTCHA into your forms and enjoy a website with enhanced security.


Below are two ways to install CAPTCHA 4WP on your website:

Go to your plugin dashboard on your site, then go to "Add New", and then search for CAPTCHA 4WP.

Download the CAPTCHA 4WP plugin zip, then select upload in your plugin dashboard under "Add New".

OPTION 1

OPTION 2

Uploading WP Activity Log as a zip file in WordPress
WP Activity Log in the WordPress plugin repository
Close

Installing WP Activity Log Free on your website

You deserve a pat on the back for choosing to record user actions and changes on your website. That is the first step towards better user accountability, easier troubleshooting of website security, and many other benefits of issues.


Below are the two ways to install WP Activity Log on your website:

Go to your plugin dashboard on your site, then go to "Add New" and then search for WP Activity Log.

Download the WP Activity Log plugin zip, then select upload in your plugin dashboard under "Add New".

OPTION 1

OPTION 2

Uploading WP 2FA as a zip file in WordPress
WP 2FA in the WordPress plugin repository
Close

Installing WP 2FA Free

Congratulations on taking the first step towards enhancing your WordPress site's security with WP 2FA Free! You're now on your way to protecting your valuable data and ensuring peace of mind. No coding or technical knowledge is required.


Below are two ways to install WP 2FA on your website:

Go to your plugin dashboard on your site, then go to "Add New", and then search for WP 2FA.

Download the WP 2FA plugin zip, then select upload in your plugin dashboard under "Add New".

OPTION 1

OPTION 2