Search for answers or browse our knowledge base.
Configuring the WordPress file changes warnings in the activity log
WP Activity Log uses the Website File Changes Monitor plugin to detect and keep a log of file changes in the WordPress activity log. It is a free plugin developed by us. It is a dedicated file integrity monitor plugin for WordPress.
This document explains in detail how to use both plugins to detect file changes and keep a log of them in the WordPress activity log. It also explains how to configure email and SMS notifications for when file changes occur.
Detecting website file changes and keeping a log in the activity log
If you want to detect and keep a log of website file changes in the activity log, follow these steps:
- Navigate to the Enable/Disable events in the plugin menu.
- Click the File Changes tab.
- Click on Install plugin now.

This will automatically download and install the Website File Changes Monitor plugin on your WordPress website. Refer to this getting started guide for Website File Changes Monitor for information on how to schedule the scans and configure the basic settings.
File changes information in the activity logs
With both plugins installed, the WP Activity Log plugin keeps a record in the activity logs whenever there are file changes. It also keeps a record when a scan starts or stops.

Click on Review Changes to see the details of the file change in the Website File Changes Monitor plugin.

Activity log event IDs for file changes
The event IDs used to keep a log of file integrity monitoring scans and file changes in the WordPress activity log are:
- 6028: the content of some files have changed
- 6029: file(s) have been added to the website
- 6030: file(s) have been deleted from the website
- 6031: file(s) cannot be scanned because it is bigger than the maximum file size limit
- 6032: file integrity scan stopped due to the limit of 200,000 files
- 6033: file integrity scan has started / stopped

If you do not want to keep a log of a specific change, you can disable any of these events from the Enable/Disable Events section, in the File Changes tab. For more information on the different event IDs refer to the list of event IDs in the WordPress activity log.
Get alerted via Email or SMS of important site file changes
When using WP Activity Log and Website File Changes Monitor you can configure email and SMS notifications for when there are file changes on your website. Let’s assume you want to receive an email whenever there are any type of file changes. You also want to receive an SMS message when existing files are modified. Below is an example explanation of how you can achieve this.
Get an email notification for any file change
The plugin keeps a record of file changes with event IDs 6028, 6029, and 6030. To receive an email notification for when any of the above are reported:
- Navigate to the Notifications section in the plugin menu,
- click the Custom Notifications tab and click Add New,
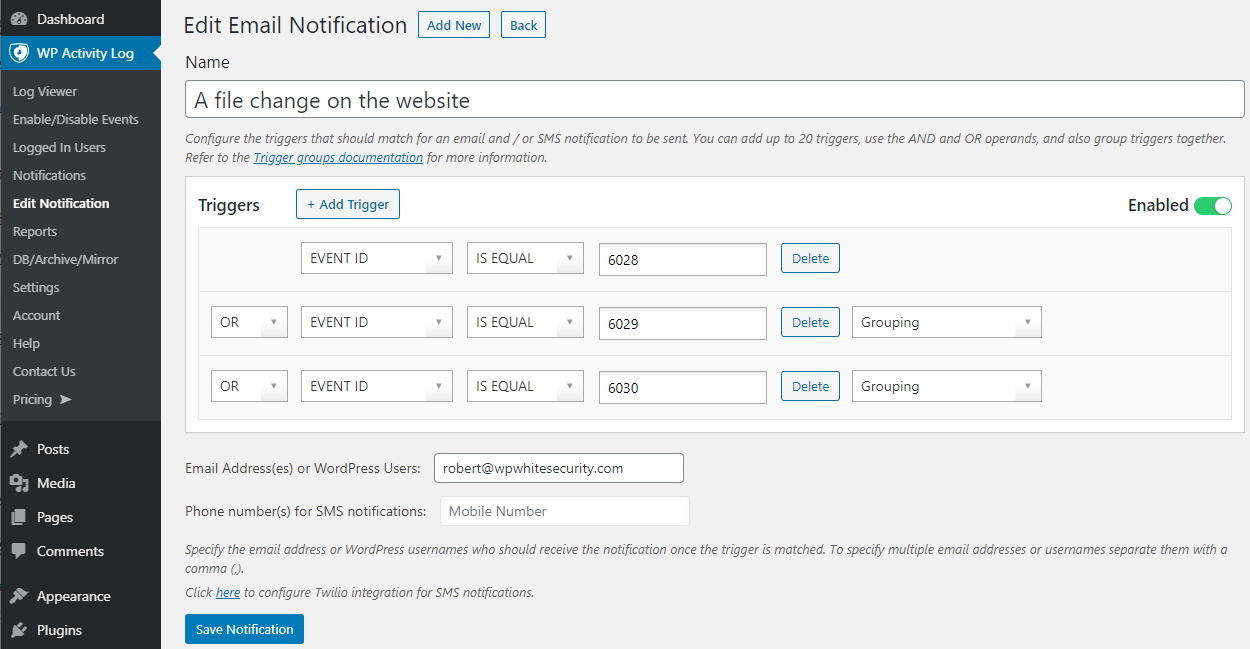
- Specify a title, add an email address, and add the below trigger:
(EVENT ID IS EQUAL 6028) OR (IF EVENT ID IS EQUAL 6029) OR (IF EVENT ID IS EQUAL 6030)
Below is a screenshot of how this custom notification should look when configured in the plugin. The next time any of these event IDs are reported in the WordPress activity log, you will receive an email notification with all the details.

Refer to the getting started with email and SMS notifications for WordPress for more details on how to setup triggers etc.
Get an instant SMS message when files are changed
Files on a WordPress website only change when a theme, plugin or WordPress core are updated. So it is a good idea to setup a SMS notification for when existing files are changed. Better safe than sorry!
The process is very similar to email notifications; you have to create a custom notification. However, the rule is a bit different and you specify a phone number instead of an email address. Here is how you can do it:
- Navigate to the Notifications section in the plugin menu,
- Click the Custom Notifications tab and click Add New,
- Specify a title, add a phone number, and add the below trigger:
IF EVENT ID IS EQUAL 6028
The next time event ID 6028 is reported in the WordPress activity log, you will receive an SMS notification.

Refer to the SMS notifications for WordPress administrators guide for more details on how to setup the SMS carrier and other SMS notifications examples.
