



Updated on 19 February, 2025 by Brenda Barron
What is the wp-config.php file? – Everything You Need To Know
The wp-config.php file contains the configuration information required to make WordPress work. As the name suggests, it’s written in PHP – the language that WordPress is built on.
The file is automatically generated when you install WordPress. However, it can be edited at any point. While you’re not always required to access or edit the file when managing your WordPress website, you may need to do so in certain circumstances.
In this post, we’ll cover everything you need to know about managing the wp-config.php file, from the way the file is structured and where it’s located to access tips and editing advice.
Note: If you’re going to edit the file for any reason, make sure you take a backup first.
Table of contents
What is the wp-config.php file used for?
The wp-config file is used for configuring different aspects of WordPress. It contains important information like database connection information, meaning that securing this file and its data is crucial for maintaining strong WordPress database security.
There are many modifications you can make to wp-config, many of which aren’t necessary for most websites. Having said that, there’s quite a lot you can configure through wp-config. And while some changes can be handled through the WordPress dashboard, others are managed through code.
Settings and options that can be configured through wp-config fall into several categories, including:
Database settings
Site URLs and folder paths
Security keys and salts
Advanced options
Let’s take a look at each of these categories in more detail now.
Database settings
One of the most critical roles of the wp-config.php file is to connect your WordPress site to its database. This connection is the foundation of WordPress. The database is where site content like posts, pages, user information, and settings is stored. The file includes the following database-related settings:
Database name (DB_NAME): Identifies which database WordPress will use. Each WordPress installation needs its own unique database name.
Database username and password (DB_USER and DB_PASSWORD): Provides secure access credentials for WordPress to interact with the database.
Database host (DB_HOST): Specifies the web server where the database resides. Most hosts use localhost, but external database setups may require a specific address.
Database character set (DB_CHARSET) and collation (DB_COLLATE): Defines how text is stored and sorted within the database. This ensures compatibility for multilingual sites and special characters.
Security keys and salts: Protect data stored in cookies by hashing it. These keys reduce vulnerabilities by making it harder for attackers to decipher sensitive information.
Without these settings, WordPress can’t communicate with the database, rendering your site inoperable.
Defining site URLs and folder paths
The wp-config.php file also allows you to manually define your site’s URLs and the locations of critical directories. This is useful when migrating a site or customizing its structure:
Site and home URLs (WP_SITEURL and WP_HOME): Specify the primary web addresses for the site and WordPress installation. Hardcoding these values can sometimes resolve issues related to broken links or migrations.
Custom folder locations: Define alternative paths for wp-content, plugins, themes, and uploads folders. This level of customization helps developers who want to separate core files from user-generated content. Or, if they want to optimize directory organization.
These settings ensure consistency and flexibility, especially for non-standard installations.
Managing security keys and salts
WordPress generates eight unique keys and salts that strengthen the security for user sessions and stored data:
Keys (AUTH_KEY, SECURE_AUTH_KEY, LOGGED_IN_KEY, etc.): Used to sign and hash cookies.
Salts (AUTH_SALT, SECURE_AUTH_SALT, etc.): Add randomness to the hashing process, making it nearly impossible for hackers to guess stored values.
You can generate fresh keys and salts using the WordPress Salt Generator. Updating these periodically is a best practice for maintaining strong site security.

Enabling advanced features
The wp-config.php file also supports advanced configurations that can significantly enhance your site’s performance, usability, and security. Below are some of the most common advanced settings:
Error logging and debugging: Enable debugging features (WP_DEBUG, WP_DEBUG_LOG, and WP_DEBUG_DISPLAY) to log and display errors, making it easier to troubleshoot issues during development.
Environment types: You can use this file to set the environment type your site uses too (WP_ENVIRONMENT_TYPE), like local, development, staging, or production. This makes it so developers can create workflows that work with specific environments.
Memory limits (WP_MEMORY_LIMIT): Adjust the PHP memory limit allocation to handle resource-intensive tasks or high-traffic sites.
Autosave intervals (AUTOSAVE_INTERVAL): Control how frequently WordPress autosaves drafts, reducing the risk of data loss during content creation.
Post revisions (WP_POST_REVISIONS): Limit or disable the number of post revisions stored in the database to improve performance and database efficiency.
Automatic updates: Configure update preferences (WP_AUTO_UPDATE_CORE) for WordPress core, plugins, and themes, either enabling or disabling them as needed.
Cron jobs: Manage scheduled tasks by enabling or disabling WordPress Cron jobs (DISABLE_WP_CRON).
SSL requirements: Force SSL for login and admin areas (FORCE_SSL_ADMIN) to enhance security on sites handling sensitive data.
These features cater to developers and administrators managing complex sites or addressing specific use cases that exceed the default capabilities of the WordPress dashboard.
Where is wp-config.php located?
The wp-config.php file is typically found in the root directory of your WordPress installation. This is the main folder where all the core WordPress files, such as wp-content, wp-includes, and wp-admin, are stored. In most hosting environments, the root directory is labeled public_html, though it may also appear as www or htdocs depending on your hosting setup.

For example:
cPanel-based hosting: The root directory is generally inside the public_html folder.
Plesk or other custom panels: The location may vary but often defaults to folders like httpdocs or a specific site directory.
Local development setups: The root folder is usually defined during installation, often named wordpress or something custom, depending on your preferences.
If you have installed WordPress in a subdirectory, like in a folder called blog, the wp-config.php file will typically be inside that subdirectory instead.
Why might the file be hidden?
In many hosting setups, system files like wp-config.php are hidden by default to prevent accidental deletion or modification. If you don’t see the file in your root directory, you may need to enable hidden files in your file manager.
Here’s how to enable hidden files in some common hosting environments:
In cPanel File Manager
Log in to your hosting account and access the File Manager.
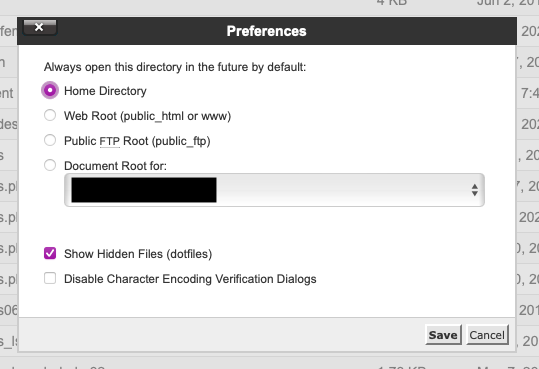
Click the Settings button (usually in the top-right corner).
Check the box for Show Hidden Files (dotfiles) and click Save.
In FTP clients like FileZilla
Open your FTP client and connect to your server.
Look for a Show hidden files option in the settings or preferences menu.
Enable the option to make hidden files, like wp-config.php, visible.
How to access and edit wp-config.php safely
Accessing the wp-config.php file is essential for making advanced WordPress configurations. Depending on your hosting setup, there are several ways to locate and edit this file. Below, we’ll talk about the tools you need and offer step-by-step instructions for accessing this file using cPanel, FTP, or SSH. Then, we’ll offer editing tips, and common mistakes to avoid.
Note: No matter which approach you take, it must be done with care. A single mistake can cause your website to break. Following safe practices matters.
Assemble the required tools
To edit wp-config.php, you’ll need the following tools:
Text editor: Use a code-friendly text editor like Notepad++, Sublime Text, or Visual Studio Code. Avoid using word processors like Microsoft Word, as they can introduce formatting issues. Avoid word processors like Microsoft Word, which can add unwanted formatting. Also, ensure your editor is set to use UTF-8 encoding without BOM (Byte Order Mark). Use the syntax highlighting provided in the aforementioned editors to spot errors more easily.
FTP client: Tools like FileZilla or Cyberduck to download and upload the file to your server.
Backup tool: A reliable backup plugin or hosting service feature to create a copy of your site.
Always back up before editing
Any errors in the wp-config.php file can make your site inaccessible. A backup ensures you can quickly restore the file if something goes wrong.
To do this, download a copy of the wp-config.php file via FTP, your hosting provider’s file manager, or SSH. Then, save the backup with a clear name, like wp-config-backup-YYYYMMDD.php.
Finally, use a full site backup tool, like UpdraftPlus or your hosting platform’s built-in backup feature, for added security.
Restrict file permissions
Restricting file permissions prevents unauthorized access or modification of wp-config.php. This protects sensitive data like database credentials and security keys.
For most servers, the default file permissions 400 (read-only for the owner) or 440 (read-only for the owner and group) are sufficient. For shared hosting, 440 is preferred to allow necessary server processes access without exposing the file to other users.
Secure the file location
Moving wp-config.php to a non-web-accessible location adds an extra layer of security, too. To relocate the file, move it to a directory outside the web root like:
/home/user/wp-config.phpThen, add this line to a new wp-config.php file in the root directory:
require_once( '/path/to/wp-config.php' );Accessing wp-config.php via cPanel
If your hosting plan/configuration includes cPanel, you can access the wp-config file through the File Manager, too. To do this, complete the following steps:
1. Log in to cPanel
Go to your hosting provider’s cPanel URL (usually found in your welcome email).
2. Open the File Manager
Under the Files section, click on File Manager.
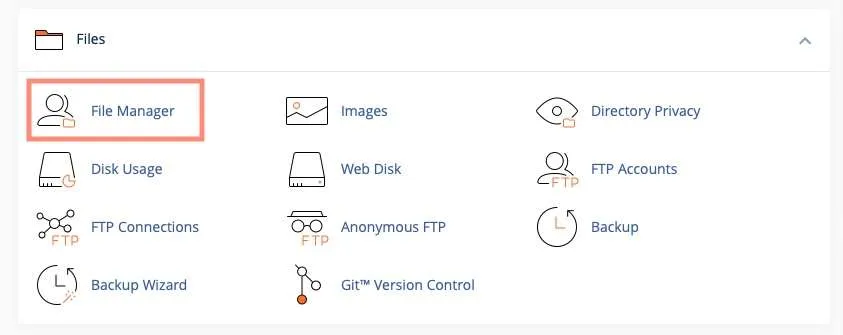
3. Go to the root directory
In the left-hand directory tree, locate public_html (or the folder containing your WordPress installation).

4. Locate the wp-config.php file
Scroll through the directory until you find the wp-config PHP file.
5. Edit or download the file
Right-click on the file and select Edit to make changes directly in the cPanel editor.
Alternatively, click Download to save a backup before editing.

Accessing wp-config.php via FTP/SFTP
Another easy way to access the wp-config.php file is through FTP/SFTP. Your hosting service provider will provide the connection details. You’ll need an FTP client such as FileZilla. However, some hosting providers offer a web-based interface that’ll allow you to connect just the same.
You should find the wp-config file in the WordPress root directory, typically the public_html folder. Here’s how to do it:
1. Download an FTP client
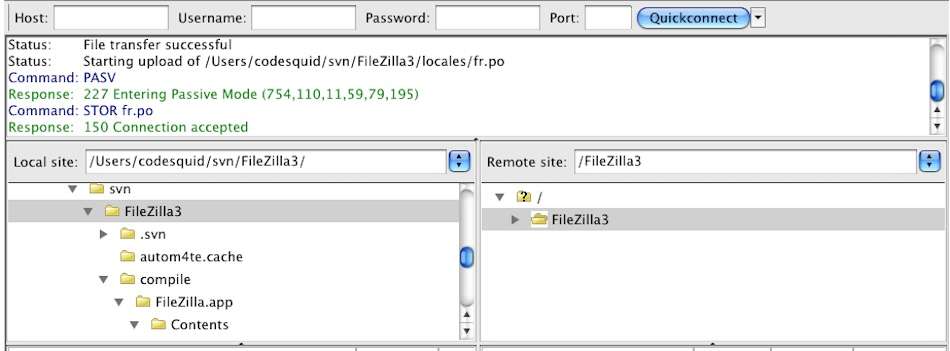
Install a tool like FileZilla or Cyberduck if you don’t already have one.
2. Get your FTP credentials
Log in to your hosting control panel.
Look for FTP account settings or access details (these usually include a hostname, username, password, and port number).
3. Connect to your server
Open your FTP client and enter the hostname (usually something like ftp.example.com), username, and password.
For SFTP, ensure the connection type is set to “SFTP” and enter the appropriate port (default is usually 22).
4. Navigate to the root directory
Once connected, go to the public_html folder (or a similar root directory, depending on your host).
Look for the wp-config.php file.

5. Download or edit the file
Right-click the file and choose Download to save a backup before making changes.
Use the FTP client’s built-in editor or open the file in a text editor like Notepad++ or Visual Studio Code for edits.
Accessing wp-config.php via SSH
SSH is another popular option; however, this requires some knowledge of the OS (Operating System) on which the webserver is running. Your hosting service provider will also provide your connection details.
1. Get your SSH credentials
Log in to your hosting control panel and retrieve your SSH access details (username, password, and port).
2. Install an SSH client
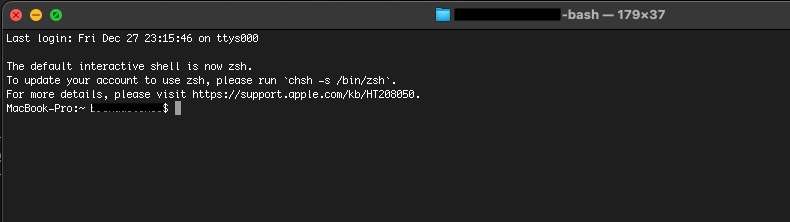
For Windows, use a tool like PuTTY. On macOS and Linux, use the built-in terminal.
3. Connect to your server
Open your SSH client and enter the following command:
ssh username@hostname -p portReplace username, hostname, and port with your specific details.
4. Navigate to the root directory
Use the cd command to navigate to the WordPress installation directory.
For example:
cd /var/www/htmlor
cd public_html5. Edit the file
Open the wp-config.php file using a command-line text editor such as Nano or Vim:
nano wp-config.phpMake your changes, save the file, and exit the editor.
No matter the method you choose to access the config file, you’ll then need to re-upload the changed file.
Common mistakes to avoid
Sometimes this process doesn’t go as planned. But some issues are preventable. Here are some common mistakes people make when updating wp-config.php and how to avoid them:
Syntax errors: Missing semicolons (;) or mismatched quotes can break the file. Always review changes carefully before saving.
Encoding issues: Ensure the file is saved with UTF-8 encoding without BOM to prevent errors.
Accidental deletions: Avoid removing any existing lines unless explicitly required.
Skipping backups: Always back up the file to quickly revert if needed.
By following these steps and avoiding common pitfalls, you can safely edit the wp-config.php file without risking disruptions to your WordPress site.
The structure of wp-config.php and ways to edit the file
The wp-config.php file is a core part of every WordPress installation, acting as the blueprint for your site’s configuration. It’s written in PHP, the same programming language WordPress is built on, and defines critical settings like database access, security keys, and debugging options. Understanding its structure is essential for safe and effective edits.
Below is a breakdown of the file’s key sections
1. PHP opening tag
The file begins with <?php, signaling that the code within is written in PHP.
This tag must not have any whitespace or characters before it, as they could cause errors.
2. Comments
Explanatory comments are placed throughout the file to describe each configuration option.
Comments begin with /** or // and are ignored by the server.
3. Database settings
These configurations enable WordPress to connect to its database. They must be accurate for your site to function.
Essential note: Changing the value of a database setting only changes the setting and not the actual value of the resource. For example, changing the database name in wp-config DOES NOT change the actual database name that WordPress uses. It merely tells WordPress to look for a database with such a name (as defined in wp-config) when looking to save or read database data.
As such, if you’re planning on changing any of the database settings, keep in mind that you’ll need to make changes to the wp-config file and the WordPress database itself.
With this in mind, here are some things you can change in wp-config related to the WordPress database:
Database name
The database name setting allows us to set the database name in which WordPress stores its tables and data. This is set during installation.
/** The name of the database for WordPress */
define( 'DB_NAME', 'database_name_here' );
Database username
The database username tells WordPress which username to use when connecting to the database
/** Database username */
define( 'DB_USER', 'username_here' );
Database password
The database password tells WordPress which password to use in conjunction with the database username to access the database
/** Database password */
define( 'DB_PASSWORD', 'password_here' );
The database hostname tells WordPress where (on which server) the database is hosted.
/** Database hostname */
define( 'DB_HOST', 'localhost' );
Database charset
The database charset tells WordPress which character set to use when saving data to the database and reading data from the database. By default, this is set to UTF8, which has been the standard of choice since WordPress version 2.2.
/** Database charset to use in creating database tables. */
define( 'DB_CHARSET', 'utf8' );
Database collate type
The database collation defines the character set and the sort order used when it comes to sorting and comparison. By default, this is left empty, which allows the MySQL (or MariaDB) server to assign the value.
/** The database collate type. Don’t change this if in doubt. */
define( 'DB_COLLATE', '' );
4. Security keys and salts
Paying attention to security ensures a healthy and thriving WordPress. To this end, you’ll find a number of WordPress security settings and configurations in the wp-config file, including security keys and salts, which These keys are critical for securing user sessions and data.
Here’s what some of them do:
AUTH_KEY and AUTH_SALT: Authorizes the user to sign in to WordPress and make changes using an unsecured connection (no SSL)
SECURE_AUTH_KEY and SECURE_AUTH_SALT: Authorizes the user to sign in to WordPress and make changes using a secured connection (SSL)
LOGGED_IN_KEY and LOGGED_IN_SALT: Authorizes the user to sign in to WordPress but cannot make changes
NONCE_KEY and NONCE_SALT: Signs the nonce (number used once), preventing replay attacks
Each key should have a unique, random value.
define( 'AUTH_KEY', 'unique_phrase_here' );
define( 'SECURE_AUTH_KEY', 'unique_phrase_here' );
define( 'LOGGED_IN_KEY', 'unique_phrase_here' );
define( 'NONCE_KEY', 'unique_phrase_here' );
define( 'AUTH_SALT', 'unique_phrase_here' );
define( 'SECURE_AUTH_SALT', 'unique_phrase_here' );
define( 'LOGGED_IN_SALT', 'unique_phrase_here' );
define( 'NONCE_SALT', 'unique_phrase_here' );
SSL
Using an SSL/TLS certificate on WordPress (HTTPS) is one of the most basic security measures you can take. It encrypts all data between your website and visitors and will even boost your SEO efforts.
Enabling this setting forces WordPress to use SSL to secure logins and the WordPress admin area. Keep in mind that the SSL certificate needs to be configured already.
Setting to edit:
define( ‘FORCE_SSL_ADMIN’, true );5. Table prefix
Defines a unique prefix for database tables. This can improve security and allow multiple installations within one database.
Changing the database table prefix often comes up as a security measure you can take to minimize risks. It’s often recommended as a good security practice. Everyone knows the default table prefix, which can leave you open to certain vulnerabilities.
The table prefix is set during the initial WordPress installation process. While it can be changed once WordPress is up and running, it is not a matter of just updating the wp-config file with a new value – you also need to manually rename the tables in the MySQL database.
Alternatively, you can use a plugin to help you accomplish this; however, proceed with caution – our research shows that most of these plugins have not been updated in a very long time.
$table_prefix = 'wp_';6. Debugging and development settings
Used to enable error reporting during development. It’s recommended to set WP_DEBUG to false in production environments.
The WordPress debugging tool is a useful tool used to troubleshoot WordPress issues. The tool includes four different settings that enable debugging, logging, and error display.
By default, these are set to false. You’ll need to change this to true to enable debugging. Remember to change it back to false once you’re done debugging.
define( ‘WP_DISABLE_FATAL_ERROR_HANDLER’, true ); // 5.2 and later
define( ‘WP_DEBUG’, true );
define( ‘WP_DEBUG_LOG’, true );
define( ‘WP_DEBUG_DISPLAY’, false );
Script debug
When enabled, script debug loads what WordPress.org refers to as the “dev versions” of CSS (Cascading StyleSheets) and JS (JavaScript) files.
This can be useful when testing changes to default versions of JS or CSS files.
By default, this is set to false
define( ‘SCRIPT_DEBUG’, true );SAVEQUERIES
When enabled, SAVEQUERIES saves all database queries, including execution time and function that calls it to an array, stored in $wpdb->queries. By default this is set to false.
define( ‘SAVEQUERIES’, true );7. WordPress updates
WordPress updates are a critical component of the WordPress ecosystem. WordPress receives updates that add new features, update existing ones, and fix bugs. These updates also patch security holes that might be present. Updates are so crucial that WordPress offers an automatic updates option to ensure you’re always running the latest version.
Disable automatic updates
If you have a policy of testing updates in a staging environment before rolling them out to production, you may want to disable automatic updates on the production WordPress altogether.
define( ‘AUTOMATIC_UPDATER_DISABLED’, true );Configure updates
You can also choose which updates are rolled out automatically and which ones are not.
define( ‘WP_AUTO_UPDATE_CORE’, true );If you set the value to true, all updates will be enabled
If you set the value to false, all updates are disabled
If you set the value to minor, only minor updates are enabled
8. Absolute path and WordPress file system
The WordPress file system stores essential data. This includes the code of the WordPress core, themes, plugins, and uploads. Files are stored in specific locations, which are configured in the wp-config file. As such, it’s entirely possible to move them, then configure the new locations in wp-config so WordPress knows where to find them.
Do keep in mind that changing values here will not automatically move the files and folders — you’ll need to do this manually.
Absolute path
Sets the directory path for WordPress and includes the core configuration file.
/** Absolute path to the WordPress directory. */
if ( ! defined( 'ABSPATH' ) ) {
    define( 'ABSPATH', DIR . '/' );
}
/** Sets up WordPress vars and included files. */
require_once ABSPATH . 'wp-settings.php';
wp-content folder
define( ‘WP_CONTENT_DIR’, dirname(__FILE__) . ‘/blog/wp-content’ );
define( ‘WP_CONTENT_URL’, ‘http://example/blog/wp-content’ );
Plugins folder
define( ‘WP_PLUGIN_DIR’, dirname(__FILE__) . ‘/blog/wp-content/plugins’ );
define( ‘WP_PLUGIN_URL’, ‘http://example/blog/wp-content/plugins’ );
define( ‘PLUGINDIR’, dirname(__FILE__) . ‘/blog/wp-content/plugins’ );
Uploads folder
define( ‘UPLOADS’, ‘blog/wp-content/uploads’ );The themes folder can’t be moved since its path is hardcoded. However, you can create and register a secondary themes folder through the register_theme_directory function.
9. Content
Content is at the heart of WordPress websites. With WordPress itself being a Content Management System (CMS), there are a number of content-related settings that can be configured through wp-admin. These include:
Autosave
Allows you to set how often WordPress autosaves a post. Value indications interval in seconds. The default value is 60 seconds.
define( ‘AUTOSAVE_INTERVAL’, 60 );Post revisions
WordPress automatically keeps a record of posts revisions. This setting can be disabled so no revisions are kept. You can also specify the maximum number of revisions WordPress should keep for a given post.
define( ‘WP_POST_REVISIONS’, true);
define( ‘WP_POST_REVISIONS’, 3 );
10. Memory limit
WordPress uses PHP memory allocation to run. By default, WordPress will try to allocate 40MB in the case of a single site and 64MB in the case of a multisite. Should WordPress run out of memory, you’ll see an “Allowed memory size of x bytes exhausted” message. In such cases, you may want to increase the memory limit.
Keep in mind that hosting providers may put limits on how much memory you can allocate. In the example below, we will allocate 64MB of memory.
define( ‘WP_MEMORY_LIMIT’, ’64M’ );Advanced configurations for wp-config.php
Beyond its core settings, the wp-config.php file supports advanced configurations. These changes allow developers and site administrators to unlock additional features and customize WordPress to specific needs. These less common but highly powerful configurations include managing cron jobs, enabling multisite setups, and defining environment types.
Below is a detailed look at these advanced options and how to use them effectively.
1. Cron jobs and timeouts
WordPress relies on a built-in system called WP-Cron to schedule tasks like publishing scheduled posts, checking for updates, or clearing expired transients. However, the default behavior can sometimes be inefficient on high-traffic sites or when external cron services are preferred. The wp-config.php file provides options to manage or disable WP-Cron and set timeouts.
Disable WP-Cron
If you prefer using a server-level cron job for better reliability, you can disable WP-Cron
define( 'DISABLE_WP_CRON', true );After disabling WP-Cron, you’ll need to set up a system cron job via your hosting provider or server panel.
Set WP-Cron timeout
Adjust the timeout for cron jobs to prevent long-running tasks from stalling.
define( 'ALTERNATE_WP_CRON', true );2. Multisite setups
The wp-config.php file is central to enabling and managing WordPress multisite as well. This is useful for networks of blogs, agencies managing multiple client sites, or businesses with subdomains for various departments.
Enable multisite
You can enable multisite functionality with wp-config, too.
define( 'WP_ALLOW_MULTISITE', true );After adding this, log in to your WordPress dashboard and go to Tools > Network Setup to configure the network.
Domain mapping (for subdomains or subdirectories)
You can also set domain mapping specifics for your multisite setup.
define( 'MULTISITE', true );
define( 'SUBDOMAIN_INSTALL', true );
define( 'DOMAIN_CURRENT_SITE', 'example.com' );
define( 'PATH_CURRENT_SITE', '/' );
define( 'SITE_ID_CURRENT_SITE', 1 );
define( 'BLOG_ID_CURRENT_SITE', 1 );
3. Environment types
Defining environment types in wp-config.php helps you manage different stages of your website, such as local development, staging, and production. Environment-specific settings allow developers to implement workflows for each stage.
Set the environment type
WordPress includes a built-in constant for defining environment types. Add this line to specify the type of environment.
Setting to edit:
define( 'WP_ENVIRONMENT_TYPE', 'development' );Supported values include:
development
staging
production
wp-config.php – A file worth knowing
The wp-config.php file is truly worth exploring. It lets you configure several different aspects of WordPress. And, it gives a fine degree of flexibility and control over the configuration and behavior of your website.
It’s important to always refer to WordPress.org’s official documentation before making any changes. When in doubt, remember to take a backup and, if possible, test out any changes you’re planning to make on a staging server first. This will help you ensure that changes don’t cause issues. Otherwise, with the knowledge acquired here, you can get wp-config to work for you!