phpMyAdmin is a useful tool that many WordPress administrators depend on for carrying out database tasks. Its popularity makes it ubiquitous, and it offers excellent flexibility and a short learning curve. This article will take a hard look at phpMyAdmin from the WordPress point of view, including how it works, available installation options, and basic navigation.
Table of contents
What is phpMyAdmin?
phpMyAdmin is a GUI web application (Graphical User Interface) that allows you to access and work on MySQL-based databases. Having a GUI can make it easier to manage MySQL databases and access stored data if you’re unfamiliar with the CLI (Command Line Interface). While professionals and enthusiasts often prefer the CLI due to its flexibility, it can be daunting to those who do not regularly work on databases – this is the problem that phpMyAdmin seeks to address.
How does phpMyAdmin work?
phpMyAdmin is a free software tool written in PHP, used to manage MySQL databases. It should be noted at this point that it also works for MariaDB, so if you are running this RDBMS flavor of my SQL, it will work just as well.
Now, phpMyAdmin is a web application, which means it runs as a website. As such, you need to have a web server running on whichever machine you want to install phpMyAdmin on and access it through a web browser. In most cases, it is installed on the same server as the database is on; however, this does not necessarily have to be the case (more on this later).
Once installed, phpMyAdmin will connect to the RDBMS and display all available databases and tables. The user account used to log in to phpMyAdmin may limit which databases and tables you see. Assuming your MySQL user account has the proper privileges, you will also be able to access the WordPress database.
Important note 1: phpMyAdmin uses MySQL user accounts and not WordPress accounts.
Important note 2: While you shouldn’t be scared to access the database, do proceed with caution. WordPress depends heavily on its database; any adverse adjustments can break your WordPress site. Always take a backup before making any adjustments, even if you’re very confident in what you’re doing.
phpMyAdmin requirements
phpMyAdmin has very few requirements, which are easy enough to meet. As mentioned earlier, you will need a web server on which PHP must be installed. This is important since phpMyAdmin requires PHP to function – hence the name. The good news is that WordPress also uses PHP; hence, if you already have WordPress installed, you have nothing to worry about.
Of course, phpMyAdmin also needs a MySQL database to connect to. As of the time of writing, phpMyAdmin supports both MySQL and MariaDB.
Lastly, you will need a web browser to connect to and use phpMyAdmin.
Speaking of requirements, as we shall shortly see, phpMyAdmin can be installed in a few different ways. As such, the requirements (and installation procedure) may vary depending on how you install phpMyAdmin.
What are the benefits of using phpMyAdmin for WordPress?
As previously mentioned, phpMyAdmin provides a graphical user interface for MySQL. This makes it much easier to carry out database tasks. It also acts as a visual aid – something that the command line interface tends to struggle with. This can be especially beneficial when running complex queries and viewing a database layout.
While MySQL is a relatively simple language to learn and use, unless you use it often, you’ll likely forget some of the commands you would typically need to use. phpMyAdmin alleviates that pressure through a graphical user interface that’s more intuitive to use.
Even so, a good understanding of databases and MySQL is still required to operate the software. You should also have a good understanding of the WordPress database schema and how database tables are structured.
Are there any downsides?
It’s important to preface this question by stating that phpMyAdmin is widely used and is akin to a database access standard. It is fully open-source, well-maintained, and generally safe to use for managing databases. Even so, phpMyAdmin can add another attack vector to your WordPress server, which increases the attack surface area. There are ways around this, which we will get to in the next section.
How to find phpMyAdmin
You may or may not already have phpMyAdmin installed. The easiest way to find out is to open a browser and type your IP address or domain name, followed by /phpmyadmin so that it reads https://myipaddress/phpmyadmin.If you get the phpMyAdmin login screen, you have phpMyAdmin installed. Otherwise, you might want to confirm with your administrator or hosting provider since the URL might be different.
If you have cPanel, you might also find a link to phpMyAdmin there. In the next section, we will look at the different ways you can install phpMyAdmin, depending on your WordPress hosting configuration.
Managed WordPress
Managed WordPress environments are typically closed environments in which the hosting provider takes care of the entire infrastructure backend. As such, it is up to the service provider to include (or not include) phpMyAdmin in such scenarios. Check any documentation the hosting provider might have provided you with during sign-up to see whether phpMyAdmin is included in your setup.
Hosted WordPress
If you have a hosting plan, there are a couple of ways you can determine whether you have phpMyAdmin installed or not. If your account comes with access to CPanel, you should easily be able to check from the dashboard. Alternatively, you can SSH into your server and check your webserver’s configuration files.
I can’t find phpMyAdmin – what do I do?
If you did not find phpMyAdmin, you might first want to contact your WordPress hosting company and ask them whether this is available. If not, there are a few ways you can install it. This is precisely what we will cover next – looking at different ways that require varying degrees of technical experience while covering different setup configurations.
How to install phpMyAdmin
Installing phpMyAdmin can be easy or not-so-easy, depending on which route you decide to take. To help you make the best decision, we have included a technical experience meter, as well as the pros, cons, and major considerations you should take into account.
One thing to keep in mind is that each setup is different, and no one procedure can cover all setups. As such, it is important to never make changes to your live WordPress website but start with a WordPress staging environment first.
Install a plugin
- Technical experience required: 1/3
- Pros: Easy to install
- Cons: Less secure than the other methods
Installing a WordPress plugin is one of the easiest ways to get access to phpMyAdmin. Different plugins can work in different ways; however, our research has come across at least one plugin that uses the actual phpMyAdmin code. What this means is that for all intents and purposes, you get the real thing, with the plugin itself acting as a wrapper that allows phpMyAdmin itself to be installed in the plugin folder instead of the web server directory.
This interesting implementation makes for a neat workaround if you are unable to install phpMyAdmin directly. The developer does remove some files to make the installation file compact enough to be installed as a plugin; however, this should not affect operations.
It is advisable to enable the plugin from the WordPress dashboard when you need to use phpMyAdmin and disable it as soon as you are done. This is something important to keep in mind should you decide to go down this route.
Considerations: You must remember to keep the plugin updated at all times – which should be the case with all plugins. Ensure you choose a reputable developer who issues frequent plugin updates to limit risks.
Install locally on the WordPress database server
- Technical experience required: 2/3
- Pros: Fairly straightforward to install
- Cons: Adds an attack vector to your WordPress server
If you have SSH access to the WordPress server, you should be able to install phpMyAdmin yourself very easily. The actual procedure and commands will vary depending on the server setup and Operating System/distro, which makes it difficult to cover in detail here. Either way, you should be able to find plenty of step-by-step tutorials online.
This method is by far the more conventional method and the accepted standard way, if you will, of installing phpMyAdmin. You will need access to an admin user or root account on the server.
Considerations: If you’re installing on the same server as the one you have WordPress on, you will need to ensure that the web server’s configuration allows for both sites. In Apache, this means you may need to adjust the virtual hosts file in the sites-available directory. The exact procedure may vary depending on the specifics of your setup.
Install remotely on any machine
- Technical experience required: 3/3
- Pros: Reduced WordPress server attack vectors
- Cons: Requires additional technical expertise
One of the downsides of installing phpMyAdmin on your WordPress server is that it adds another attack vector to your server. While this can be considered an acceptable risk in most cases, in some scenarios where WordPress web server hardening has been undertaken, such a risk may not be permitted. Installing phpMyAdmin on a remote machine, say a local virtual machine, is one possibility.
This method requires additional steps, including amending the phpMyAdmin file to connect to a remote server and editing the MySQL/MariaDB bind address to accept remote connections. As such, a greater level of technical expertise is required to get this method to work.
Considerations: As mentioned earlier, this route may require additional configurations, including making adjustments to your firewall to allow remote connections. If you’ve never done this before, first try it in a staging environment and ensure you understand whatever changes you make since this can affect the operations and security of your website.
The basics of getting around phpMyAdmin
The most common way to access phpMyAdmin, is to type in the domain name followed by /phpmyadmin. This will bring up the login screen. Enter the username (sometimes followed by (at) localhost) and password to open phpMyAdmin.

You may need to edit the MySQL config file to allow remote connections. You’ll find this on the MySQL server. Look for the mysqld.cnf file and edit the bind-address.
Once you’ve successfully logged in, you’ll be taken to the home screen, where you’ll find shortcuts to the features and functions that phpMyAdmin has to offer.

If you have installed phpMyAdmin on a staging environment, make sure you take a backup before conducting any experiments. This will allow you to return to a fresh installation easily should you break anything critical. If you installed it directly on your live server, still take a backup, but proceed with extra caution.
Tip for beginners: Do not ‘drop’ databases unless you want to delete them. In MySQL, ‘drop’ is the equivalent of delete.
Where to find your WordPress database in phpMyAdmin
Once you log in on phpMyAdmin, look to the left-hand side column, where you’ll find a list of all databases your user account has access to.
Provided that you logged in with the right account, you should be able to see the WordPress database as shown below. This is known as the database name.
From here, you can either click on the + (plus) sign to view a summary of all tables within the WordPress database or click on WordPress to view all available tables in the main window.
WordPress database and tables
Once you click on WordPress, you will be able to see all available tables. At a minimum, you should be able to see all default WordPress tables, including:
- wp_commentmeta
- wp_comments
- wp_links
- wp_options
- wp_postmeta
- wp_posts
- wp_termmeta
- wp_terms
- wp_terms_relationships
- wp_term_taxonomy
- wp_usermera
- wp_users
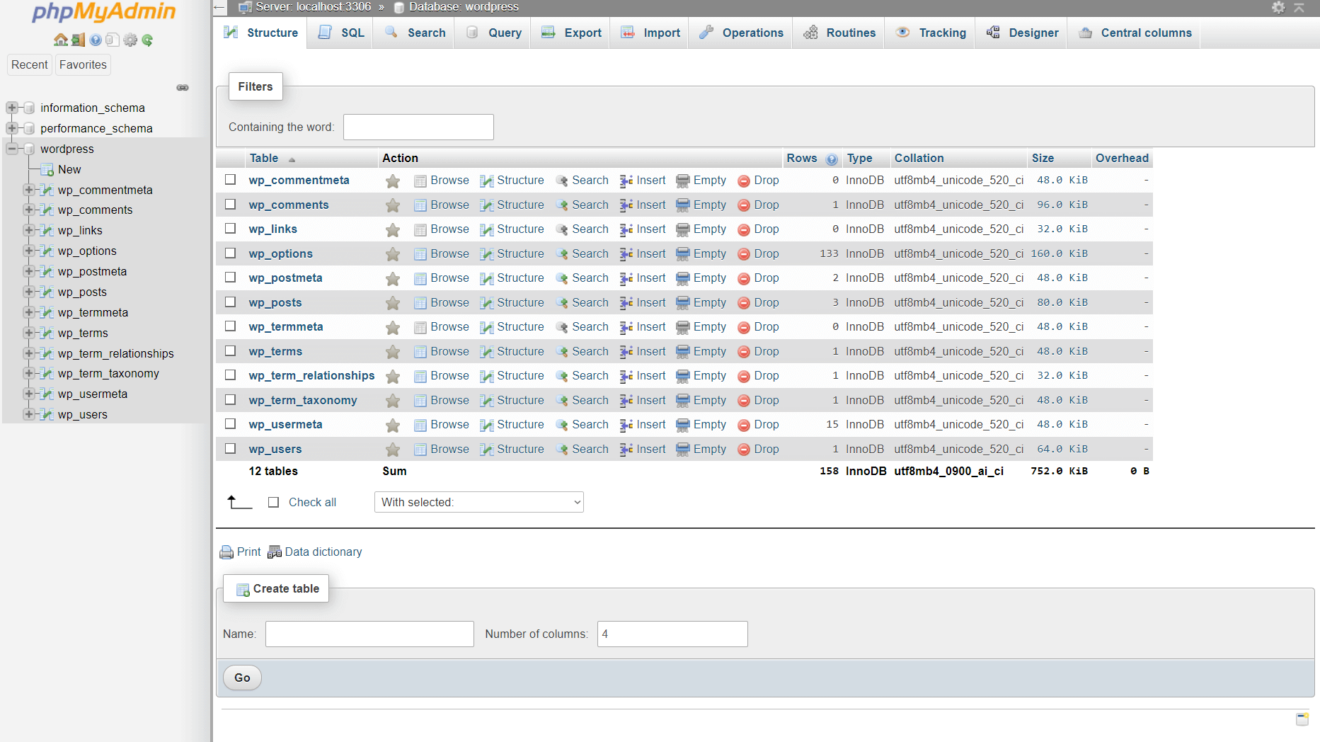
You’ll notice that each table starts with wp_. This is referred to as the table prefix. Some administrators choose to change the prefix for security purposes; however, you should be able to match the remainder of the name, even if you are using a different prefix.
You can click on any of the tables to view the data inside of it. In the screenshot below, we can see some of the data that resides in the wp_options table.

Right above the table, you will notice a yellow bar and a grey bar underneath it. These two bars give us some very interesting information.
The yellow bar shows us how many entries we have in the table (133 in this case) and how many of those entries we can see on our screen (24). On the other hand, the grey bar shows us the actual SQL statement phpMyAdmin ran to get us the data:
SELECT * FROM ‘wp_options’If we were to run this exact same command in the MySQL CLI, we would get the exact same result, albeit in a different presentation format. What this command, in particular, is telling MySQL is to select all entries from the wp_options table and show them to us.
As you can see, basic SQL commands are quite intuitive (and actually fun!).
You can just as easily search for specific data by using the filter check box. Just enter whatever keyword you want to search in the database in the Filters check box, then click the Go button at the bottom of the page.

Next, we’ll look at how easy it is to see the actual WordPress database data when using phpMyAdmin.
A closer look at database entries using phpMyAdmin
phpMyAdmin makes it very easy to view database entries. In the following example, we will look at one particular entry that will give us great insight into how the WordPress database works and how it relates to what we see in WordPress.
To keep things simple and as straightforward as possible, we will look at the wp_comments table. However, this applies to all WordPress database tables.
- Step 1: Click on the plus sign (+) next to WordPress from the left-hand database menu.
- Step 2: Click on the wp_comments table menu option
- Step 3: Click on the edit option under entry with comment_ID 1

This will allow us to view and edit the default WordPress comment that comes with any WordPress installation. If you are following this on an existing WordPress installation, the comment might not be available anymore. In such cases, click on any available comment – we will not be editing any data, so there is nothing to worry about it.
Once you click on Edit, phpMyAdmin will open that database entry, where we can see how WordPress stores comment data in the database.
As the screenshot below shows, you can see the comment author, date, approval, and the actual comment.

MySQL CLI comparison
In comparison, we could run the below comment in MySQL CLI:
USE wordpress;This tells MySQL that we want to use the WordPress table. Next, we can enter the following command:
SELECT * FROM wp_comments WHERE comment_ID =1;Which will give us the below result:

As the screenshot below shows, the MySQL CLI command returns the exact same data as phpMyAdmin, albeit in a less user-friendly format. And that is the power of phpMyAdmin for WordPress.
phpMyAdmin – a worthy and helpful tool
phpMyAdmin makes the data stored in the database more accessible through its user interface. While it’s not a requirement, it can be a welcome alternative to the often-cumbersome command-line interface that MySQL uses by default.
Get data on user and system activities by installing WP Activity Log – the most comprehensive activity log plugin available. It enables you to keep a record of what your users get up to on your WordPress websites. It also facilitates troubleshooting, compliance, user management, and overall security of your websites.
Frequently Asked Questions
WordPress does not use phpMyAdmin, which makes WordPress phpMyAdmin something of a misnomer. However, you can use phpMyAdmin to access the WordPress database and easily view tables such as the wp_users table, WooCommerce data, and anything else WordPress, plugins, and themes store in the database.
PHP is a scripting language, while phpMyAdmin is a web application. phpMyAdmin is written in PHP, which is also the scripting language used to write WordPress itself, as well as plugins and themes.
MySQL is an RDBMS, which stands for Relational DataBase Management System. While MySQL is often used to refer to the database, it is actually a system used to manage the database rather than the database itself. On the other hand, phpMyAdmin is a web application that gives MySQL a GUI (Graphical User Interface), making it easier to manage MySQL databases.
It depends on how phpMyAdmin is installed. If it’s installed as a plugin, you first need to log in to your WordPress admin account and then access it as you would any other plugin. If it’s installed on your web server, the process may differ depending on your web hosting provider; however typically involves typing in your URL, followed by ‘/phpmyadmin’. You may also be able to log in through CPanel if this has been made available to you.