


Updated on 7 July, 2025
Getting started with activity log notifications
The WP Activity Log Notifications module enables you to be instantly notified via SMS, email, or Slack of important and critical changes that happen on your WordPress sites and WordPress multisite networks.
WP Activity Log includes:
- Pre-configured notifications that can be enabled with just a click
- Custom WordPress notification triggers you can configure yourself using the included Query Builder
Table of contents
Getting familiar with WordPress notifications
First, navigate to WP Activity Log > Notifications. Here, you’ll find all pre-configured and custom notifications, as well as settings related to notifications.
If this is your first time visiting the Notifications section, you will get an alert to set up your notifications channel. We will cover this in the next section.

The Notifications menu is divided as follows:
- Activity log highlights: Send daily and weekly highlights emails
- WordPress notifications: Configure preset notifications related to WordPress themes, plugins, and suspicious activity
- Users notifications: Configure preset notifications related to user profiles and activity
- Content notifications: Configure preset notifications related to content
- WooCommerce notifications: Configure preset notifications related to WooCommerce
- Custom notifications: Configure custom notifications using the built-in query builder
- Settings: Configure notifications settings
Getting set up
Before we start configuring notifications, we need to ensure that the notifications channels, whether it’s email, SMS, or Slack, are correctly set up. To get started, head to the Settings tab, where we can configure various notification settings as follows:
Default email address, SMS number, and Slack channel
In this section, we will enter the default email, phone number, and Slack channel to which notifications will be sent.
Default email address(es): Enter the email address or addresses you want to send notifications to by default. This can be changed on a per-notification basis when setting up notifications.
Default phone number: Enter the phone number you want to send notifications to by default. This can be changed on a per-notification basis when setting up notifications. Do note that to send SMS notifications, you need to integrate WP Activity Log with Twilio.
Default channel name: Enter the default Slack channel name to which you would like to send notifications when integrating Slack. Do note that to send Slack notifications, you need to integrate WP Activity Log with Slack.
Twilio SMS account
WP Activity Log uses Twilio to send SMS notifications. To successfully integrate WP Activity Log with Twilio, we need to supply the Account SID, Auth token, and Twilio number/Alphanumeric ID.
Slack account
When configuring Slack notifications, you’ll need to enter the Slack bot token here.
Activity log highlights
Activity log highlights are summary-like emails sent daily or weekly. You can choose which highlights are included in the email, ensuring the notifications do not include data you do not need.
Daily Activity log highlights email
Daily activity log highlights emails are notifications email sent daily with a summary of the previous day’s activities. Emails are generated and sent at midnight, right at the day’s end. You can configure these notification emails as follows:
- Send me a summary of what happens every day: Turn the slider to the “On” position to receive the daily summary email. Emails are sent to the default email address configured in the Settings.
- Email address: If you would like to send the daily activity log highlights email to a different email address, enter it here. You can also specify multiple email addresses, separated by commas.
- Send empty summary emails: Enable this option to receive the summary email even if there are no events to report.
Weekly Activity log highlights email
Weekly activity log highlights emails are notifications email sent weekly with a summary of the previous week’s activities. Emails are generated and sent at midnight on Monday, right at the week’s end. You can configure these notification emails as follows:
- Send me a summary of what happens every day: Turn the slider to the “On” position to receive the daily summary email. Emails are sent to the default email address configured in the Settings.
- Email address: If you would like to send the daily activity log highlights email to a different email address, enter it here. You can also specify multiple email addresses, separated by commas.
- Send empty summary emails: Enable this option to receive the summary email even if there are no events to report
Include these in the highlights email
Here, you can select which type of events you want to include in the highlight emails. Options selected here will be included in both daily and weekly emails. To include any of the available options, simply move the slider to the right.
Should the events of each section be included in the summary email?
Include events: Select this option if you want to include individual events in the highlights email.
Number of events to include: Choose the number of events to include in the email.
Last 10 events: Choose this option to include the last 10 events for each category individually.
All of the events: Choose this option to include all of the events for each category individually.
WordPress notifications
Under WordPress notifications, you’ll find notifications related to:
- Suspicious activities: Set notifications for suspicious activities, including failed logins for known and unknown users
- WordPress install changes: Set notifications for changes to the WordPress installation, including WordPress core updates
- Plugin changes: Changes to plugins, including installation and uninstallation, activation and deactivations, upgrades, and file modifications
- Theme changes: Changes to themes, including installation and uninstallation, activation and deactivations, and upgrades
- Critical events: Generation of a critical event
For each event notification that you want to enable, simply turn the slider to the “On” position and remember to click the Save Notifications button for changes to take effect. You can specify the email address per notification or set a default notifications email on the Settings page. Notifications may include additional configurable options.
Users notifications
Under Users notifications, you’ll find notifications related to:
- User activity: Set notifications for user activities, including logins and password changes
- User profiles: Set notifications for activities related to user profiles, including changes to email addresses, passwords, and roles and the creation of new user accounts
For each event notification that you want to enable, simply turn the slider to the “On” position and remember to click the Save Notifications button for changes to take effect. You can specify the email address per notification or set a default notifications email on the Settings page. Notifications may include additional configurable options.
Content notifications
Under Content notifications, you’ll find notifications related to:
Content: Set notifications for content-related activities, including publishing of content, changes, trashing and deletions, and other content changes. For each event notification that you want to enable, simply turn the slider to the “On” position and remember to click the Save Notifications button for changes to take effect. You can specify the email address per notification or set a default notifications email on the Settings page. Notifications may include additional configurable options.
WooCommerce notifications
Under WooCommerce notifications, you’ll find notifications related to:
WooCommerce: Set notifications for changes relating to products, store, coupons, and orders. For each event notification that you want to enable, simply turn the slider to the “On” position and remember to click the Save Notifications button for changes to take effect. You can specify the email address per notification or set a default notifications email on the Settings page. Notifications may include additional configurable options.
Custom notifications
Custom notifications enable you to build your own notifications using the built-in query builder.
Title: Provide a title for the notification.
Query Builder
The query builder is a powerful tool for building highly customized notifications. It uses rules to set up conditions that, when met, trigger the notification.
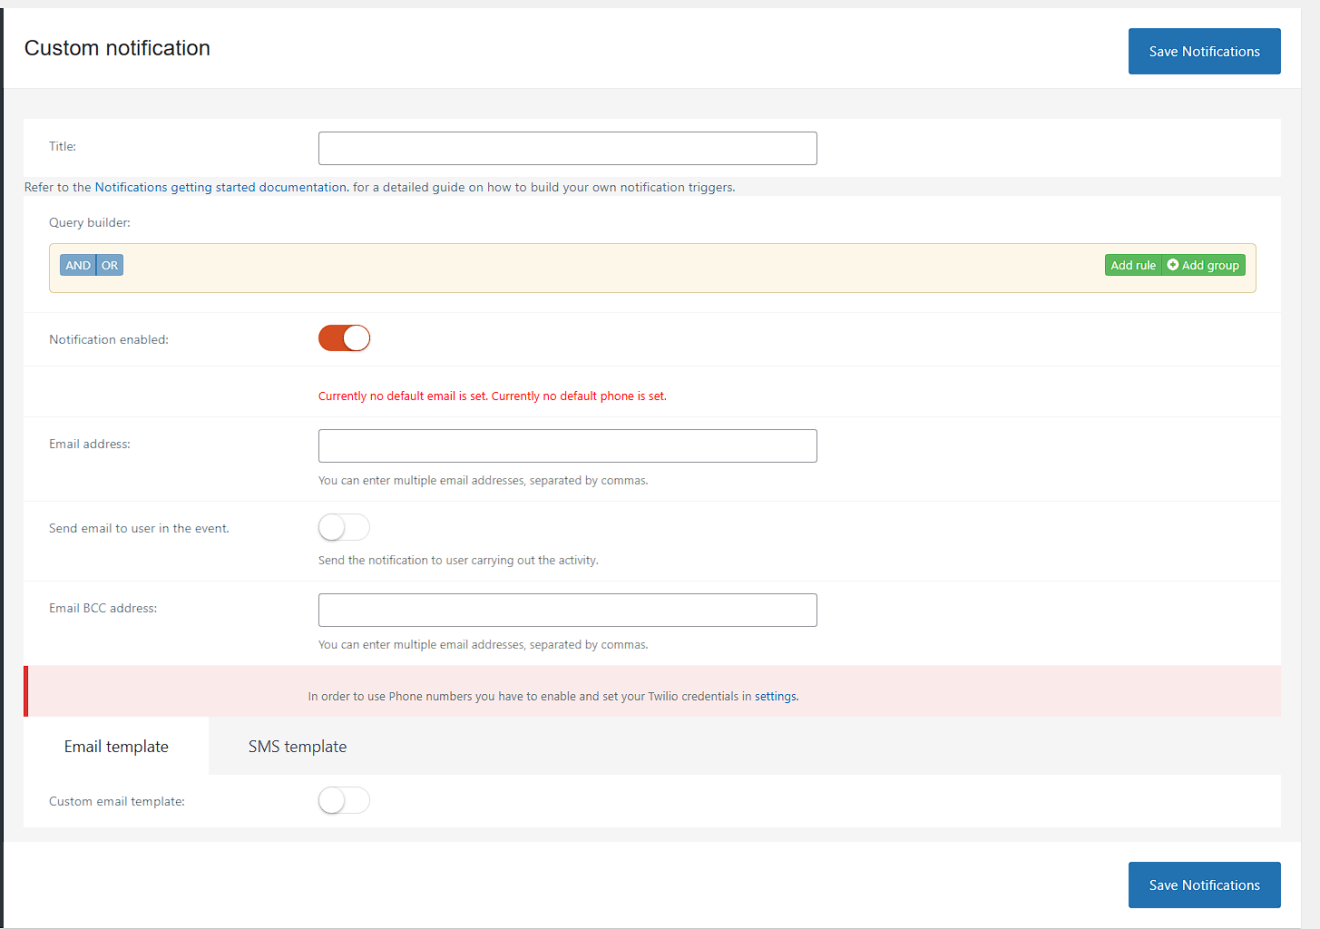
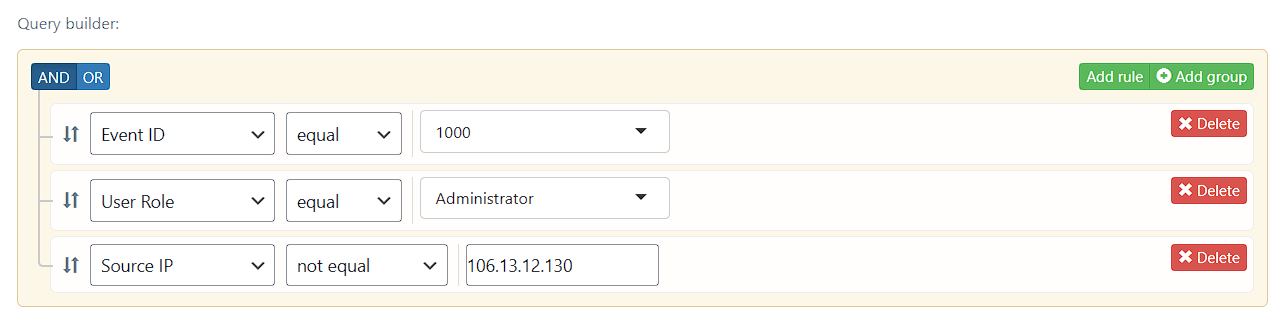
We will show this with an example: We’ll set up a notification so that when a user with the Administrator role logs in from an IP address other than the office’s IP (106.13.12.130), we are notified via email.
Note: For this notification to work, we need to set up three rules:
- A user must log in
- The user logging in must be an Administrator
- IP address must not be 106.13.12.130
This means that all three conditions must be met (are true) for the notification to trigger. So:
- Click the Add rule to add the first rule
- The first rule should be ‘Event ID’ ‘equal’ ‘1000’ (1000 is the Event ID of a user login. Refer to the complete list of WordPress events and IDs for more information)
- Click the Add rule button to add the second trigger
- The second rule should read ‘User Role’ ‘equal’ ‘Administrator’
- Click the Add rule button again to add the third and final rule
- The third rule should be ‘Source IP’ ‘not equal’ ‘106.13.12.130’
Rule grouping
We can also group rules together using the Add group feature. Grouped rules enable you to bind query components. Bound components, that is, components within brackets, are processed separately from the rest of the query.
We will illustrate how this works with an example. We will create a notification that will alert us whenever an Administrator or an Editor publishes a post.
Step 1: First, click on the Add Group button. This will give us the first group.
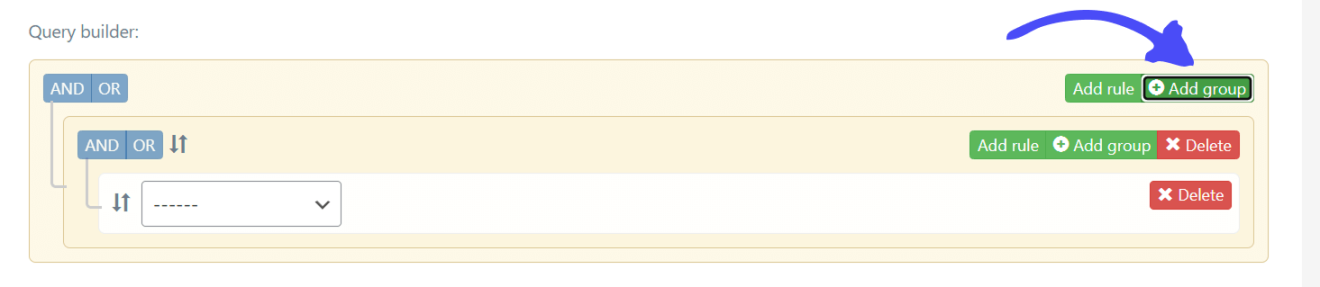
Step 2: Next, fill in the first group. In this example, we will choose:
- User Role equal Administrator
- Post Type equal post
- Post Status equal publish
Step 3: Click on the uppermost Add group button, the same one we used in Step 2
Step 4: Fill in the second group. In this example, we will choose:
- User Role equal Editor
- Post Type equal post
- Post Status equal publish

Next, make sure the notification is enabled and specify the email address of the email notification recipient in the Email address text field. You can specify multiple email addresses in this section.
If you would like to also notify the user carrying out the activity, move the slider next to Send email to user in the event to the right.
If you would like to be notified by SMS, enter the mobile phone number of the SMS notification recipient in the Phone number placeholder. You can specify multiple phone numbers.
Lastly, click Save Notifications to save the trigger.
Settings
In the Settings section, you can set up and manage the default email, phone number, and Slack channel to which notifications will be sent. Refer to the Getting set up section for more information about available options.
Default templates
In the default templates section, we can configure the notification templates for each notification channel. The available tags ensure you can include the information you deem necessary while excluding anything that is not important.
Email template
To configure the email notification template, click on the Email template tab, then fill in the following information:
- Subject: Enter the email subject line here. You can include any of the available tags
- Body: Enter the email body here. You can include HTML and any of the available tags
Click on Save Notifications once ready.
SMS template
To configure the SMS notification template, click on the SMS template tab, then fill in the following information:
- Body: Enter the SMS body here. You can include any of the available tags
Do keep in mind that SMS is limited to 160 characters per message. If the notification message exceeds this limit, multiple messages will be sent.
Click on Save Notifications once ready.
Slack template
To configure the Slack notification template, click on the Slack template tab, then fill in the following information:
- Body: Enter the Slack notification body here. You can include any of the available tags
Click on Save Notifications once ready.
Support
If you encounter any problem or have a query, please open a support ticket. Include any information you think is useful to help us diagnose your issue. Kindly also include the license key information.
