


Updated on 22 July, 2026
How to register and log in to WordPress with Passkeys using WP 2FA (user guide)
Below, we’ll walk you through setting up passkeys for your user account in WordPress. This guide assumes your WordPress admin has already activated passkeys in the WP 2FA plugin. If this still needs to be done, this guide can help: How to Set Up Passkeys in WordPress.
Table of contents
Step 1: Accessing Passkey Configuration (User Side)
After passkeys are enabled on your WordPress site, you can configure your own passkeys:
1. Log in to your WordPress dashboard
2. Navigate to your user profile or WP 2FA settings
3. Locate the Add a Passkey button
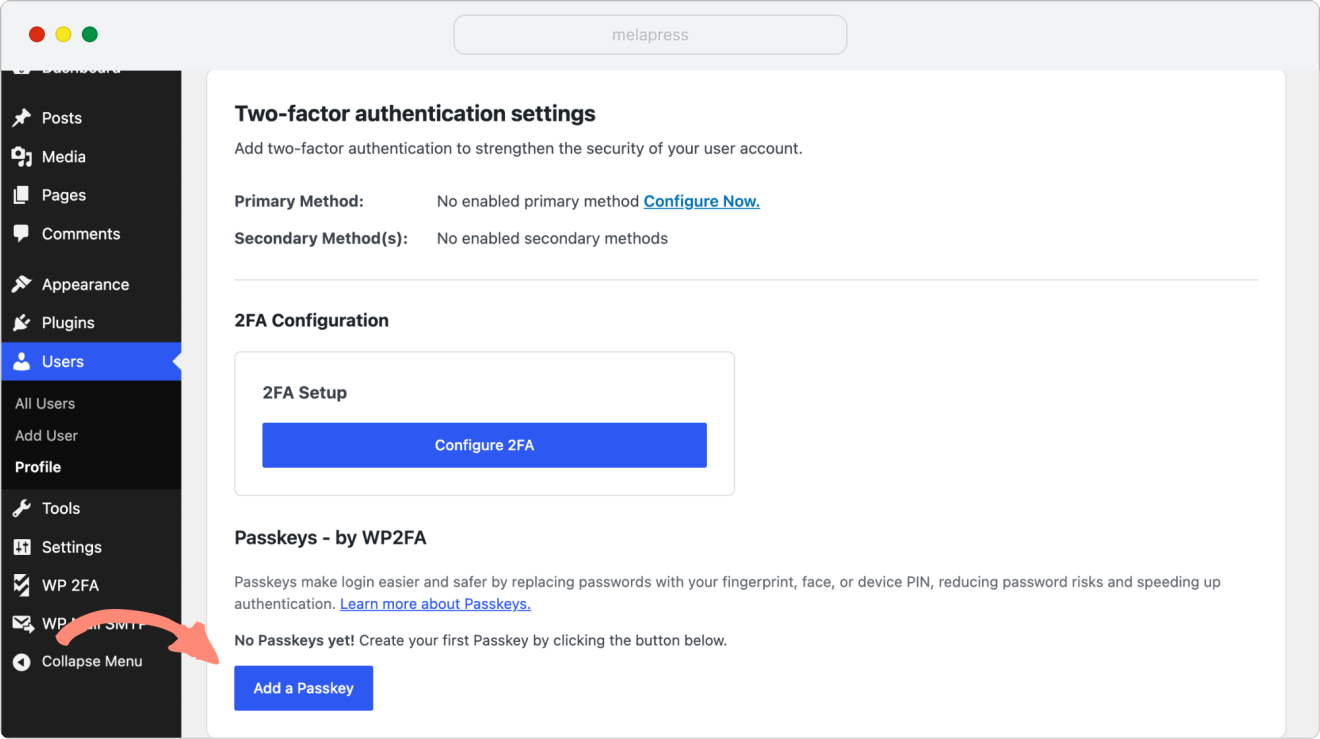
Next, we’ll need to choose your authentication method and register your passkey.
Step 2: Choose your authentication method & register your passkey
When you click on Add a Passkey, you’ll see two button options:
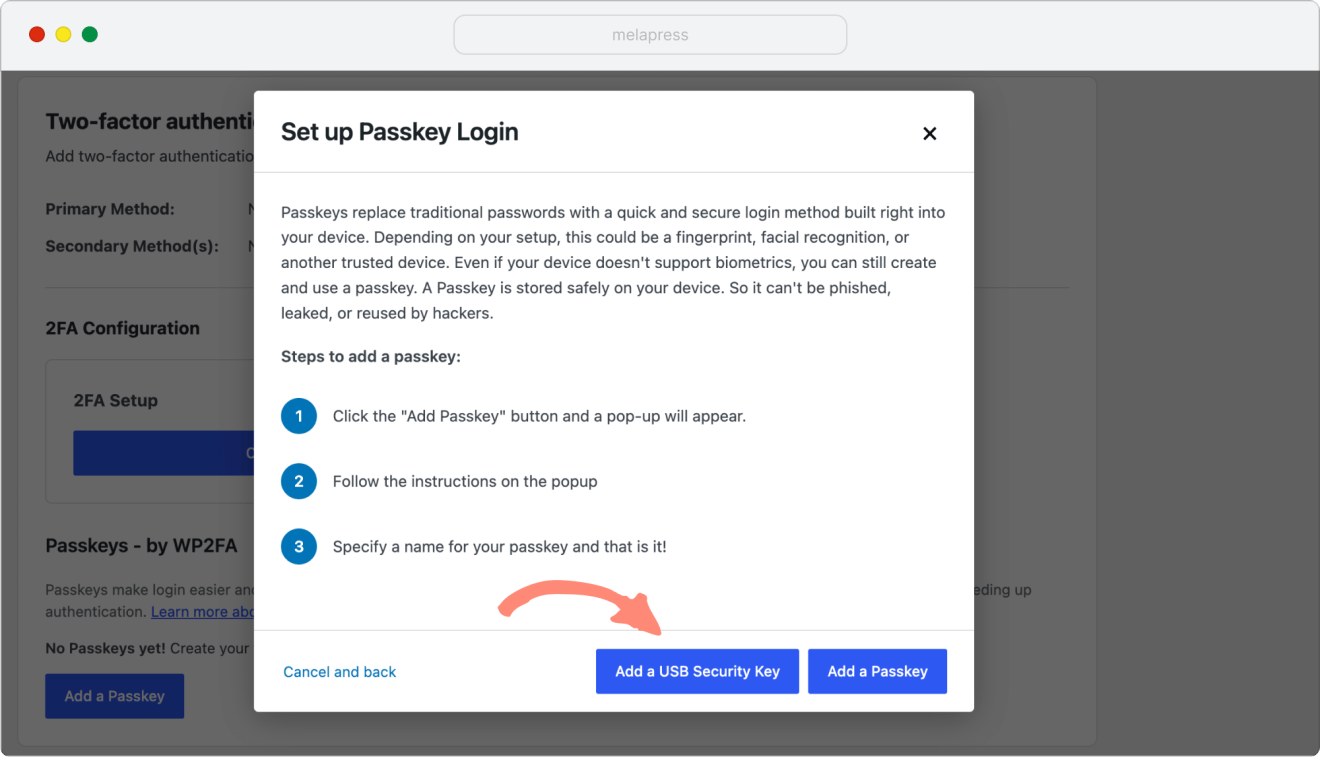
- Add a USB security key – Use this for hardware security keys like YubiKey, Google Titan Key, or Microsoft Security Key
- Add a Passkey – Use this for biometric authentication (Windows Hello, Face ID, Touch ID, fingerprint) or other available passkey methods
Depending on which button you select, you’ll see different authentication options. For example, some of the most common.
Hardware Security Key (e.g., YubiKey, Microsoft Security Key)
1. Click Add a USB security key
2. When prompted, insert your hardware security key (e.g., YubiKey) into your computer’s USB port
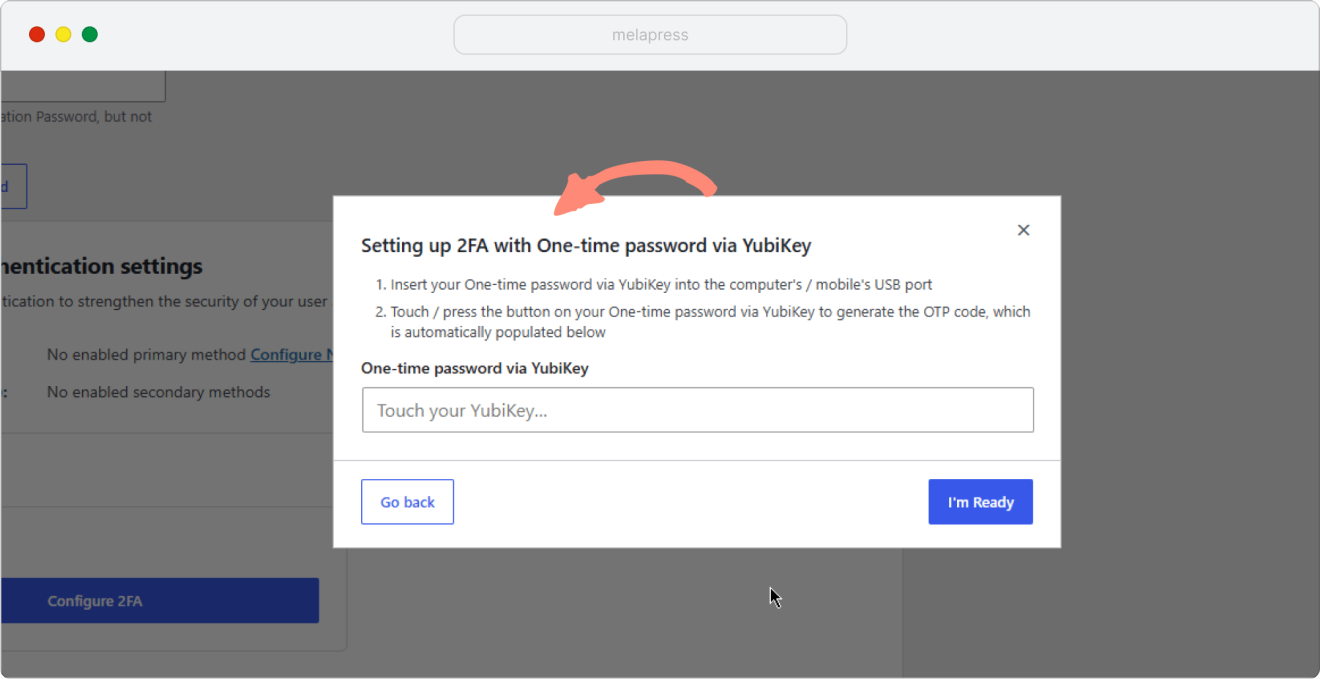
3. Touch or tap the key when the indicator light blinks.
4. Then touch your YubiKey again to generate a new one-time password.
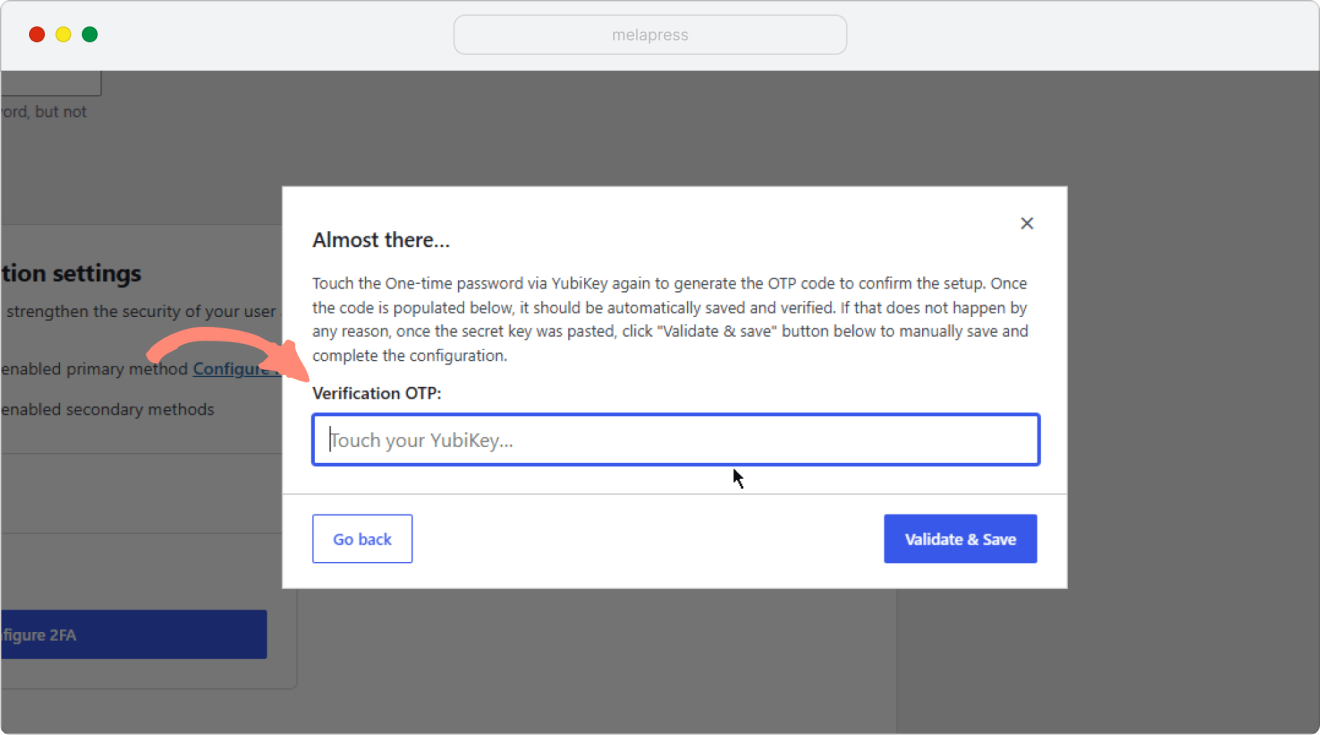
5. Name your passkey accordingly, then press Continue (e.g. a name that represents the passkey method)
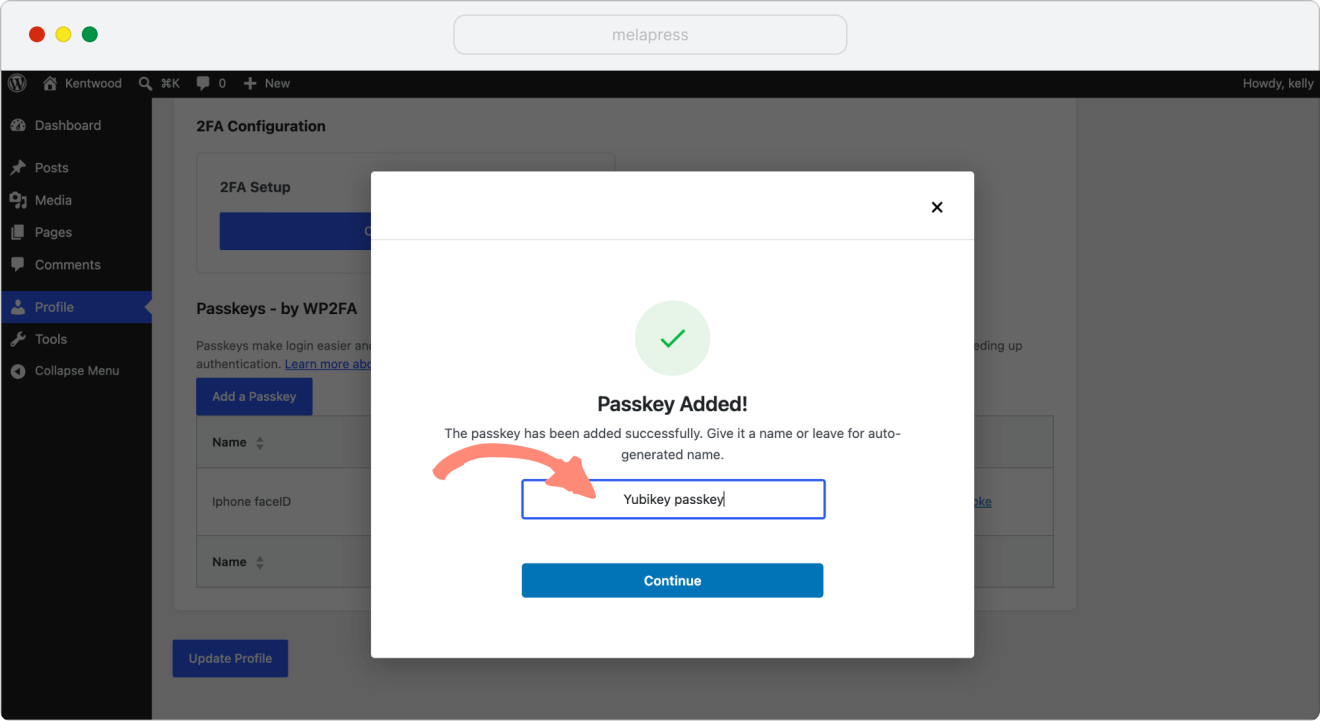
Supported hardware security keys:
- YubiKey (Series 5 or newer)
- Google Titan Security Key
- Microsoft Security Key
- Any FIDO2-compliant security key
iCloud Keychain (Apple users)
Note: Apple requires iCloud Keychain to be enabled when creating and using synced passkeys on a Mac.
1. Click Add a Passkey
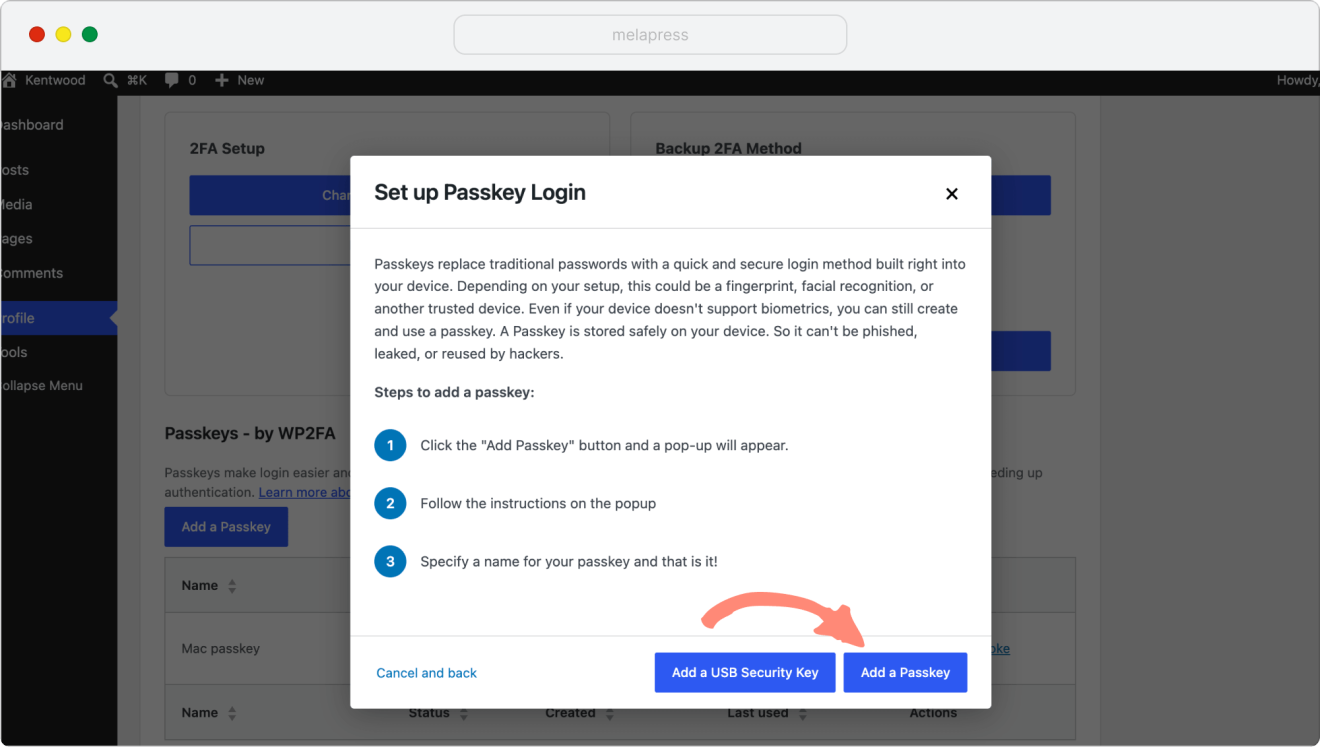
2. You’ll see a prompt with available passkey methods on your device so you can choose the desired one
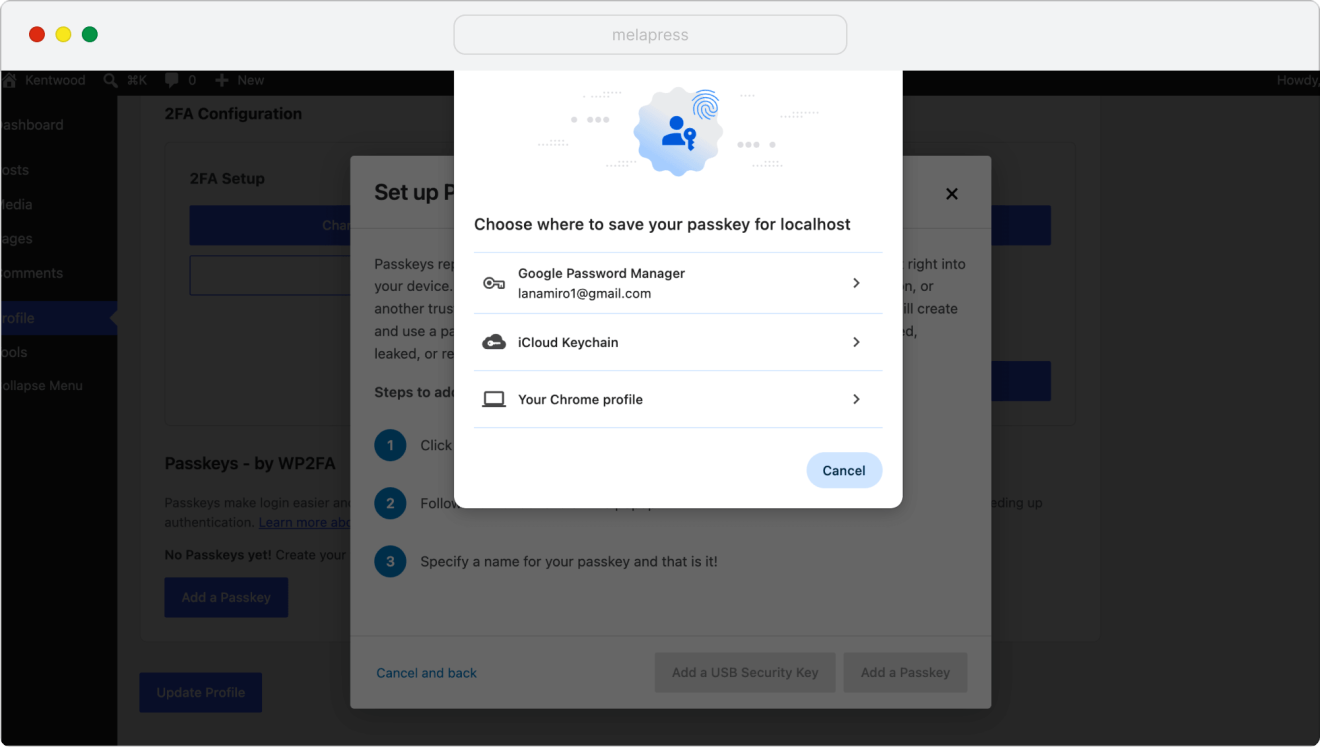
3. Select iCloud Keychain from the list
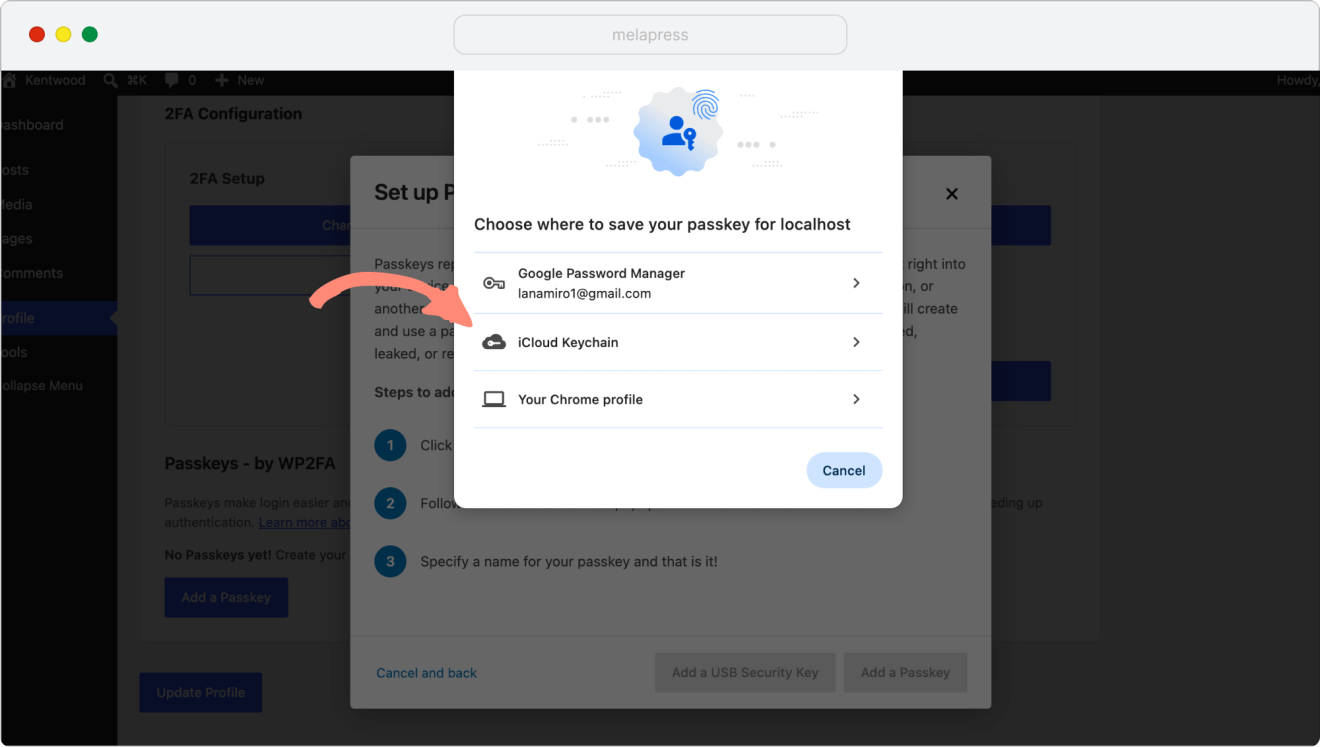
4. Depending on your setup, authenticate using your configured Mac method:
- Facial recognition
- Fingerprint scanner or
- PIN
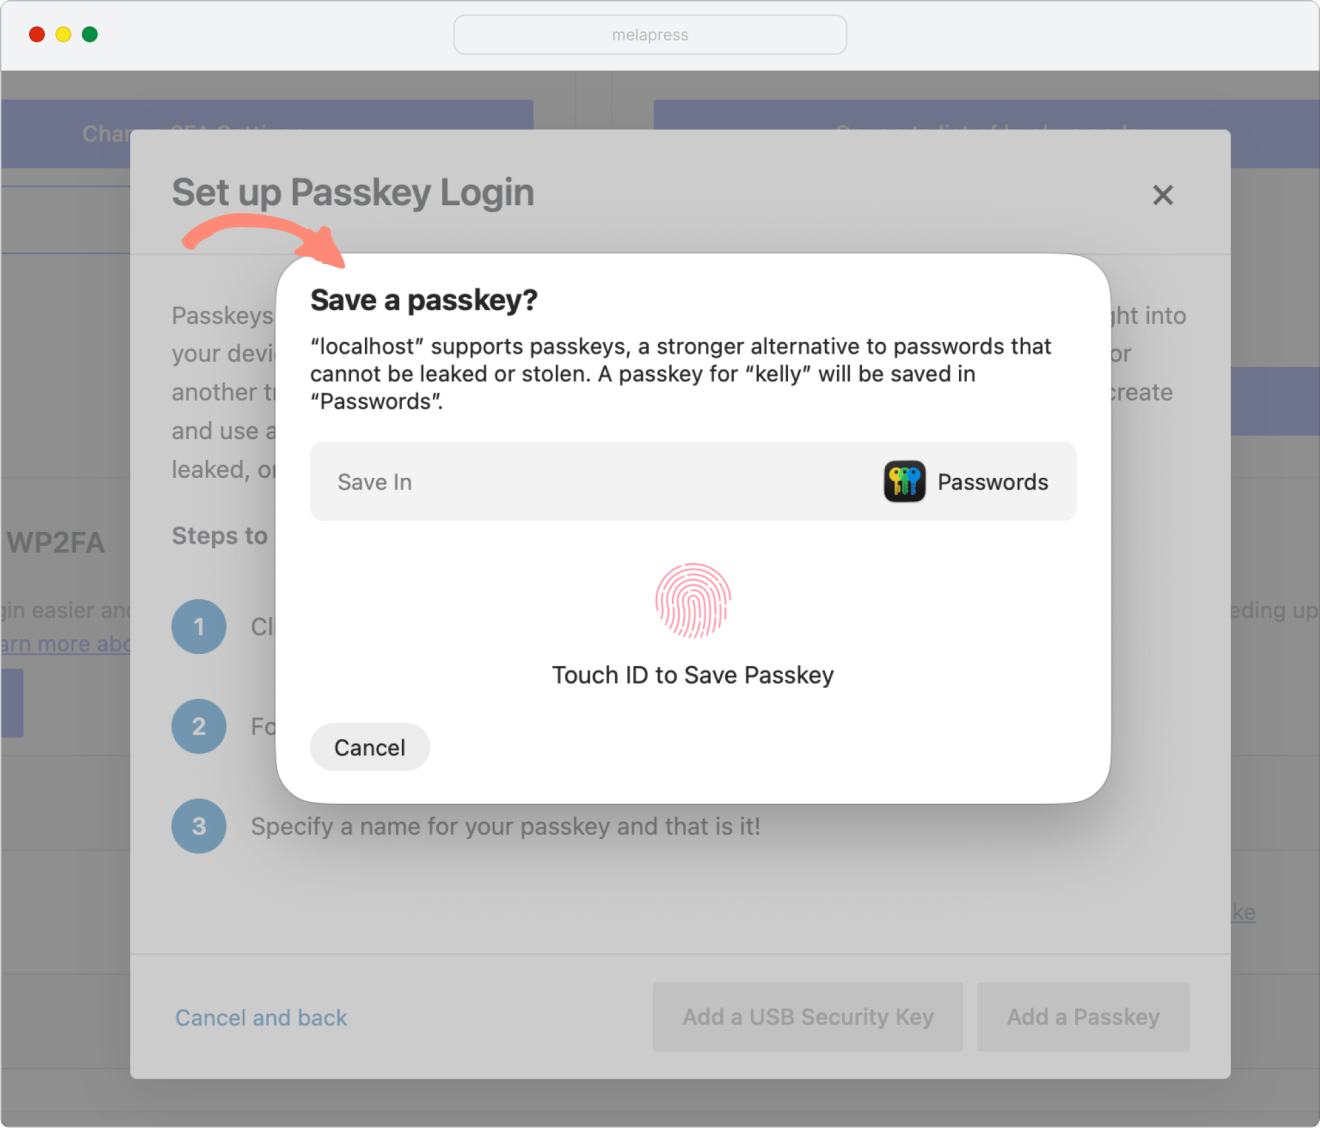
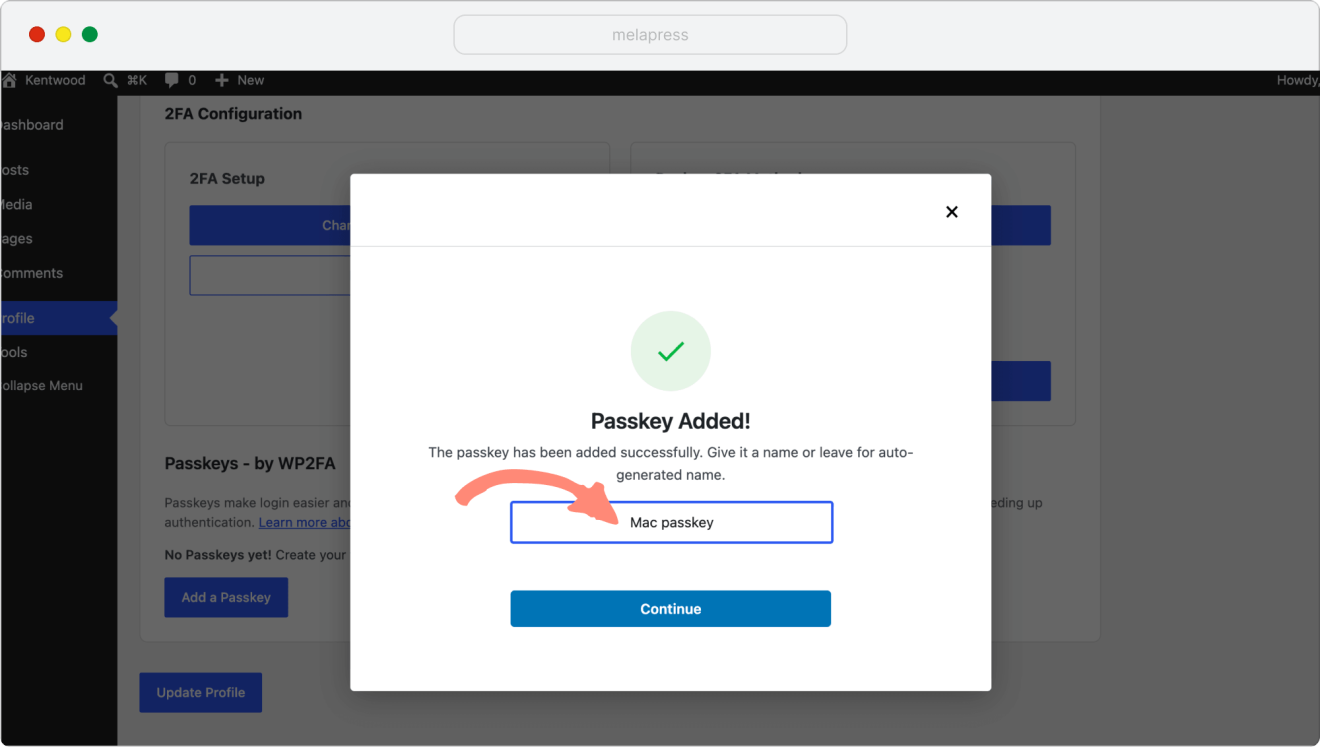
5. Name your passkey accordingly and press Continue. E.g: Mac passkey.
Password managers (1Password, Microsoft password manager, Google Password manager, etc.)
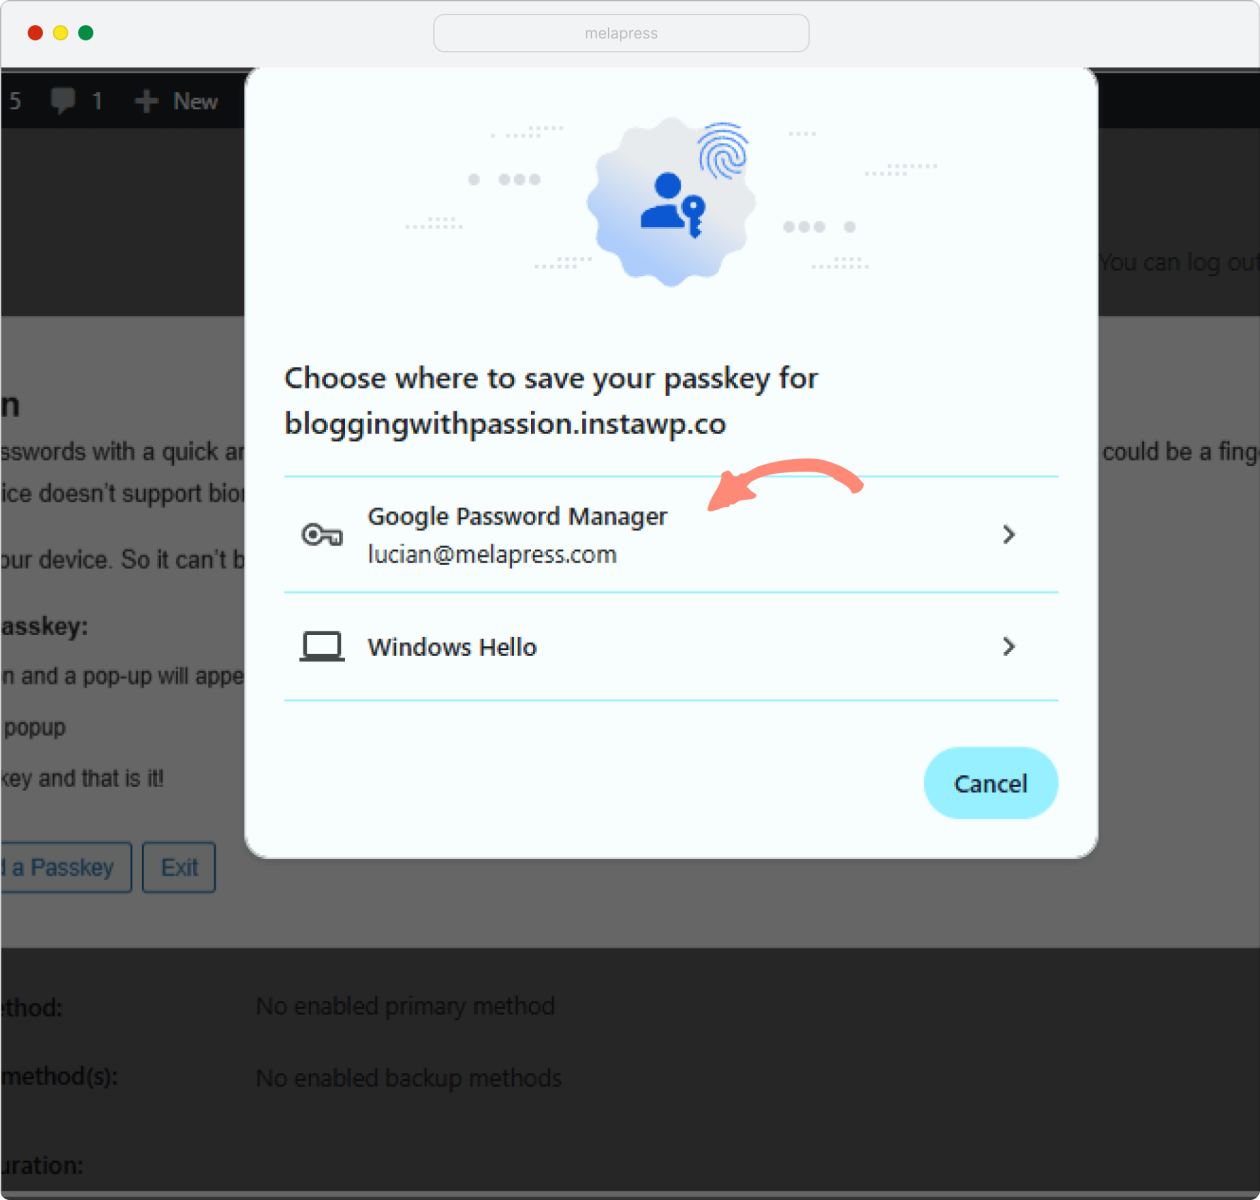
1. Click Add a passkey
2. Choose Google Password Manager
3. Click Create button
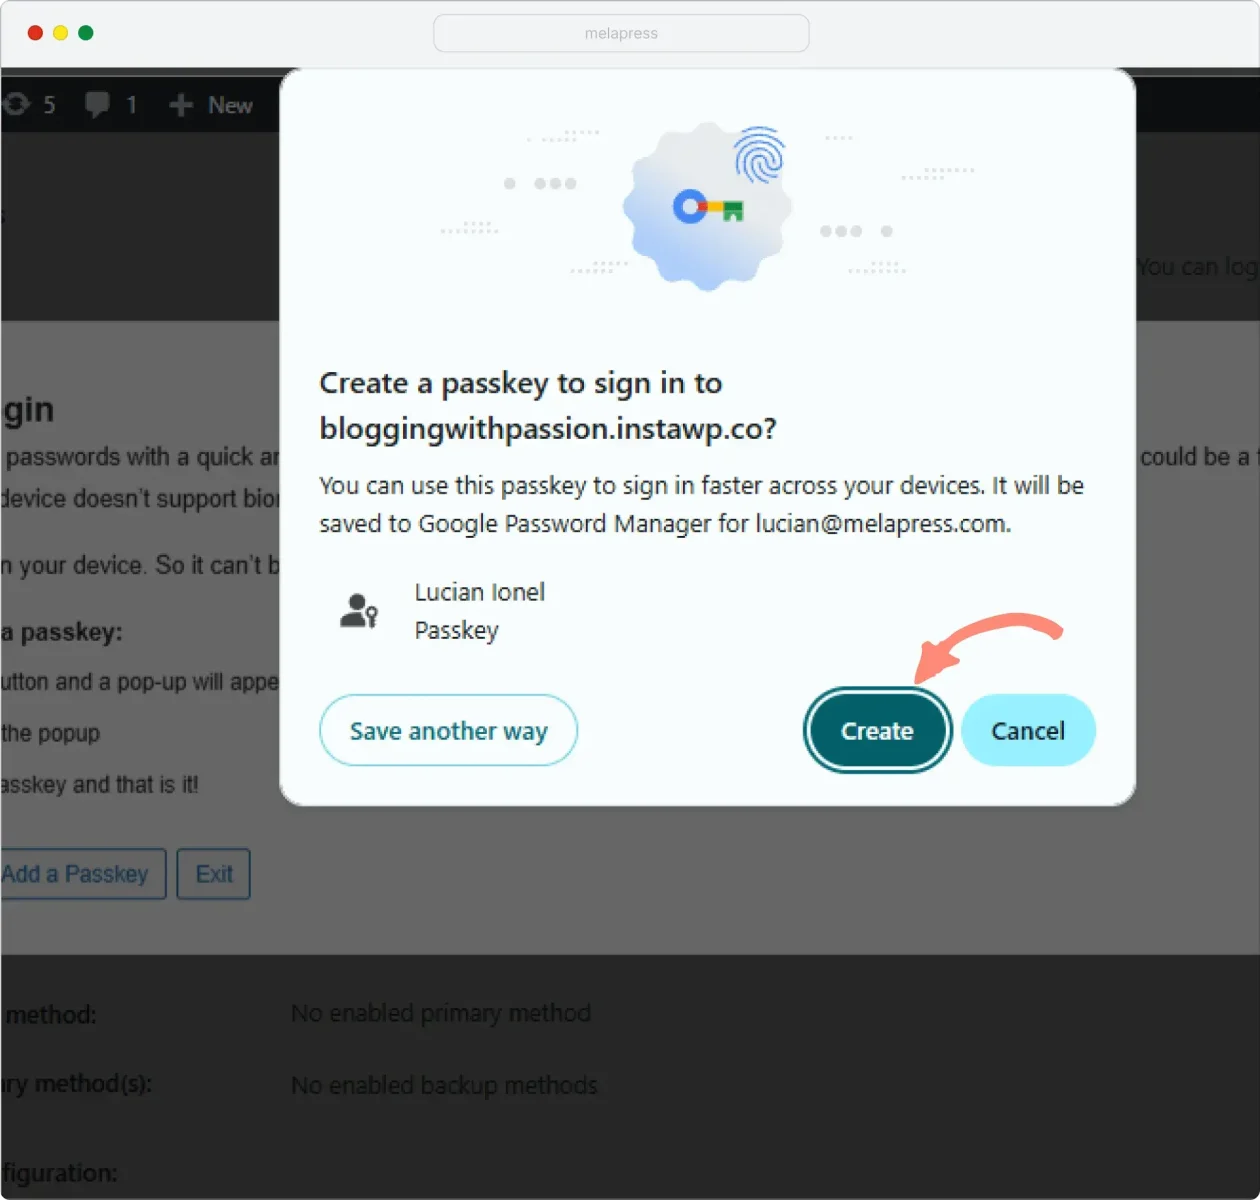
4. You will then be prompted to confirm your Google Password Manager PIN (if set)
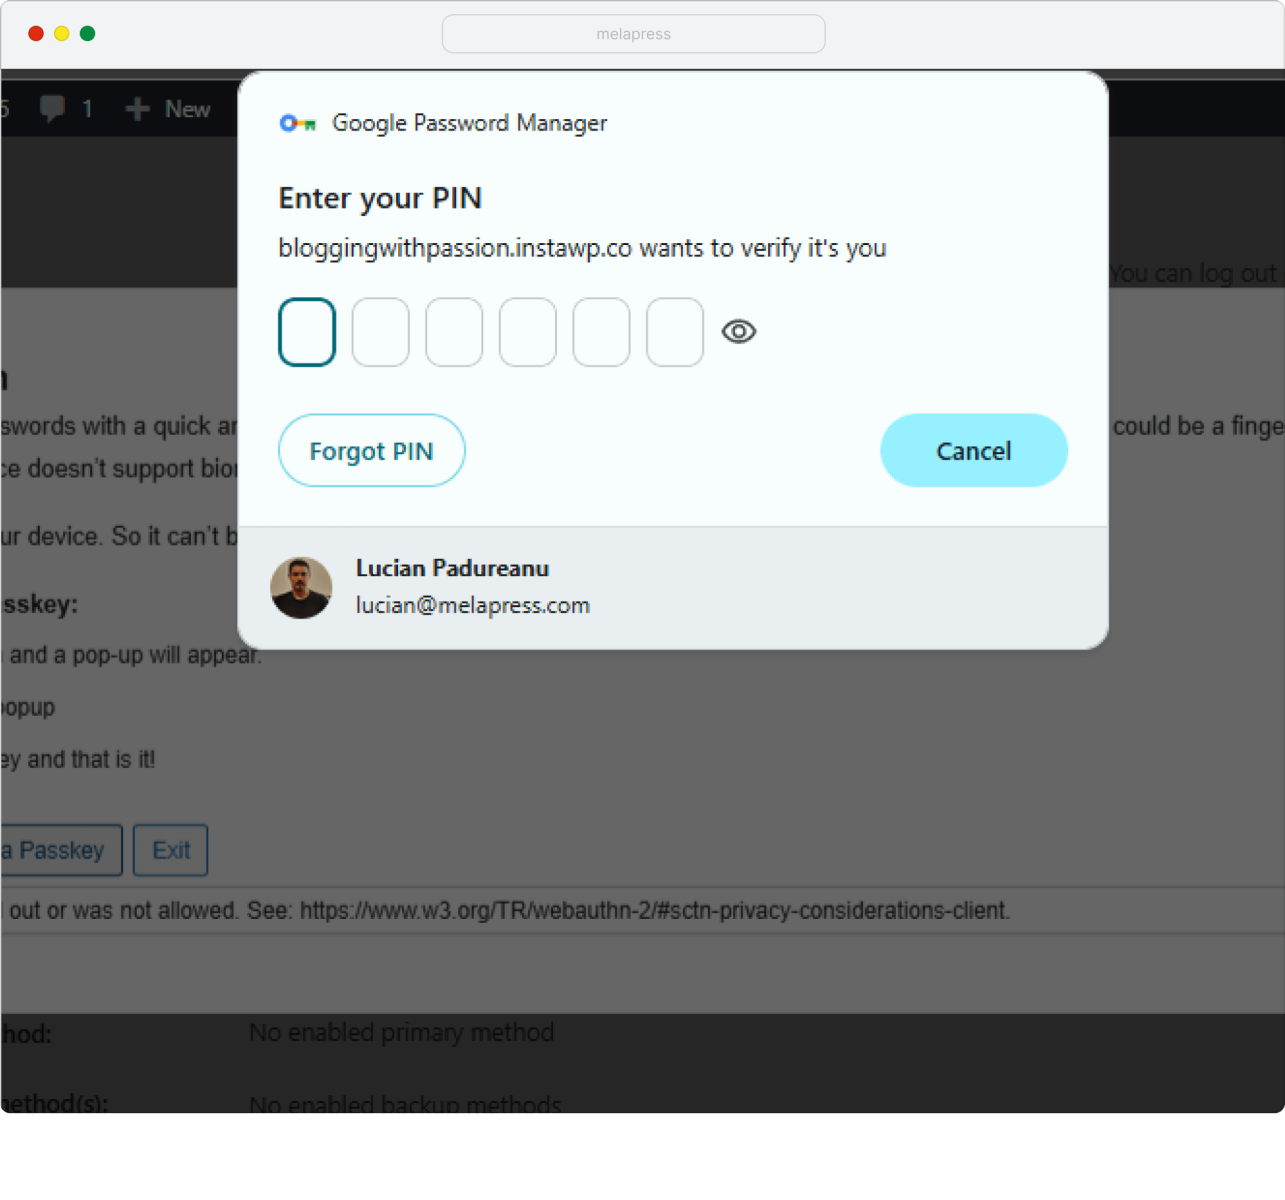
5. That’s it, name your passkey accordingly, and you can use it next time you log in when using this login method with this specific passkey.
Mobile Device Biometrics (iPhone, Android)
This allows you to use your phone or tablet’s biometrics next time you want to log in. You will need a passkey stored on that device for this, and the process to do so is shown below:
1. Click Add a Passkey
2. You should see a prompt with available passkey methods. Click on Use a phone or tablet.
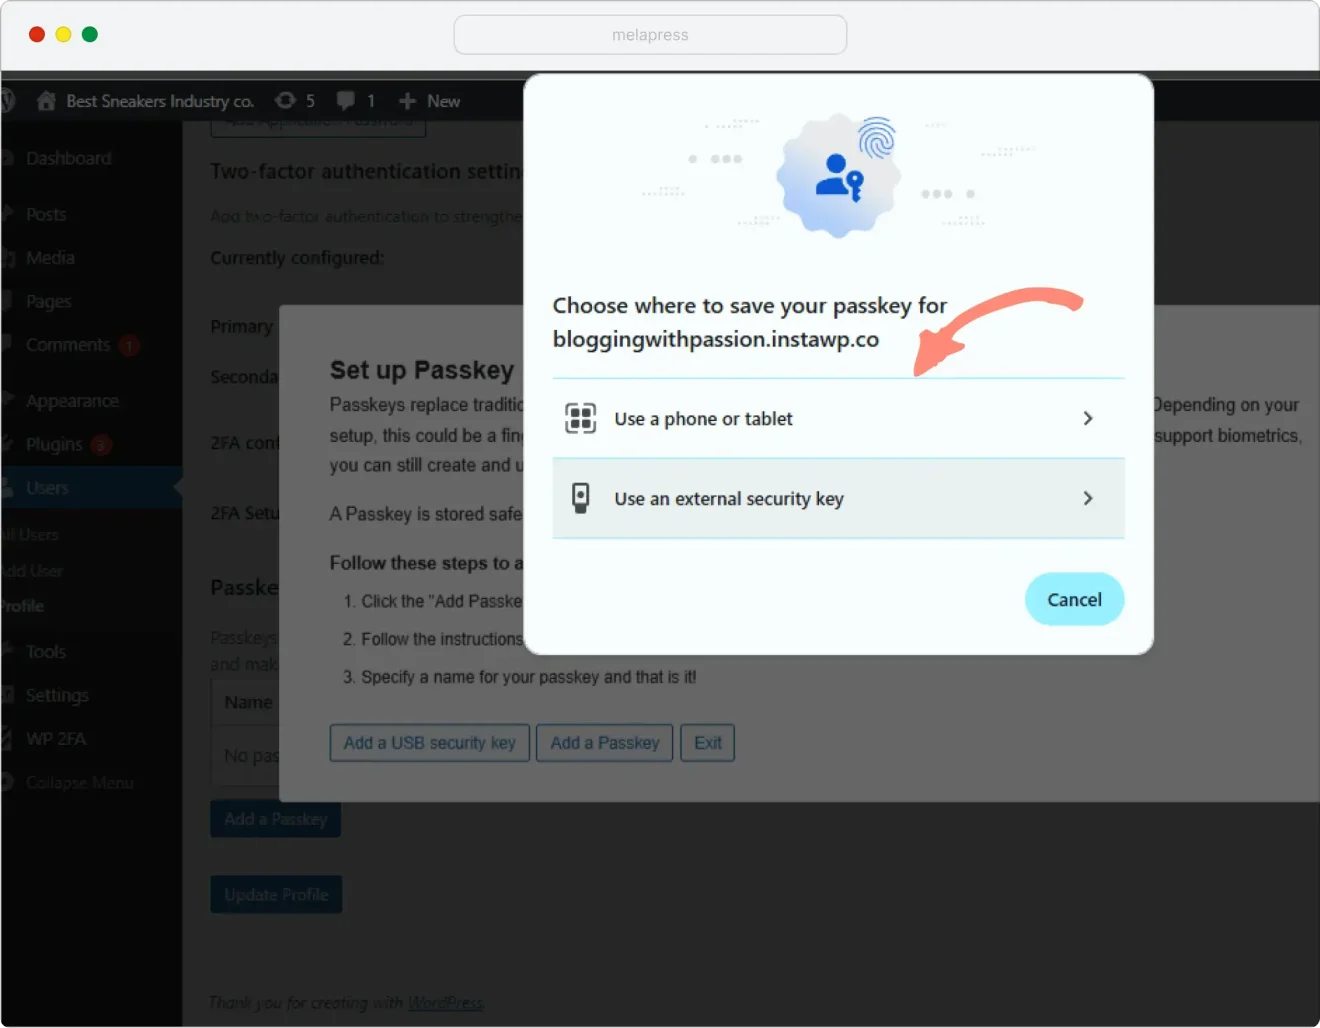
3. Scan the QR code with the device you want to store the passkey on.
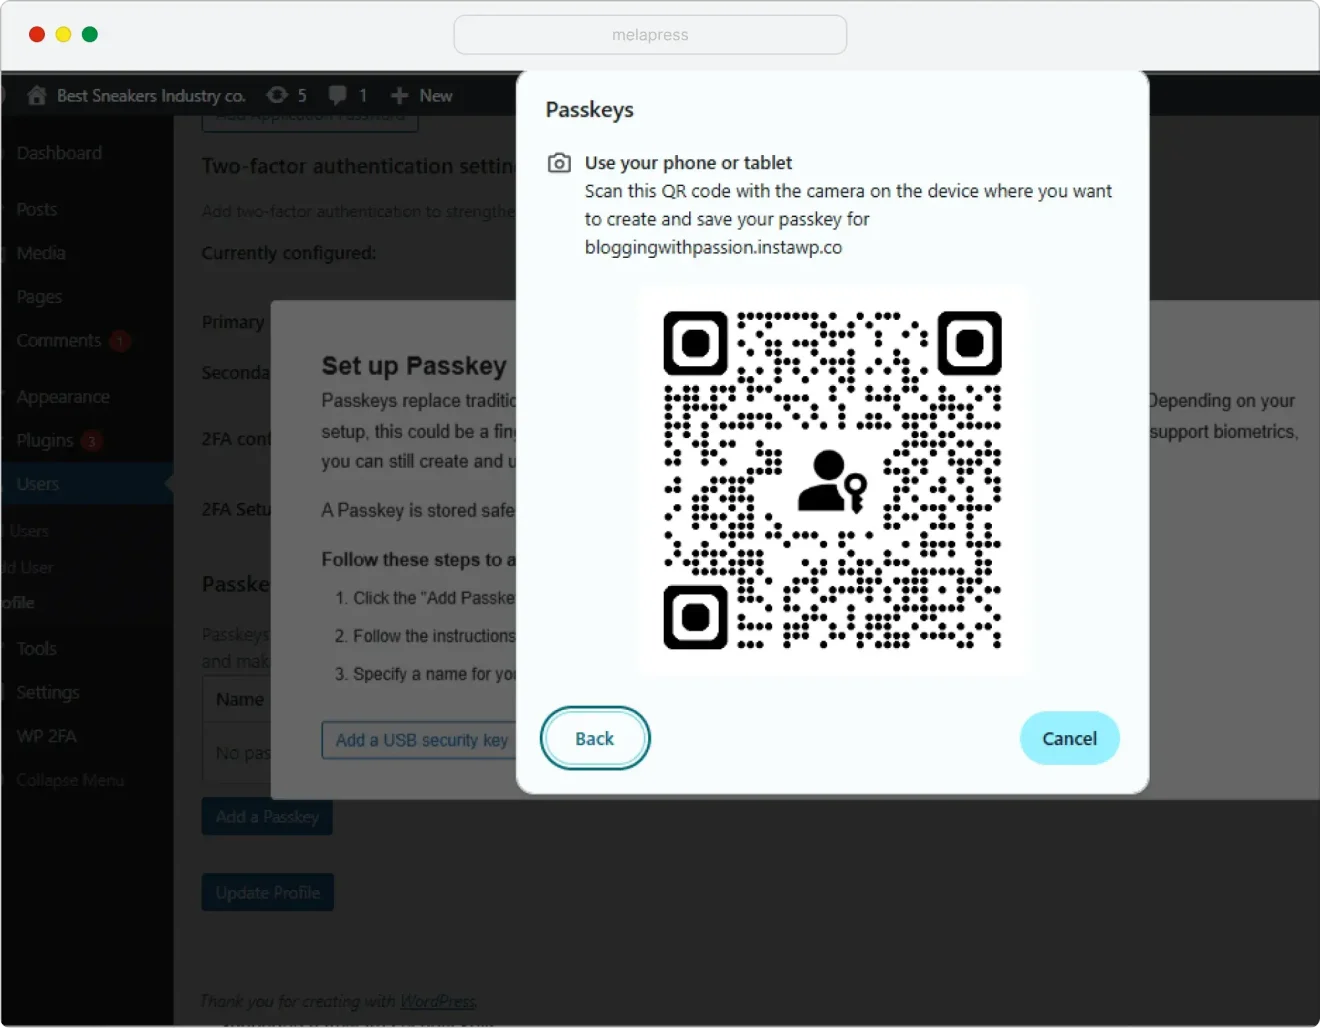
4. Once the fingerprint, face ID, or PIN is validated on the device, the passkey will be successfully stored.
5. Name your passkey accordingly and submit. E.g: iPhone passkey, iPAD home passkey, etc.
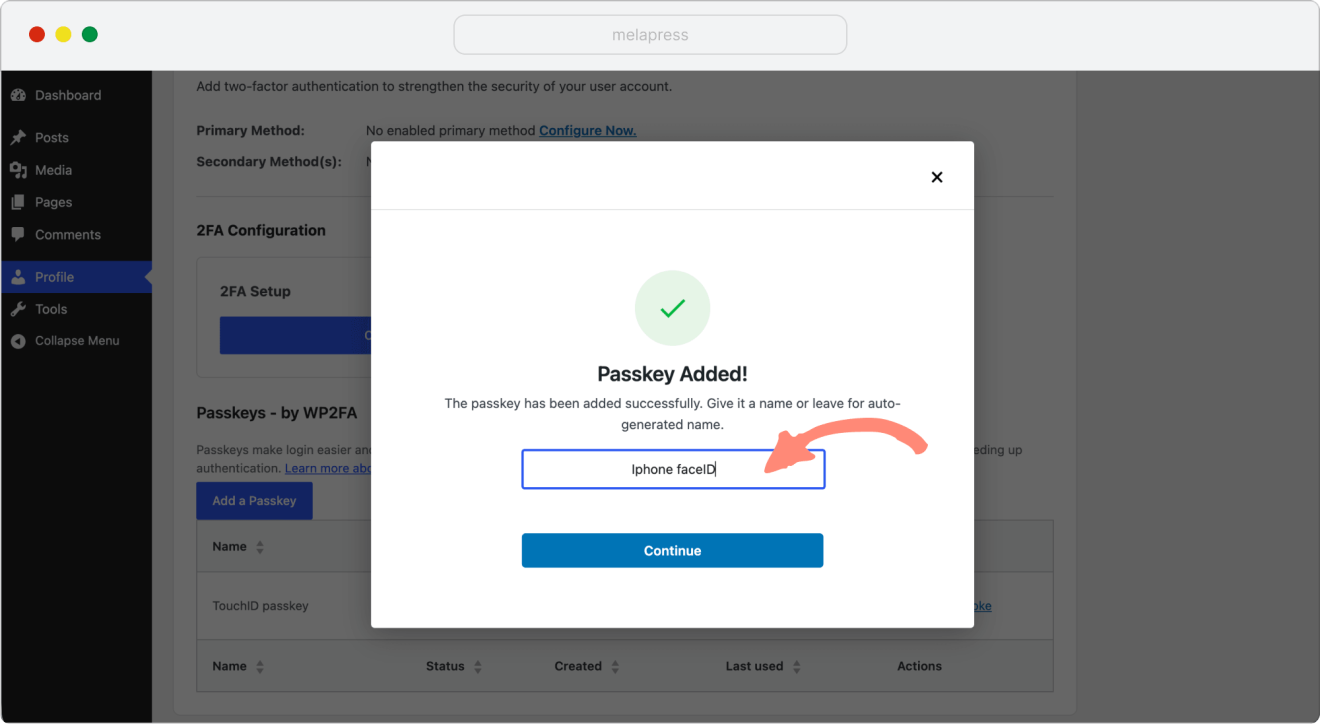
Tip: Use descriptive names that help you identify the device or method, especially if you plan to register multiple passkeys. This makes it easier to manage them later.
Step 3: Logging In with Passkeys
Once you’ve configured a passkey, you can use it to log in to your WordPress site.
Standard Passkey Login (Same Device)
1. Navigate to your WordPress login page
2. Enter your username
3. Instead of entering a password, click Log in with a passkey
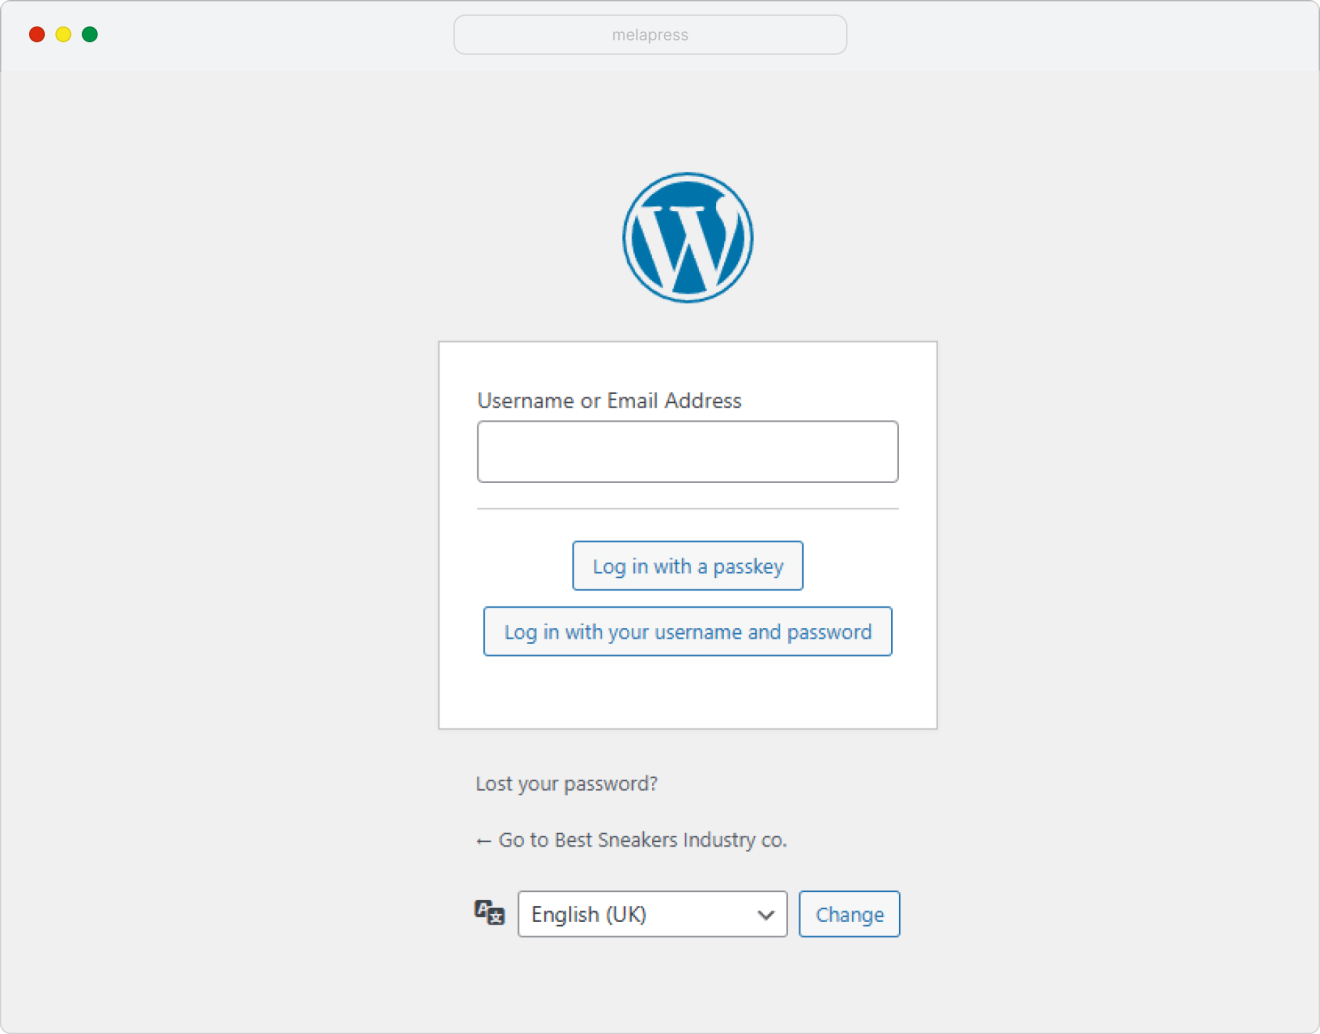
4. Authenticate using your configured/desired method:
- Touch your hardware security key
- Use Face ID/Touch ID/fingerprint scanner
- Use Windows Hello
- Use phone biometrics
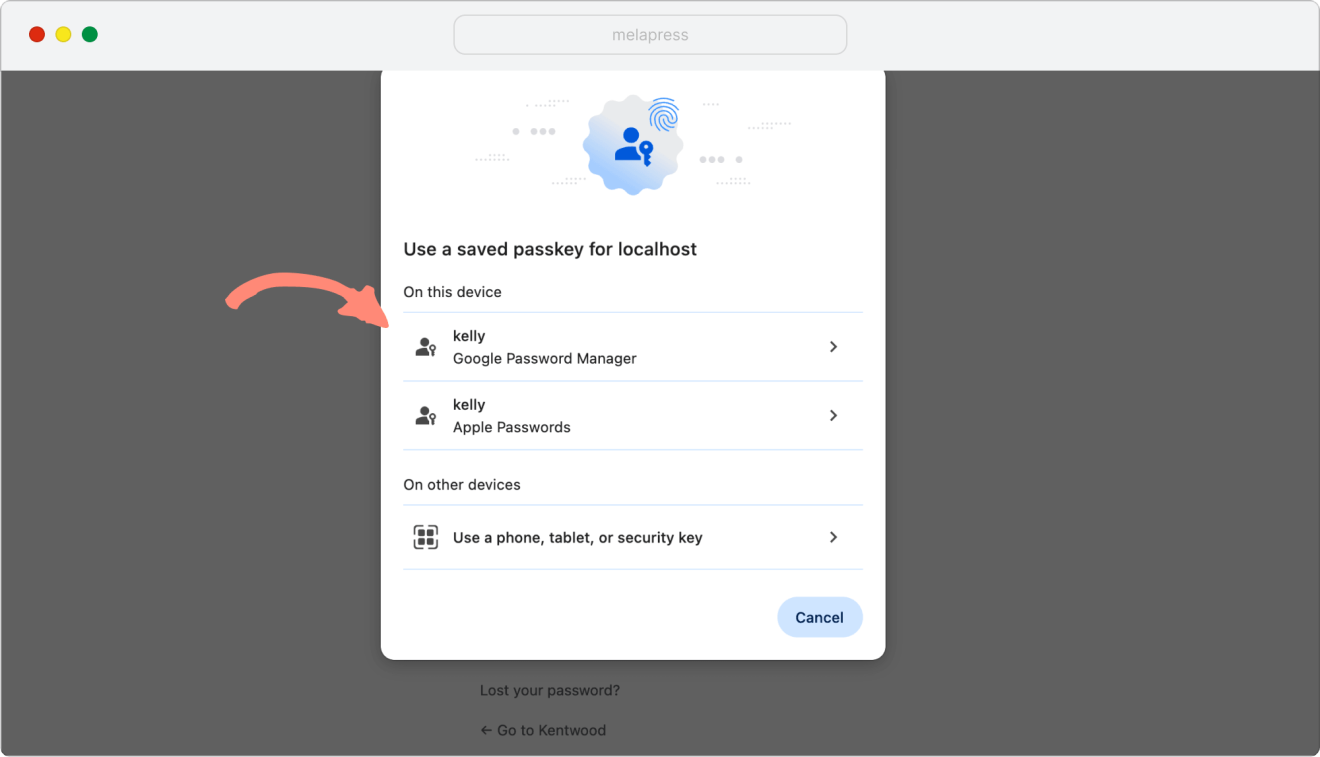
Cross-Device Passkey Login (QR Code Method)
If you have a passkey stored on your mobile device (e.g., iPhone) but want to log in from your desktop computer:
1. Navigate to your WordPress login page on your desktop computer
2. Enter your username
3. Click Log in with a passkey
4. Select Use a phone, tablet, or security key
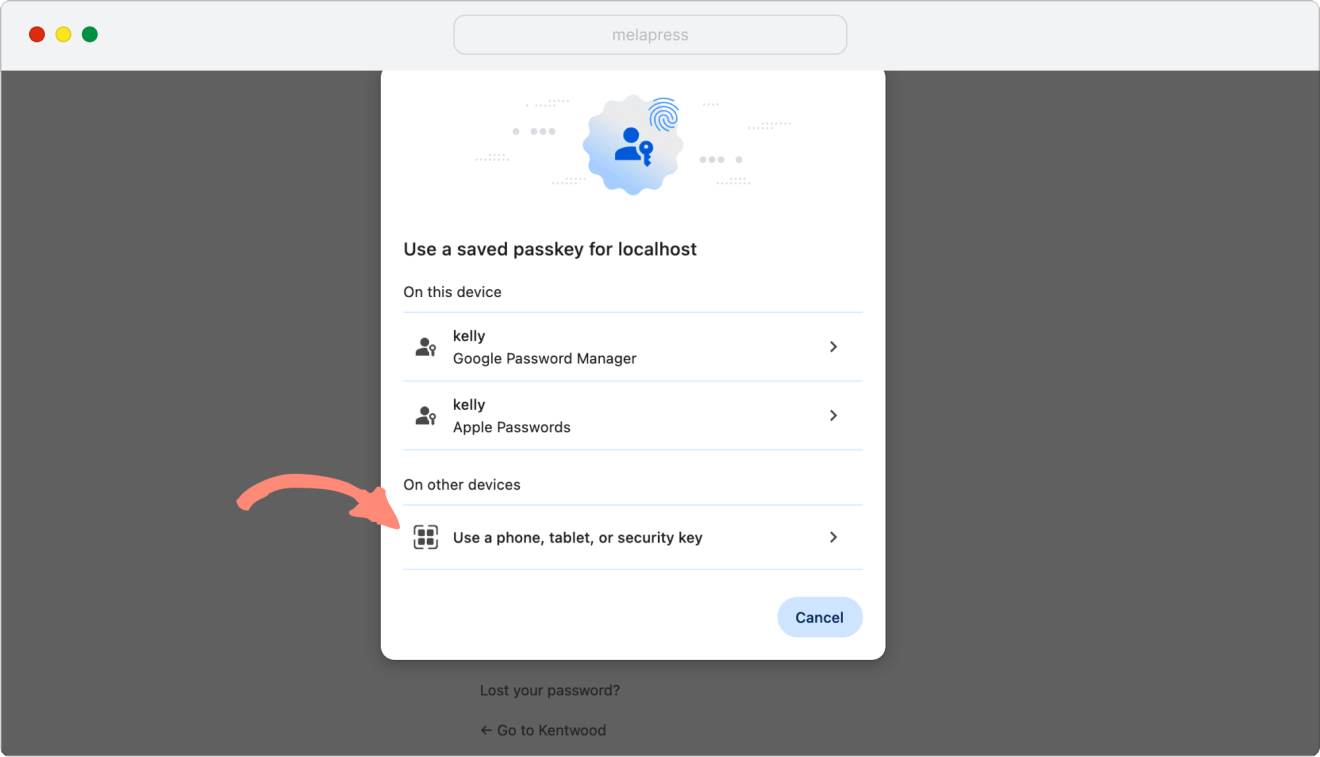
5. A QR code will appear on your desktop screen
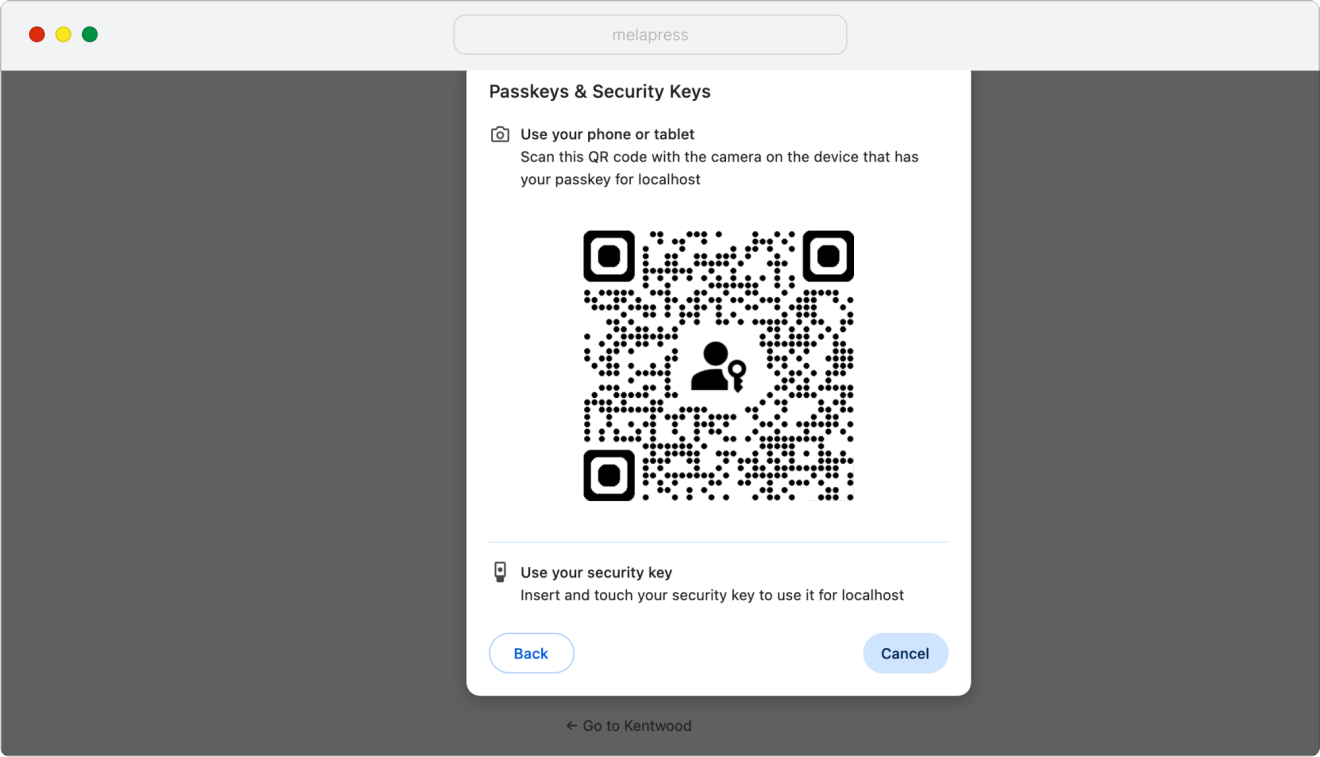
6. On your mobile device (iPhone/Android):
- Open your camera app
- Scan the QR code displayed on your desktop
- Your phone will prompt you to authenticate
- Use Face ID, Touch ID, or a fingerprint scanner on your mobile device where the passkey was previously registered.
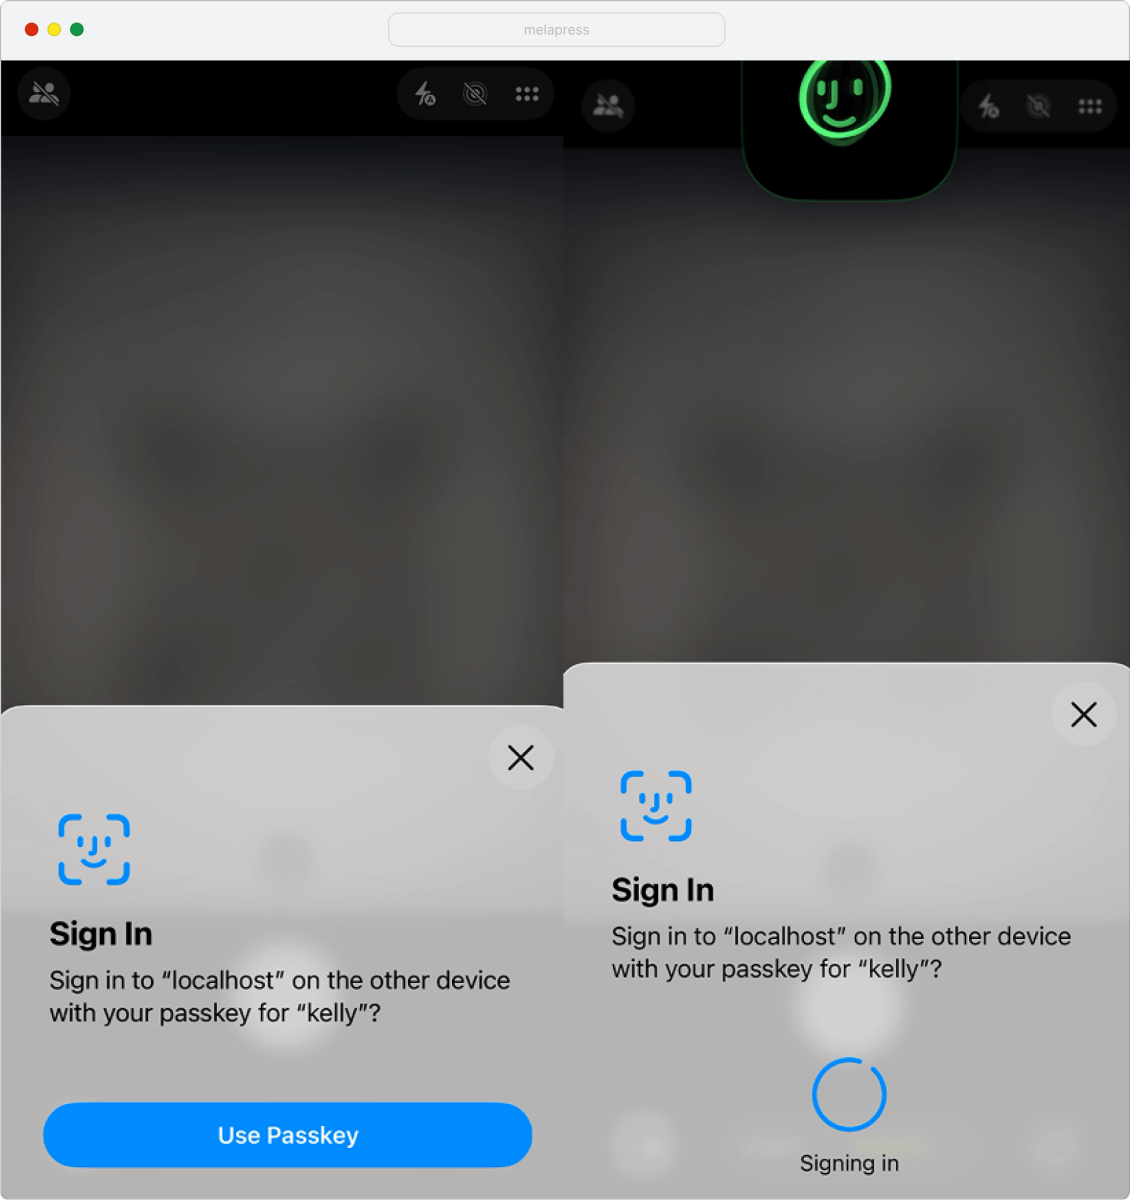
7. Once biometrics are confirmed, you will be logged into your website.
Managing Your Passkeys
Viewing All Passkeys
Navigate to your WP 2FA settings to see a list of all registered passkeys. Each passkey entry shows:
- Passkey name
- Date added
- Last used date
- Status (Active/Disabled)
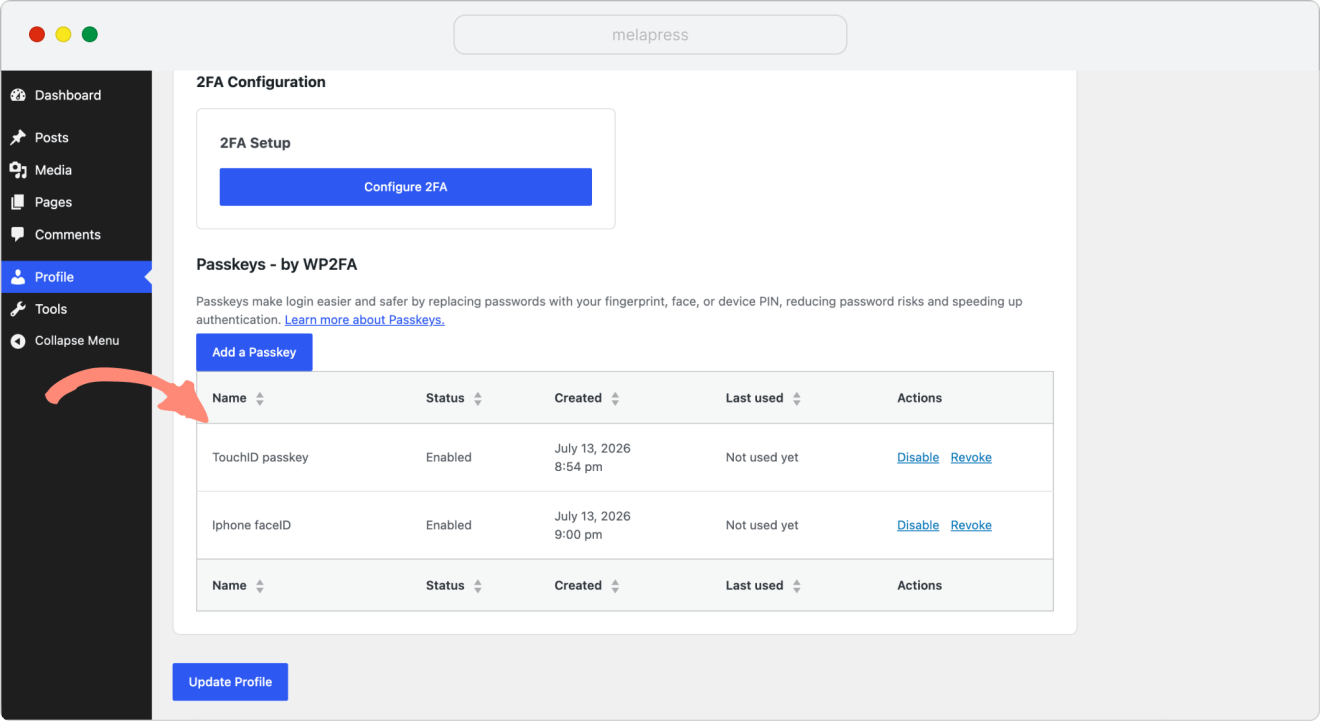
Disabling a Passkey (Temporary)
If you want to temporarily disable a passkey without deleting it:
1. Locate the passkey in your list
2. Click Disable next to the passkey
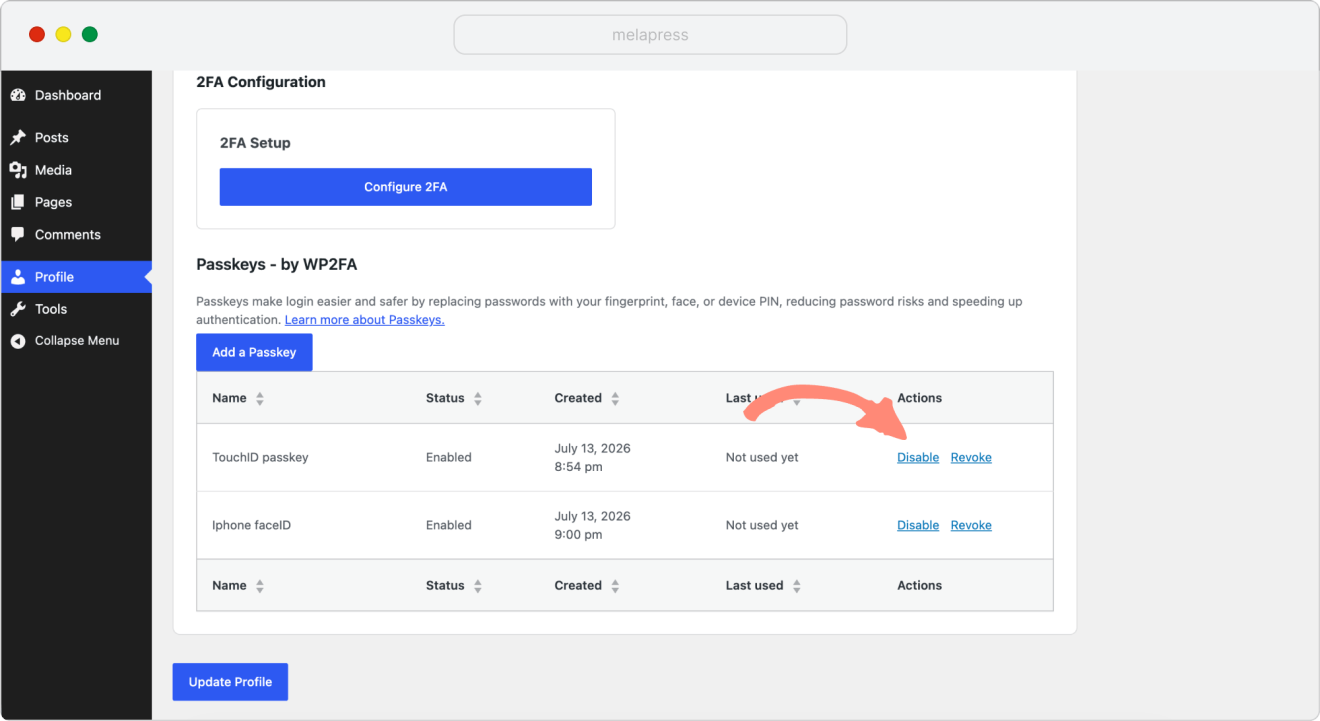
3. The passkey will remain in your list, but cannot be used for logging in
4. Click Enable to reactivate it later
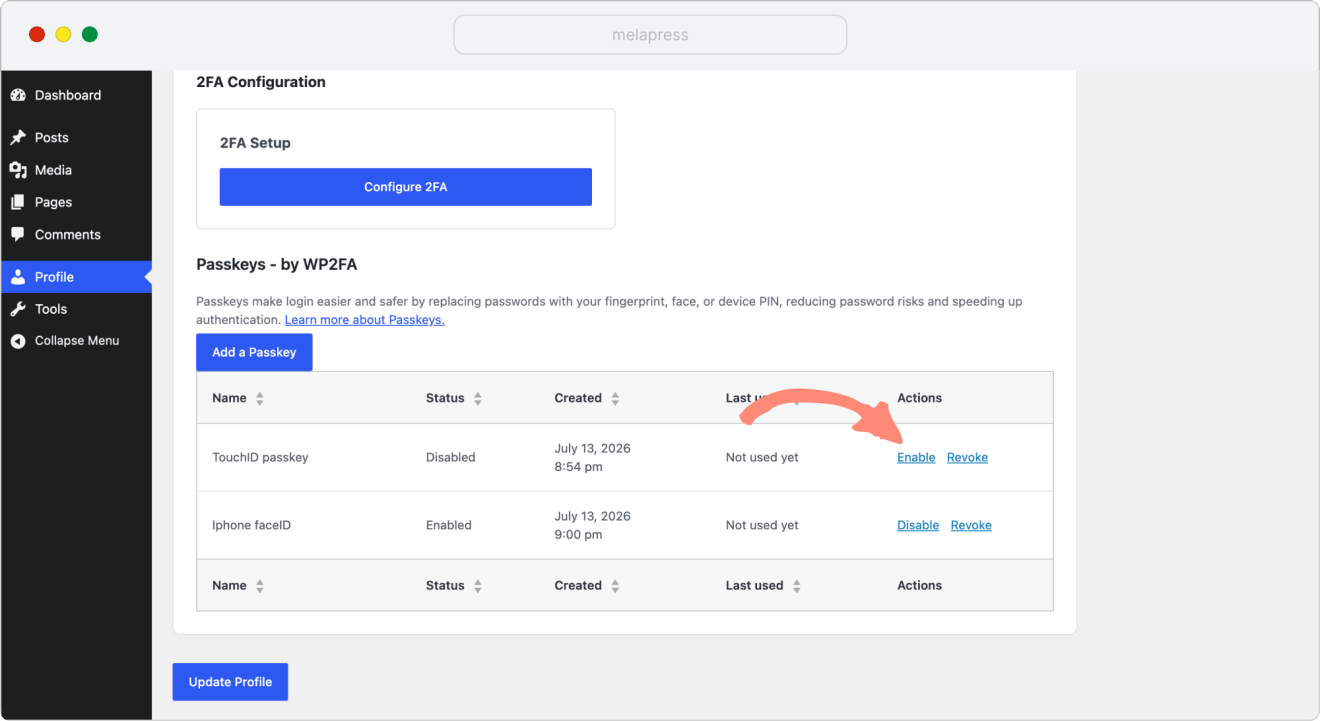
Tip: A common use case for this is when you've lost a device temporarily and want to prevent login until you find it.
Revoking a Passkey (Permanent Removal)
If a device is lost, stolen, or no longer in use:
1. Locate the passkey in your list
2. Click Revoke
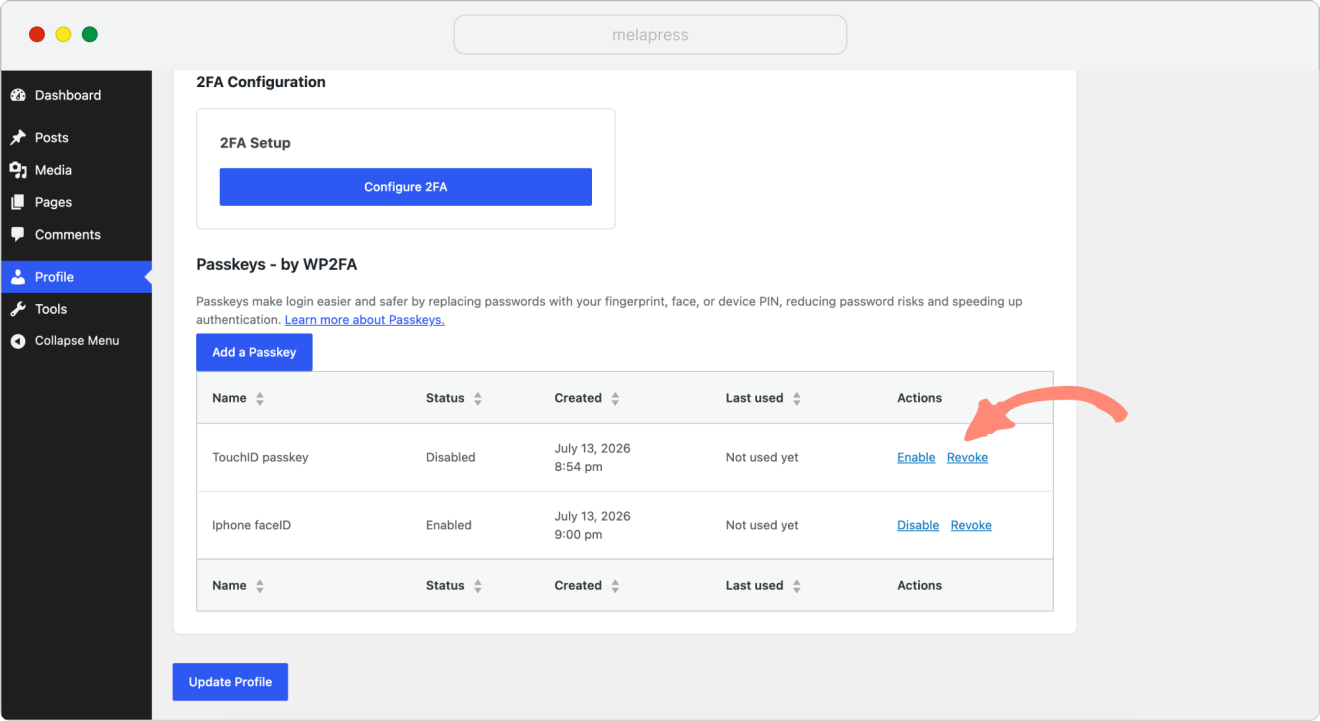
3. Confirm the action when the browser prompt shows up
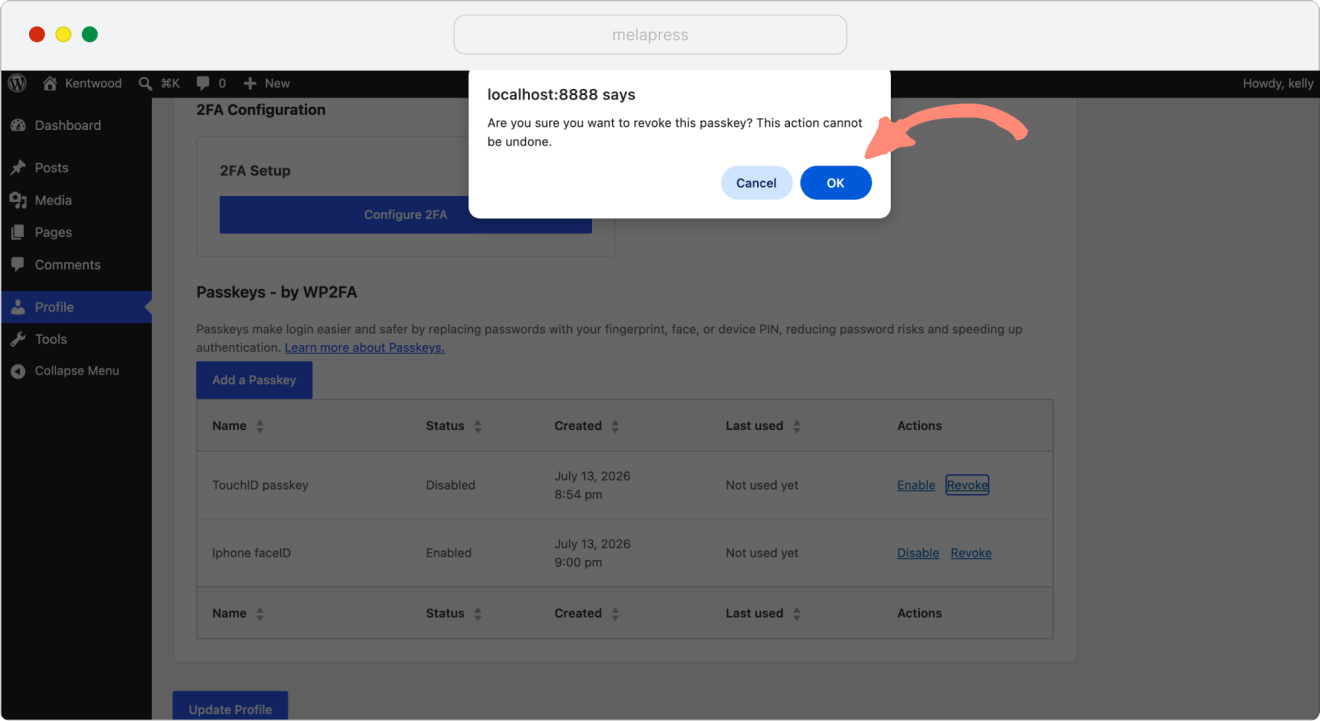
4. The passkey will be permanently removed and cannot be used for login
Important: Always revoke passkeys for devices you no longer control to maintain security.
Best Practices
Register Multiple Passkeys
We recommend registering at least 2-3 passkeys across different devices:
- Primary device (e.g., YubiKey or work laptop)
- Backup device (e.g., personal phone)
- Emergency backup (e.g., secondary security key stored securely)
This ensures you can still access your account using a passkey if one device is unavailable (you will still have the option to use your username and password).
Use Descriptive Names
Always name your passkeys with clear, descriptive names that help you identify:
- Device type (e.g., “YubiKey”, “iPhone 14”, “Surface Laptop”)
- Location (e.g., “Work”, “Home”, “Travel”)
- Purpose (e.g., “Primary”, “Backup”, “Emergency”)
Example names:
- “YubiKey 5C – Primary Work“
- “iPhone 14 Pro – Personal Backup“
- “Windows Hello – Home Laptop“
Secure Your Backup Passkey
If using a hardware security key as a backup:
- Store it in a secure location (safe, locked drawer)
- Keep it separate from your primary key
- Never share it with others
Revoke Lost or Stolen Passkeys Immediately
If a device with a registered passkey is lost or stolen:
- Log in using an alternate passkey
- Immediately revoke the lost/stolen passkey
- Monitor your account activity for any unauthorized access
Frequently Asked Questions
Can I use the same passkey on multiple WordPress sites?
No, each passkey is unique to the specific WordPress site where it was registered. You’ll need to register passkeys separately for each site.
Are passkeys more secure than passwords?
In general, passkeys are considered more secure in most situations. Passkeys are resistant to phishing, credential theft, and brute-force attacks because:
They use public-key cryptography
The private key never leaves your device
They cannot be guessed or stolen through phishing
Do passkeys work offline?
Yes, passkeys can authenticate locally on your device even without an internet connection, though you’ll still need an internet connection to access the WordPress site itself.
