Search for answers or browse our knowledge base.
How to configure 2FA policies to make 2FA mandatory for website users
To be an effective security solution, two-factor authentication (2FA) must be used by all your website users. If it is not possible, at least the users who have privileges to make changes on your WordPress website, such as users with administrator, editor and author roles should use 2FA.
By default, when you install the WP 2FA plugin on your website, 2FA is optional. However, you can use the 2FA policies in the plugin to make 2FA mandatory. This document explains how you can configure the policies to enforce 2FA on all your WordPress website users, some individual users, some users with a specific role, or the users of a specific individual site on a multisite network.
Table of contents
Making 2FA mandatory for…
All website users
Once you install the WP 2FA plugin:
- Navigate to Settings > Two-factor authentication in the WordPress dashboard.
- Select the option All users in the Enforce 2FA on setting.
- Click Save Changes to save the plugin settings.

Once you enable two-factor authentication, your users will receive an email and also get a notification when they login to the website. Depending on your settings, users can have a grace period during which they have to configure 2FA, or are required to configure 2FA instantly, as explained in the section what happens when you enable the 2FA policies.
Specific users or users with a specific role
Once you install the WP 2FA plugin:
- Navigate to Settings > Two-factor authentication in the WordPress dashboard.
- Select the option Only for specific users and roles in the Enforce 2FA on setting.
- Specify the roles of the users or the usernames in their respective fields.
- Click Save Changes to save the plugin settings.

Once you enable two-factor authentication, your users will receive an email and also get a notification when they login to the website. Depending on your settings, users can have a grace period during which they have to configure 2FA, or are required to configure 2FA instantly, as explained in the section what happens when you enable the 2FA policies.
All users of an individual site on a multisite network
When WP 2FA is installed on a multisite network, you can require the users of an individual site on the multisite network to configure 2FA. To achieve this, once you install the WP 2FA plugin:
- Navigate to the Network dashboard
- Click on Settings > Two-factor authentication in the menu.
- Select the option These sub-sites in the Enforce 2FA on setting.
- Specify the names of the sub-sites on which you want the users to use 2FA.
- Click Save Changes to save the plugin settings.

Once you enable two-factor authentication, your users will receive an email and also get a notification when they login to the website. Depending on your settings, users can have a grace period during which they have to configure 2FA, or are required to configure 2FA instantly, as explained in the section what happens when you enable the 2FA policies.

The super admins on a multisite network
On a multisite network, you can configure a policy to require only the super admins of a multisite network to configure and use two-factor authentication. To achieve this, once you install the WP 2FA plugin:
- Navigate to the Network dashboard
- Click on Settings > Two-factor authentication in the menu.
- Select the option Only super admins in the Enforce 2FA on setting.
- Click Save Changes to save the plugin settings.

Once you enable two-factor authentication, the super admins of the multisite network will receive an email and also get a notification when they login to the website. Depending on your settings, users can have a grace period during which they have to configure 2FA, or are required to configure 2FA instantly, as explained in the section what happens when you enable the 2FA policies.
What happens when you enable the 2FA policies?
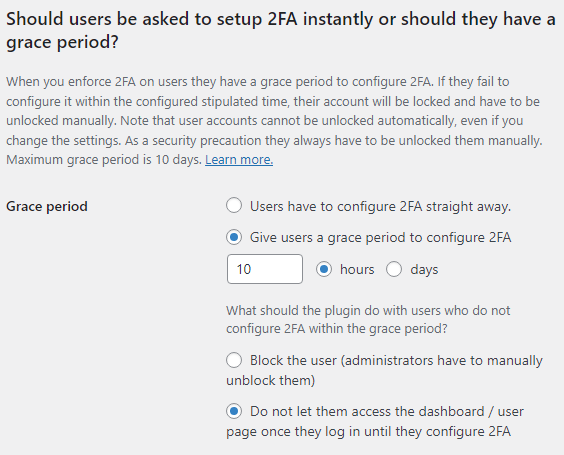
When you enable the two-factor authentication policies the users for whom the policies apply are notified that they have to configure and use 2FA. You can give the users a grace period, for example three days to configure 2FA, or you can require them to configure it instantly. You can configure these from the Grace period setting, which is highlighted in the below screenshot.

If you want the users to configure 2FA right away, select the top option Users have to configure 2FA straight away. Otherwise configure the grace period duration by specifying the number of days or hours using the options at the bottom.
The following section explains what happens when you enable the 2FA policies.
1. Users are notified that they have to configure two-factor authentication
When the administrator makes 2FA compulsory on a website, the plugin sends an email to the users to whom the policies apply notifying them to setup 2FA.

If the users have a grace period until they can configure two-factor authentication, they are notified every time they login to the website:

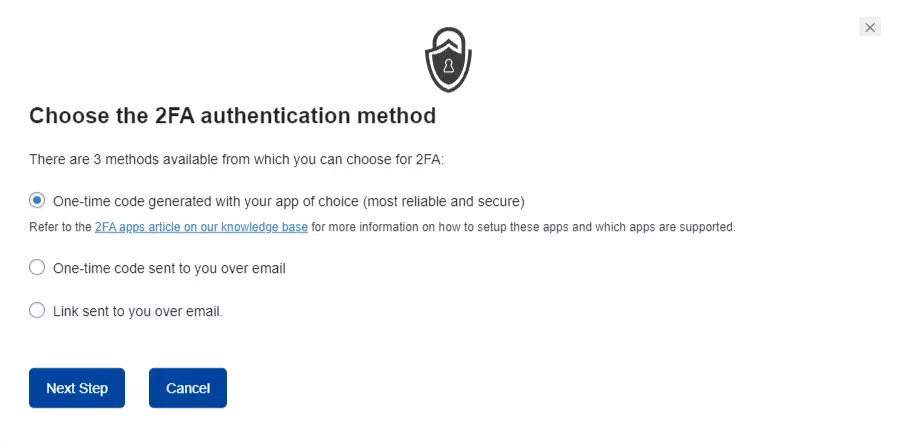
If the users are required to configure 2FA right away, when they try to log in they will be greeted with the below prompt. Upon clicking Next they can follow the wizard to configure 2FA.

2. Users have to set up & use 2FA
Once the users are notified that they should setup two-factor authentication (2FA) they can do so by clicking Next if they are required to configure 2FA instantly, and if they are prompted with the above prompt. Otherwise, they can configure 2FA by clicking the Configure 2FA now button in the dashboard notification. Users can also configure 2FA by clicking Configure Two-factor authentication (2FA) in their user profile page.

Configuring two-factor authentication for your WordPress user is really simple. It just takes a few seconds.
What happens if WordPress users do not configure two-factor authentication?
Users who are required to configure and use 2FA instantly, won’t be able to access the dashboard or their user area before configuring 2FA.
Users who are given a grace period to configure two-factor authentication but fail to configure it within the grace, their WordPress user is locked and they cannot login to the website.

When the site administrator unlocks the locked WordPress user, the user can log back into the website and the grace period is reset.
What if I do not configure 2FA policies?
Although it is not recommended, it is also possible to simply not enforce 2FA. This is the default option. When the setting Enable 2FA on is set to Do not enforce 2FA on any users, users won’t get any notification to configure and use 2FA. However, users can still configure 2FA from their profile page.
Can I disallow specific users, or users with a role from configuring 2FA?
With WP 2FA you can also exclude users from the 2FA policies. When you exclude specific users, users with a specific role(s), or all users of an individual site on a multisite network, those users will not be allowed to configure two-factor authentication, even if they wanted to. You can exclude users by using the options in the plugin settings, shown in the below screenshots.

Add an extra layer of security to your WordPress – download the free WP 2FA trial!
